PE File Parser
1. Context
I have been doing a lot of malware analysis recently, but I realize I do not know much about the entire structure of a PE file. It has really been annoying having to look up what each component is and where they are in memory everytime I need them.
I have already implemented an ELF parser (similar to Linux’s readelf) for an OS I wrote in Rust, and I have learned a ton about ELF files with that project.
So I have decided to write another parser, and this time I want to learn about the Windows’s PE file! I’ll document them all here so I don’t have to go and look them up on Google later!
Here is a broad view of what a PE file looks like before we dive in each component.
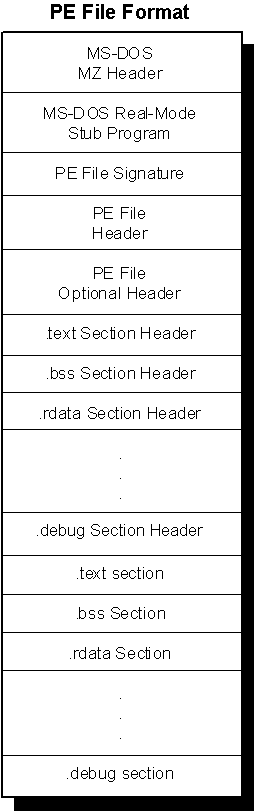
2. MS-DOS Header
At the very beginning of a PE file is the MS-DOS/Real-Mode Header. This header has been around since the version 2 of the MS-DOS operating system.
This header always occupies the first 64 bytes of any PE file, and it contains these components:
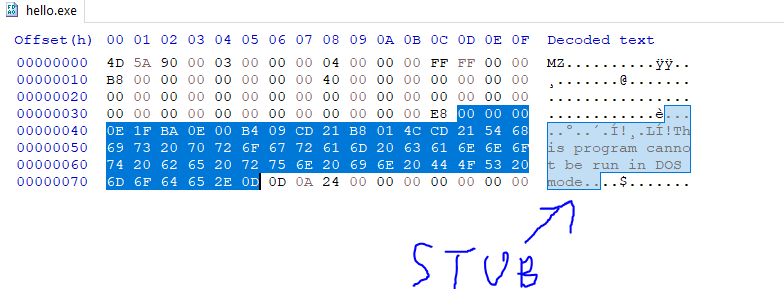
- e_magic: The magic number of PE files. This field is 2 bytes, and it is always set to the value 0x5A4D (which is MZ in ASCII). Basically, if a file has this, it is an MS-DOS-compatible executable file.
- e_cblp: The number of bytes used last page of file.
- e_cp: The number of pages required to hold the file. This should equal totalFile/pageSize rounding up
- e_crlc: The number of relocation items or the number of entries in the relocation pointer table.
- e_cparhdr: The size of the executable header in terms of paragraphs. Each paragraph is a 16-byte chunks.
- e_minalloc: The minimum number of extra paragraphs needed to be allocated to begin execution. Usually, this represents the size of uninitialized data and/or stack segments linked at the end.
- e_maxalloc: The maximum number of extra paragraphs neededto be allocated to begin execution
- e_ss: The initial SS value. The paragraph address of the stack segment relative to start of the load module. Must be relocated and placed in SS register before execution.
- e_sp: The initial SP value. Must be loaded into SP register before execution.
- e_csum: Checksum of the contents of the executable.
- e_ip: The initial IP value. Must be loaded into IP register before execution.
- e_cs: The initial CS value. Must be loaded into CS register before execution.
- e_lfarlc: The file address of the relocation table, or the offset from the start of the file to the relocation pointer table.
- e_ovro: The overlay number. Generally not used.
- reserved1: 4 reserved words. Each must be 0.
- e_oemid: The identifier for the OEM for e_oeminfo.
- e_oeminfo: The OEM information for a specific value of e_oeminfo.
- reserved2: Reserved word. Must be 0.
- e_lfanew: The file address of the new exe header, or the offset into the file where we can find the PE file header.
Out of all of these, the field e_lfanew is the most important for us to locate the next important part of the PE file, the PE file header.
3. MS-DOS Real-Mode Stub Program
Before getting to the PE file header, there is a stub(a small program) in the middle of that and the MS-DOS header.
This program is run by MS-DOS when the executable is loaded, and it runs instead of the actual application when loaded in DOS mode.
Usually, this stub does nothing more than just outputing a message saying that the program can’t be run because the OS is not compatible. This ensures that the executables can be run on any Windows OS for backward compatibility, but instead of executing the real program, the user will be notify that their current OS is not compatible instead of having the program crashed.
This stub is usually 38 bytes right after the MS-DOS header.
4. PE file Signature
After the MS-DOS stub, we can find the PE file signature. This is similar to the magic byte MZ in the MS-DOS header, but instead it is 0x50450000 OR PE\0\0 representing IMAGE_NT_SIGNATURE.
This signature is the starting point of the PE file header, and it can be found at the field e_lfanew from MS-DOS header.
Starting with Windows and OS/2 executables, the files neede this signature to specify what the intended OS is for them.
5. PE File Header
Right after the PE file signature is the PE file header. This can be located at
imageBase + imageDOSHeader->e_lfanew + SIZE_OF_NT_SIGNATURE
where SIZE_OF_NT_SIGNATURE is 4 bytes.
The file header is located at this address as a struct of size 20 bytes containing these fields:
- Machine: 2 bytes indicating what type of machine the executable is built for(MIPS R4000,Intel x86, …)
- NumberOfSections: 2 bytes specifying the number of sections and indicating the size of section table(which is right after the headers)
- TimeDateStamp: 4 bytes where the lower 32 bits specify the number of seconds since 00:00 Jan 1st, 1970 indicating when the file was created.
- PointerToSymbolTable: 4 bytes representing the file offset of the COFF symbol table. This field is 0 is there is no COFF symbol table.
- NumberOfSymbols: 4 bytes representing the number of entries in symbol table. This field is 0 if there is no COFF symbol table. This data can be used to locate the string table, which immediately follows the symbol table.
- SizeOfOptionalHeader: 2 bytes representing the optional header. This should be 0 for object file because only image file has optional header
- Characteristics: 2 bytes of flags indicating attributes of the file. See the flags here.
A useful entry in PE file header is the NumberOfSections field. In order to be able to parse and extract sections in a PE file, we must know how many section headers and section bodies are using this field of the PE file header.
6. PE file Optional Header
The Optional Header is a 224-byte struct right after the File Header. This can be located at
imageBase + imageDOSHeader->e_lfanew + SIZE_OF_NT_SIGNATURE + sizeof(IMAGE_FILE_HEADER)
The Optional Header contains meaningful info about the executable image, and it is divided into two parts - Standard fields and NT additional field.
The standard fields: fields that are related to the Common Object File Format(COFF) used by most UNIX executables.
- Magic: Magic bytes
- MajorLinkerVersion: Indicates the major version of the linker
- MinorLinkerVersion: Indicates the minor version of the linker
- SizeOfCode: Size of this executable code
- SizeOfInitializedData: Size of initialized data.
- SizeOfUninitializedData: Size of uninitialized data.
- AddressOfEntryPoint: Indicates the location of the entry point for the application and the end of IAT.
- BaseOfCode: Relative offset of “.text” section.
- BaseOfData: Relative offset of uninitialized data of the “.bss” section.
Windows NT additional fields: fields added to the Windows NT PE file to support for most Windows NT process behavior:
- ImageBase: preferred base address in the address space of a process to map this executable to. Linker default is 0x400000, but can override this.
- SectionAlignment: Can’t be no less than page size and must be a multiple of page size. Each section loaded into address space sequentially beginning at ImageBase. This field dictates the minimum amount of space a section can occupy.
- FileAlignment: Minimum granularity of chunks of info within the image file before loading.
- MajorOperatingSystemVersion: Major version of Windows NT OS
- MinorOperatingSystemVersion: Minor version of Windows NT OS
- MajorImageVersion: Major version number of the application.
- MinorImageVersion: Minor version number of the application.
- MajorSubsystemVersion: Major version number of Windows NT Win32 subsystem
- MinorSubsystemVersion: Minor version number of Windows NT Win32 subsystem
- Reserved1: Reserved
- SizeOfImage: amount of address space to reserve in the address space for the loaded image.
- SizeOfHeaders: How much space in the file is used for representing all the file headers. The section bodies begin at this location in the file.
- CheckSum: validate the executable file at load time.
- Subsystem: Identify target subsystem for this executable.
- DllCharacteristics: Flags used to indicate if a DLL image includes entry points for process and thread.
- SizeOfStackReserve: Amount of address space to reserve for stack
- SizeOfStackCommit: Amount of address space to commit for stack
- SizeOfHeapReserve: Amount of address space to reserve for heap
- SizeOfHeapCommit: Amount of address space to commit for heap
- LoaderFlags: tell loader to whether break on load, debug on load, or just let things run normally
- NumberOfRvaAndSizes: Length of DataDirectory array that follows. This is the size of array, not the number of valid entries(must check for invalid entries manually)
- DataDirectory: where to find other important components of executable info. Basically an array of IMAGE_DATA_DIRECTORY structures located at the end of optional header.
For DataDirectory, these are the directory entries:
- DataDirectory[0]: IMAGE_DIRECTORY_ENTRY_EXPORT - Export directory
- DataDirectory[1]: IMAGE_DIRECTORY_ENTRY_IMPORT - Import directory
- DataDirectory[2]: IMAGE_DIRECTORY_ENTRY_RESOURCE - Resource directory
- DataDirectory[3]: IMAGE_DIRECTORY_ENTRY_EXCEPTION - Exception directory
- DataDirectory[4]: IMAGE_DIRECTORY_ENTRY_SECURITY - Security directory
- DataDirectory[5]: IMAGE_DIRECTORY_ENTRY_BASERELOC - Base relocation table
- DataDirectory[6]: IMAGE_DIRECTORY_ENTRY_DEBUG - Debug directory
- DataDirectory[7]: IMAGE_DIRECTORY_ENTRY_ARCHITECTURE - Architecture-specific data
- DataDirectory[8]: IMAGE_DIRECTORY_ENTRY_GLOBALPTR - The relative virtual address of global pointer
- DataDirectory[9]: IMAGE_DIRECTORY_ENTRY_TLS - Thread local storage directory
- DataDirectory[10]: IMAGE_DIRECTORY_ENTRY_LOAD_CONFIG - Load configuration directory
- DataDirectory[11]: IMAGE_DIRECTORY_ENTRY_BOUND_IMPORT - Bound import directory
- DataDirectory[12]: IMAGE_DIRECTORY_ENTRY_IAT - Import address table
- DataDirectory[13]: IMAGE_DIRECTORY_ENTRY_DELAY_IMPORT - Delay import table
- DataDirectory[14]: IMAGE_DIRECTORY_ENTRY_COM_DESCRIPTOR - COM descriptor table
- DataDirectory[15]: .NET HEADER - .NET header
Each IMAGE_DATA_DIRECTORY struct contains the size and relative virtual address of the directory. In order to locate a directory, you get the relative virtual address to determine which section the directory is in. Once having found the section containing that directory, the section header for that section can be used to find the exact file offset location of the data diorectory.
7. Sections
Below the Optional Header are the PE File Sections or the section table. Each section contains a part of the content of the file, including code, data, resources,…
Each section has a header storing information pointing to a body, and the body stores the raw data of that specific section.
The section headers are right after the Optional Header, and each of the header is 40 bytes with no padding in between. In Windows, the struct for this is IMAGE_SECTION_HEADER
- Name: 8-byte null-padded UTF-8 encoded string.
- VirtualSize: total size of the section when loaded into memory. Usually not used.
- VirtualAddress: The address of the first byte of the section relative to the image base. The actual address = VirtualAddress + ImageBase(from Optional Header).
- SizeOfRawData: The size of the section. If this is less than VirtualSize, the remainder of the section is padded with zero.
- PointerToRawData: File pointer to the first page of the section in the COFF file.
- PointerToRelocations: File pointer to the beginning of relocation entries for the section. Set to 0 for exectuable images. Not used
- PointerToLinenumbers: File pointer to the beginning of line-number entries for the section. Not used
- NumberOfRelocations: The number of relocation entries for the section. Set to 0 for executable. Not used
- NumberOfLinenumbers: The number of line-number entries. Set to 0 for executable. Not used
- Characteristics: Flags describing the characteristics of section. See here.
Since section headers are organized in no specific order, we can only locate these by name instead of indexing.
8. IAT - Import Address Table
Usually when I perform malware analysis and reverse engineering, I tend to care about the IAT because it contains a list of functions that the executable require from each dll. This is necessary for the loader to create a jmp thunk table so we can make API calls.
Let’s assume we don’t know where is IAT is in the image yet. The way to find it is pretty simple.
First, we need to find the data directory corresponding to the import functions. In this case, they are IMAGE_DIRECTORY_ENTRY_IAT and IMAGE_DIRECTORY_ENTRY_IMPORT. From what I’m understanding, these two usually are the same, but IMAGE_DIRECTORY_ENTRY_IAT is much less well-documented than IMAGE_DIRECTORY_ENTRY_IMPORT, so we will be using the later one for this.
Second, we need to get the Virtual Address of that directory entry. We’ll call this importVA.
Third, we check to see which section the data of this directory entry will be in. This is a simple math check. Let’s call the section’s virtual address sectionVA, and its virtual size sectionVSize.
Then,
importVA > sectionVA and importVA < sectionVA + sectionSize
will return the result of whether the data of the directory entry is contained in that section.
Now that we have found the section, we can get the address of the first IMAGE_IMPORT_DESCRIPTOR struct in the image. These struct contains information about the import functions in the IAT.
  pFirstImportDescriptor = baseAddress + dosHeader->e_lfanew + sizeof(IMAGE_NT_HEADERS64) +
    section.PointerToRawData + (importVA - sectionVA)
After that, we can just loop through from this address populating a IMAGE_IMPORT_DESCRIPTOR struct to read of information about the IAT’s functions.
9. Wrapping up
This is just a quick note of how to parse and understand different part of the PE file.
I have not certainly covered everything there is about this topic, but I have learned a ton of new things about this file type writing this blog post!
Feel free to check out my PE parser I wrote here if you need any clarification. I was working on it as I was going through and writing this blog!